Difference between revisions of ":Face Detect"
(Created page with "==Face Detect== ===Description=== Face detection is to detect if there is any human face appearing in the video, and capture the face then send it to the NVR for analysis and...") |
|||
| (39 intermediate revisions by 4 users not shown) | |||
| Line 4: | Line 4: | ||
[[file:FaceDetect.png]] | [[file:FaceDetect.png]] | ||
| − | === | + | ===Example Photos of Distance Requirements=== |
| − | + | <gallery> | |
| − | + | file:FD_Too_Far.jpg|Too Far | |
| − | + | file:FD_Minimum_Needed.jpg|Minimum Needed | |
| − | + | file:FD_Perfect.jpg|Perfect | |
| + | </gallery> | ||
| + | ===Installation Requirements=== | ||
| + | [[file:Face_Detect_Install_Requirements.png|400px]] | ||
| − | + | The horizontal distance between camera and monitoring target is d(m), the camera installation height is | |
| − | + | h(m), depression angle of camera is α(degree) (it is the included angle between the camera monitoring | |
| + | direction and horizontal surface). You can refer to the following parameter table: | ||
| − | ===Step by Step Instructions=== | + | {| class="wikitable" |
| + | |Parameter | ||
| + | |Recommended value | ||
| + | |Range | ||
| + | |- | ||
| + | |Height h(m) | ||
| + | |2.5 | ||
| + | |2~3 | ||
| + | |- | ||
| + | |Horizontal distance d(m) | ||
| + | |6 | ||
| + | |4~20 | ||
| + | |- | ||
| + | |α(degree) | ||
| + | |≤15 | ||
| + | |10~15 | ||
| + | |} | ||
| + | |||
| + | If the actual situation fails to meet the settings recommended in the table above, you can refer to the table | ||
| + | below. Select the most suitable parameter configuration if it can guarantee that the face pixel is more than | ||
| + | 150 x 150 (it can reach 200 x 200 ideally) in 1080P. | ||
| + | |||
| + | {| class="wikitable" | ||
| + | |Height(m) | ||
| + | |Horizontal distance(m) | ||
| + | |- | ||
| + | |2 | ||
| + | |4~20 | ||
| + | |- | ||
| + | |2.25 | ||
| + | |5~20 | ||
| + | |- | ||
| + | |2.5 | ||
| + | |6~20 | ||
| + | |- | ||
| + | |2.75 | ||
| + | |7~20 | ||
| + | |- | ||
| + | |3 | ||
| + | |8~20 | ||
| + | |} | ||
| + | ====Installation Testing==== | ||
| + | [[file:Face_Detect_Install_Scene.png|400px]] | ||
| + | |||
| + | 1. Select test point (it is recommended to select the test point where there is good light, try to avoid | ||
| + | backlight and sidelight), lay a camera in the location which is d meters horizontally away from the test | ||
| + | point, the fixed height is h meters. (please select d and h according to the table above) | ||
| + | |||
| + | 2. Installation person A stands in the test point, look ahead horizontally, installation person B will adjust | ||
| + | the IPC; Adjust the camera angle, monitoring range, focal length until it meets the following | ||
| + | requirements: | ||
| + | |||
| + | a) The human face is in the center of the image, and it is clear. | ||
| + | |||
| + | b) Make sure the width of the face is more than 150 x 150 pixel in 1080P resolution (take snapshot via IPC web, use paint tool to check image pixel, the distance between the center of both eyes is required to be more than 50 pixels.) | ||
| + | |||
| + | 3. Make sure the requirements above should be satisfied, and then fix the camera and lens. The | ||
| + | installation person A passes the monitoring point from far to near, installation person B checks the | ||
| + | monitoring image to make sure it can acquire front, clear face whose width and height is bigger than | ||
| + | 150 pixels when person A is passing monitoring point, then it means the installation is successful. | ||
| + | The ideal monitoring effect is shown in the above image. | ||
| + | |||
| + | ===Internet Explorer Setup=== | ||
| + | ====Prerequisites==== | ||
| + | * Intelligent Network Camera. | ||
| + | * Updated firmware that supports intelligent features. | ||
| + | * Internet Explorer. | ||
| + | |||
| + | ===IVS Best Practices=== | ||
| + | To assess issues with IVS compatibility between the camera and NVR, please update both devices to the most current firmware and factory reset the NVR, and use the hard reset button to reset the camera. | ||
| + | |||
| + | ====Video Instructions==== | ||
| + | |||
| + | <embedvideo service="youtube">https://www.youtube.com/watch?v=nswo33XGKvQ</embedvideo> | ||
| + | |||
| + | <embedvideo service="youtube">https://youtu.be/0xOo6yTybHg</embedvideo> | ||
| + | |||
| + | ====Step by Step Instructions==== | ||
1. Click “Enable”. | 1. Click “Enable”. | ||
| Line 38: | Line 119: | ||
[[File:Face_Detect6.png|550px]] | [[File:Face_Detect6.png|550px]] | ||
| − | [[Category:IVS]] | + | ===System Interface Setup=== |
| − | [[Category:Event]] | + | ====Prerequisites==== |
| + | ====Video Instructions==== | ||
| + | <embedvideo service="youtube">https://youtu.be/0PtZkioK4xA</embedvideo> | ||
| + | |||
| + | ====Step by Step Instructions==== | ||
| + | 1. Go to Event. | ||
| + | |||
| + | [[File:IntrusionSetupSystem1.png|600px]] | ||
| + | |||
| + | 2. Enable Face detect under IVS and then hit apply and save. | ||
| + | |||
| + | [[File:FaceDetectionSetupSystem2.png|600px]] | ||
| + | |||
| + | ===SmartPSS Setup=== | ||
| + | ====Prerequisites==== | ||
| + | * SmartPSS 2.0 | ||
| + | * IVS capable device with Face Detection | ||
| + | * Upgraded devices to latest firmware | ||
| + | |||
| + | ===Smart PSS Video Instructions=== | ||
| + | |||
| + | <embedvideo service="youtube">https://youtu.be/Yy31x4zoSQw</embedvideo> | ||
| + | |||
| + | ====Step by Step Instructions==== | ||
| + | |||
| + | [[Category:IVS]][[Category:Event]] | ||
| + | |||
| + | 1. Launch and Log into Smart PSS | ||
| + | |||
| + | [[File:smartpss2facedetect2.png|600px]] | ||
| + | |||
| + | 2. Select "Live". | ||
| + | |||
| + | [[File:smartpss2facedetectv1.png|600px]] | ||
| + | |||
| + | 3. From Live View Select Device that is IVS capable -> right click on device and select IVS Config. | ||
| + | |||
| + | [[File:smartpss2facedetectv3.png|600px]] | ||
| + | |||
| + | 4. Select Face detection -> Select Next. | ||
| + | |||
| + | [[File:smartpss2facedetectv4.png|600px]] | ||
| + | |||
| + | 5.Draw a Detection Zone | ||
| + | |||
| + | [[File:smartpss2facedetectv5.png|600px]] | ||
| + | |||
| + | 6. Select Config for arming schedule and choose what days Face Detect is to be enabled. | ||
| + | |||
| + | [[File:smartpss2facedetectv6.png|600px]] | ||
| + | |||
| + | 7. Select Alarm -> Choose alarm type such as Record -> Select Save | ||
| + | |||
| + | [[File:smartpss2facedetectv7.png|600px]] | ||
| + | |||
| + | 8.Select Target Filter -> Select Enable -> Choose either "Width and Height or Width and Height" -> Select Draw to size the target filter (Inner green box size is minimum target, Outer green box is the maximum target) -> Apply and Save. | ||
| + | |||
| + | [[File:smartpss2facedetectv8.png|600px]] | ||
Latest revision as of 19:49, 23 March 2018
Contents
Face Detect
Description
Face detection is to detect if there is any human face appearing in the video, and capture the face then send it to the NVR for analysis and processing, it can activate snapshot, record and alarm.

Example Photos of Distance Requirements

Too Far
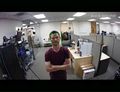
Minimum Needed
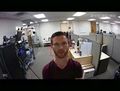
Perfect


Installation Requirements

The horizontal distance between camera and monitoring target is d(m), the camera installation height is h(m), depression angle of camera is α(degree) (it is the included angle between the camera monitoring direction and horizontal surface). You can refer to the following parameter table:
| Parameter | Recommended value | Range |
| Height h(m) | 2.5 | 2~3 |
| Horizontal distance d(m) | 6 | 4~20 |
| α(degree) | ≤15 | 10~15 |
If the actual situation fails to meet the settings recommended in the table above, you can refer to the table below. Select the most suitable parameter configuration if it can guarantee that the face pixel is more than 150 x 150 (it can reach 200 x 200 ideally) in 1080P.
| Height(m) | Horizontal distance(m) |
| 2 | 4~20 |
| 2.25 | 5~20 |
| 2.5 | 6~20 |
| 2.75 | 7~20 |
| 3 | 8~20 |
Installation Testing

1. Select test point (it is recommended to select the test point where there is good light, try to avoid backlight and sidelight), lay a camera in the location which is d meters horizontally away from the test point, the fixed height is h meters. (please select d and h according to the table above)
2. Installation person A stands in the test point, look ahead horizontally, installation person B will adjust the IPC; Adjust the camera angle, monitoring range, focal length until it meets the following requirements:
a) The human face is in the center of the image, and it is clear.
b) Make sure the width of the face is more than 150 x 150 pixel in 1080P resolution (take snapshot via IPC web, use paint tool to check image pixel, the distance between the center of both eyes is required to be more than 50 pixels.)
3. Make sure the requirements above should be satisfied, and then fix the camera and lens. The installation person A passes the monitoring point from far to near, installation person B checks the monitoring image to make sure it can acquire front, clear face whose width and height is bigger than 150 pixels when person A is passing monitoring point, then it means the installation is successful. The ideal monitoring effect is shown in the above image.
Internet Explorer Setup
Prerequisites
- Intelligent Network Camera.
- Updated firmware that supports intelligent features.
- Internet Explorer.
IVS Best Practices
To assess issues with IVS compatibility between the camera and NVR, please update both devices to the most current firmware and factory reset the NVR, and use the hard reset button to reset the camera.
Video Instructions
Step by Step Instructions
1. Click “Enable”.

2. Click face enhancement to enhance the face image display.

3. Select max and min size, draw max and min target for target filtering. This step is to filter target, which can’t be operated under default status.

4. Activate record, alarm, email and snapshot according to the requirements.

5. Target filter can set max target and min target, which means it can detect max and min target.

6. Click ok to complete settings.

System Interface Setup
Prerequisites
Video Instructions
Step by Step Instructions
1. Go to Event.

2. Enable Face detect under IVS and then hit apply and save.

SmartPSS Setup
Prerequisites
- SmartPSS 2.0
- IVS capable device with Face Detection
- Upgraded devices to latest firmware
Smart PSS Video Instructions
Step by Step Instructions
1. Launch and Log into Smart PSS
2. Select "Live".
3. From Live View Select Device that is IVS capable -> right click on device and select IVS Config.
4. Select Face detection -> Select Next.
5.Draw a Detection Zone
6. Select Config for arming schedule and choose what days Face Detect is to be enabled.
7. Select Alarm -> Choose alarm type such as Record -> Select Save
8.Select Target Filter -> Select Enable -> Choose either "Width and Height or Width and Height" -> Select Draw to size the target filter (Inner green box size is minimum target, Outer green box is the maximum target) -> Apply and Save.