Difference between revisions of "Camera Troubleshoot/Change IP Cameras IP Address"
(→Step by Step Instructions) |
|||
| (17 intermediate revisions by 2 users not shown) | |||
| Line 1: | Line 1: | ||
==How to Modify IP Address of IP Camera / Change IP Camera that is stuck on "192.168.1.108"== | ==How to Modify IP Address of IP Camera / Change IP Camera that is stuck on "192.168.1.108"== | ||
| − | + | ===Description=== | |
| + | This guide will show how to initialize a Dahua IP Camera and modify the IP Address | ||
===Prerequisites=== | ===Prerequisites=== | ||
* Windows Computer to use Config tool | * Windows Computer to use Config tool | ||
* Wired or wireless connection to the router or switch | * Wired or wireless connection to the router or switch | ||
| − | * Powered | + | * Powered IP camera, connected to the network |
| + | ===Video Instructions=== | ||
| + | <embedvideo service="youtube">https://youtu.be/zGyAVgv4U4Y</embedvideo> | ||
| + | |||
| + | ===Step by Step Instructions=== | ||
| + | ====How To Initialize Camera==== | ||
| + | =====Preparing the Computer===== | ||
| + | |||
| + | The computer should be assigned an IP that is set to the same subnet as the default IP the device will be at. Most Dahua devices will default to the IP address 192.168.1.108 | ||
| + | |||
| + | <gallery> | ||
| + | File:Reset_Wireless_Bridge_-_Network_Setup_1.jpg|Right click the network icon in the taskbar on the computer. Select "Open Network and Sharing Center" | ||
| + | File:Reset_Wireless_Bridge_-_Network_Setup_2.jpg|Click "Change adapter settings" on the left side of the screen | ||
| + | File:Reset_Wireless_Bridge_-_Network_Setup_3.jpg|Select the network adapter that is connected to the device | ||
| + | File:Reset_Wireless_Bridge_-_Network_Setup_4.jpg|Right click, select Properties | ||
| + | File:Reset_Wireless_Bridge_-_Network_Setup_5.jpg|Select 'Internet Protocol Version 4 (TCP/IPv4) in the list then click "Properties" button | ||
| + | File:Reset_Wireless_Bridge_-_Network_Setup_6.jpg|Select "Use the following IP address" then enter a static IP for the computer that will match the defaulted device:192.168.1.x | ||
| + | </gallery> | ||
| + | |||
| + | 1. Launch ConfigTool | ||
| + | |||
| + | [[File:Initialize_Dahua_IP_Camera_and_Change_IP_Address_-_1.jpg|600px]] | ||
| + | |||
| + | 2. Uninitialized devices will appear in the list at their default IP 192.168.1.108 | ||
| + | |||
| + | [[File:Initialize_Dahua_IP_Camera_and_Change_IP_Address_-_2.jpg|600px]] | ||
| + | |||
| + | 3. To initialize the camera: | ||
| + | |||
| + | *Check the box next to the device in the list | ||
| + | *Click Initialize | ||
| + | |||
| + | [[File:Initialize_Dahua_IP_Camera_and_Change_IP_Address_-_3.jpg|600px]] | ||
| + | |||
| + | 4. The Device initialization window will appear | ||
| + | |||
| + | Devices on the network that have not been initialized will appear in this window | ||
| + | |||
| + | Check the box next to the device then click Initialize | ||
| + | |||
| + | [[File:Initialize_Dahua_IP_Camera_and_Change_IP_Address_-_4.jpg|600px]] | ||
| + | |||
| + | 5. Continue with device initialization: | ||
| + | |||
| + | *Create a password for the device by entering it twice in the Password fields | ||
| + | *Enter an email address, which is used for password reset | ||
| + | |||
| + | Click Next | ||
| + | |||
| + | [[File:Initialize_Dahua_IP_Camera_and_Change_IP_Address_-_5.jpg|600px]] | ||
| + | |||
| + | 6. Select the options for 'Easy4ip' and 'Auto-check for updates' as desired then click OK | ||
| + | |||
| + | [[File:Initialize_Dahua_IP_Camera_and_Change_IP_Address_-_6.jpg|600px]] | ||
| + | |||
| + | 7. Device initialization will begin to process | ||
| + | |||
| + | [[File:Initialize_Dahua_IP_Camera_and_Change_IP_Address_-_7.jpg|600px]] | ||
| + | |||
| + | 8. A message will confirm a successful initialization. | ||
| + | |||
| + | [[File:Initialize_Dahua_IP_Camera_and_Change_IP_Address_-_8.jpg|600px]] | ||
| + | |||
| + | Click Finish | ||
| + | |||
| + | ====How To Change IP Address==== | ||
| + | 1. From the 'Modify IP' section of ConfigTool | ||
| + | |||
| + | Click 'Search setting' at the top of the page | ||
| + | |||
| + | [[File:Initialize_Dahua_IP_Camera_and_Change_IP_Address_-_9.jpg|600px]] | ||
| + | |||
| + | 2. Enter the username/password for the device (created in the previous guide) | ||
| + | |||
| + | Then click OK | ||
| + | |||
| + | [[File:Initialize_Dahua_IP_Camera_and_Change_IP_Address_-_10.jpg|600px]] | ||
| + | |||
| + | 3. The device will appear in the list. | ||
| + | |||
| + | To change the IP address for the device: | ||
| − | + | *Check the box next to the device | |
| + | *Click Modify IP | ||
| − | [[File: | + | [[File:Initialize_Dahua_IP_Camera_and_Change_IP_Address_-_11.jpg|600px]] |
| − | |||
| − | + | 4. The Modify IP Address window will appear | |
| − | + | Change the IP as desired, entering all information | |
| − | + | *Mode: Static or DHCP | |
| + | *Start IP: IP of device | ||
| + | *Subnet Mask: Subnet mask for network | ||
| + | *Gateway: Gateway for network | ||
| − | + | Then click OK | |
| − | + | [[File:Initialize_Dahua_IP_Camera_and_Change_IP_Address_-_12.jpg|600px]] | |
| − | + | 5. A green check mark next to the device in the list will confirm a successful IP change | |
| − | + | [[File:Initialize_Dahua_IP_Camera_and_Change_IP_Address_-_13.jpg|600px]] | |
| − | + | 6. Click the Refresh button | |
| − | |||
| − | + | [[File:Initialize_Dahua_IP_Camera_and_Change_IP_Address_-_14.jpg|600px]] | |
| − | + | 7. The device will appear in the list with the updated IP information | |
| − | + | [[File:Initialize_Dahua_IP_Camera_and_Change_IP_Address_-_15.jpg|600px]] | |
| − | |||
Latest revision as of 22:41, 16 October 2019
Contents
How to Modify IP Address of IP Camera / Change IP Camera that is stuck on "192.168.1.108"
Description
This guide will show how to initialize a Dahua IP Camera and modify the IP Address
Prerequisites
- Windows Computer to use Config tool
- Wired or wireless connection to the router or switch
- Powered IP camera, connected to the network
Video Instructions
Step by Step Instructions
How To Initialize Camera
Preparing the Computer
The computer should be assigned an IP that is set to the same subnet as the default IP the device will be at. Most Dahua devices will default to the IP address 192.168.1.108

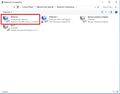
Right click the network icon in the taskbar on the computer. Select "Open Network and Sharing Center"

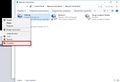
Click "Change adapter settings" on the left side of the screen
Select the network adapter that is connected to the device
Right click, select Properties
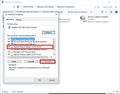
Select 'Internet Protocol Version 4 (TCP/IPv4) in the list then click "Properties" button

Select "Use the following IP address" then enter a static IP for the computer that will match the defaulted device:192.168.1.x


1. Launch ConfigTool

2. Uninitialized devices will appear in the list at their default IP 192.168.1.108

3. To initialize the camera:
- Check the box next to the device in the list
- Click Initialize

4. The Device initialization window will appear
Devices on the network that have not been initialized will appear in this window
Check the box next to the device then click Initialize

5. Continue with device initialization:
- Create a password for the device by entering it twice in the Password fields
- Enter an email address, which is used for password reset
Click Next

6. Select the options for 'Easy4ip' and 'Auto-check for updates' as desired then click OK

7. Device initialization will begin to process

8. A message will confirm a successful initialization.

Click Finish
How To Change IP Address
1. From the 'Modify IP' section of ConfigTool
Click 'Search setting' at the top of the page

2. Enter the username/password for the device (created in the previous guide)
Then click OK

3. The device will appear in the list.
To change the IP address for the device:
- Check the box next to the device
- Click Modify IP

4. The Modify IP Address window will appear
Change the IP as desired, entering all information
- Mode: Static or DHCP
- Start IP: IP of device
- Subnet Mask: Subnet mask for network
- Gateway: Gateway for network
Then click OK

5. A green check mark next to the device in the list will confirm a successful IP change

6. Click the Refresh button

7. The device will appear in the list with the updated IP information
