Difference between revisions of "NVR/Recording Setup/Motion Record"
(→Setup Motion Recording via Web Interface) |
|||
| (3 intermediate revisions by 2 users not shown) | |||
| Line 97: | Line 97: | ||
You can set the region for detection trigger like figure 2, the red region refers to where you want to monitor the motion. Setting like the figure shows, it means anybody pass the room will trigger the motion detect, and the people’s movement in the room won’t. The default setting is monitor the motion of the whole screen. And you can set the motion sensitivity of the camera threshold, usually just set it as the default number.--> | You can set the region for detection trigger like figure 2, the red region refers to where you want to monitor the motion. Setting like the figure shows, it means anybody pass the room will trigger the motion detect, and the people’s movement in the room won’t. The default setting is monitor the motion of the whole screen. And you can set the motion sensitivity of the camera threshold, usually just set it as the default number.--> | ||
| − | |||
| − | |||
1. Set up tab → event → video detect. | 1. Set up tab → event → video detect. | ||
| Line 131: | Line 129: | ||
[[File:motion_d_5.png|600px]] | [[File:motion_d_5.png|600px]] | ||
| − | == | + | ==Motion Recordings Setup for SmartPSS 1.16.4== |
| − | |||
===Prerequisites=== | ===Prerequisites=== | ||
| − | |||
* SmartPSS 1.16 | * SmartPSS 1.16 | ||
* HDD installed on Recording Device | * HDD installed on Recording Device | ||
| Line 184: | Line 180: | ||
[[File:smartp116motion11.png|600px]] | [[File:smartp116motion11.png|600px]] | ||
| − | == | + | ==Motion Recordings Setup for SmartPSS 2.0== |
| − | |||
===Prerequisites=== | ===Prerequisites=== | ||
| − | |||
* SmartPSS 2.0 | * SmartPSS 2.0 | ||
* HDD installed on Recording Device | * HDD installed on Recording Device | ||
| Line 234: | Line 228: | ||
[[File:Smart2MotionRec8.png|600px]] | [[File:Smart2MotionRec8.png|600px]] | ||
| − | |||
| − | |||
| − | |||
| − | |||
| − | |||
| − | |||
| − | |||
| − | |||
| − | |||
| − | |||
| − | |||
| − | |||
| − | |||
| − | |||
| − | |||
| − | |||
| − | |||
| − | |||
| − | |||
| − | |||
| − | |||
| − | |||
| − | |||
| − | |||
| − | |||
| − | |||
| − | |||
| − | |||
| − | |||
| − | |||
| − | |||
Latest revision as of 22:27, 14 October 2020
Contents
Motion Record
Description
Use Motion recordings to secure your home, business or building in which it records any movement on the video. Generally used when someone is on your property that isn't authorized at your home, business or building. It also saves HDD space when set to motion recording only.
Prerequisites
- A NVR that is connected to the internet.
- An IPC that is connected to the NVR.
- Up to date firmware for both systems.
Set up Motion recording via local recorder
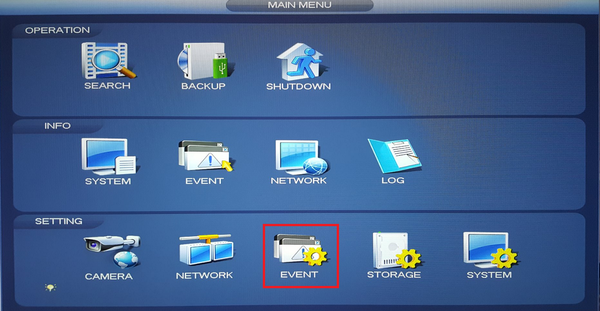
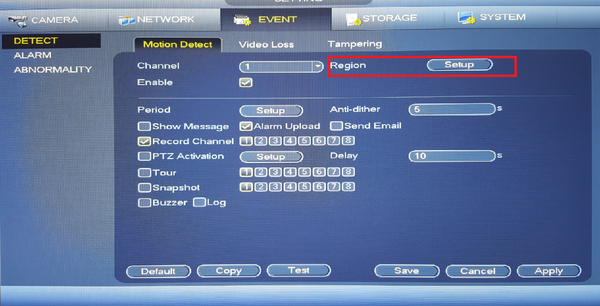
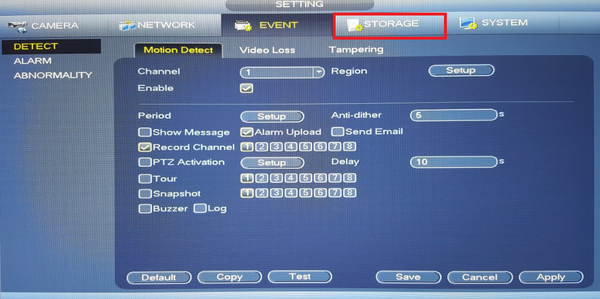
1. From the Main Menu Select "Event"
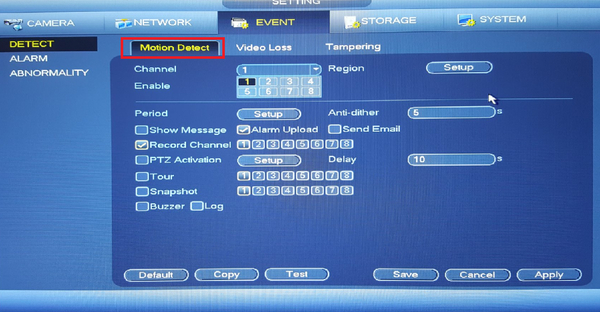
2. Select Motion Detect
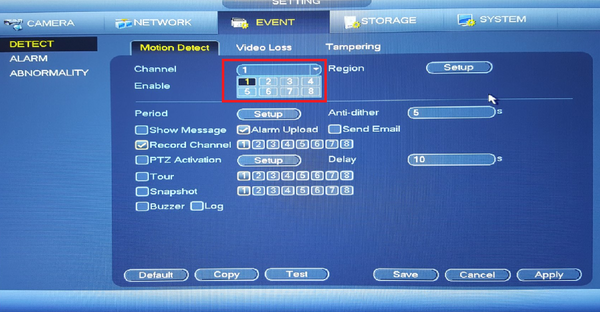
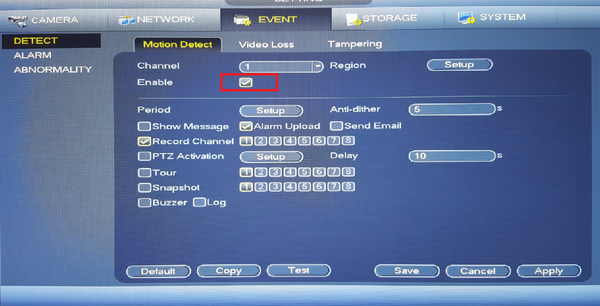
3. Choose the channel(s) to set motion and check off enable.
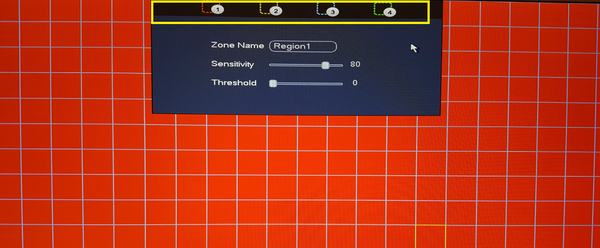
4. Select region to adjust the sensitivity of each part of the scene. By default the whole scene is set up to detect motion. Each color corresponds to a zone in which you can set each of the zones motion detection sensitivity and threshold.
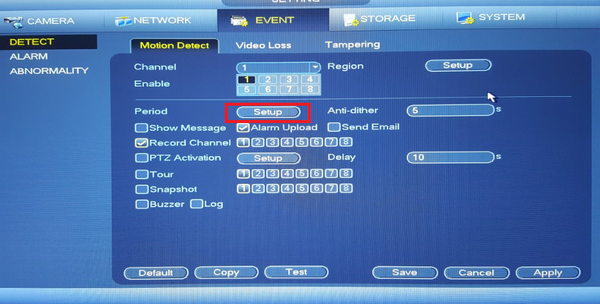
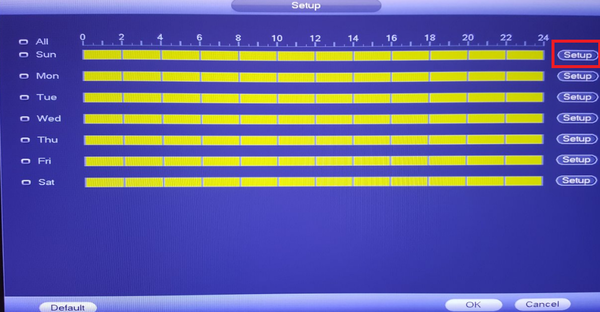
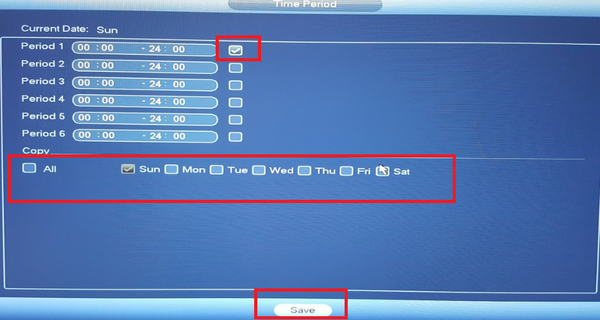
5. Select Period "Setup" to set time and days motion is to be set to.
- Select Setup.
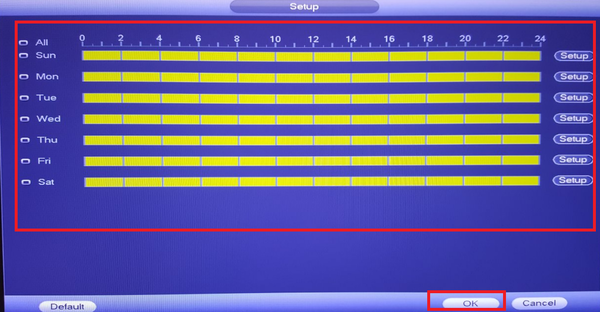
- Select the time period and days motion is to detect and record -> Click on Save.
- Select Ok to save
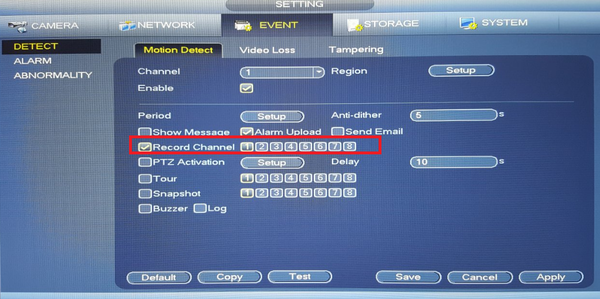
6. Check off record channel and choose which cameras are to record motion events.
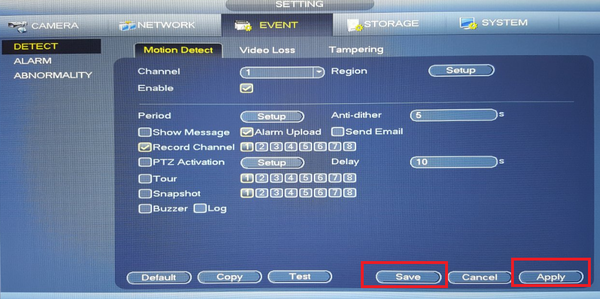
7. Select Apply and Save.
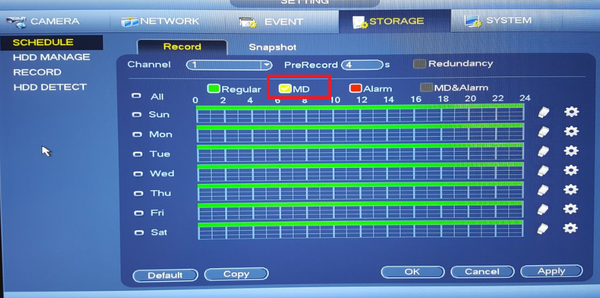
8. Select Storage.
9. Check off MD(Moition Detection)
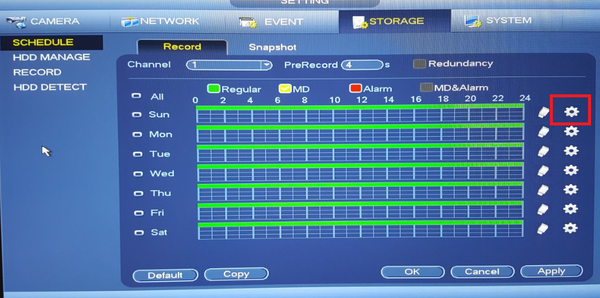
10. Select the settings icon.
- Here you can set the times and days motion detection is to record. Check off MD (motion detection). Select all or the day motion detection is to be recorded -> Select save.
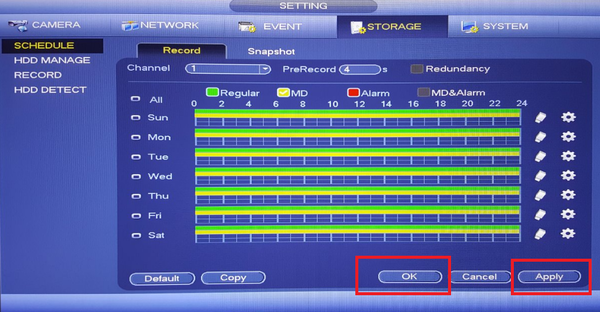
11. It will show yellow for the days and times you set motion to -> Click apply and ok to save settings.
Motion Recording Setup for Web Interface
Video Instructions
Step by Step Instructions
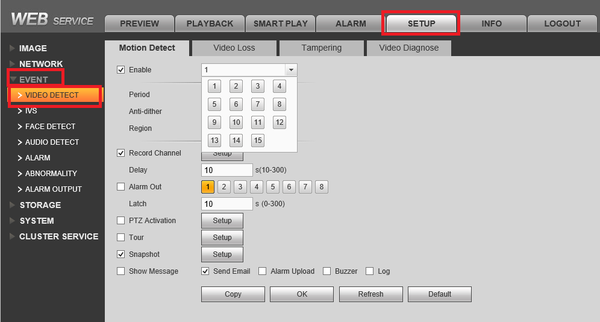
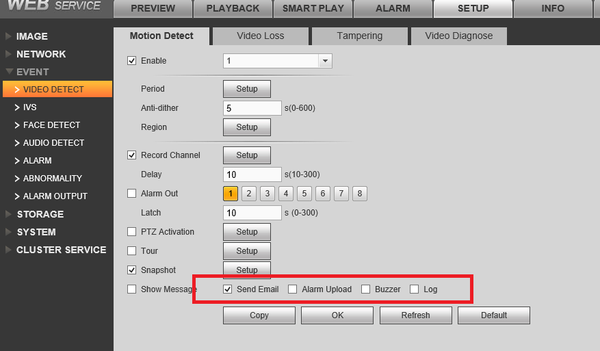
1. Set up tab → event → video detect.
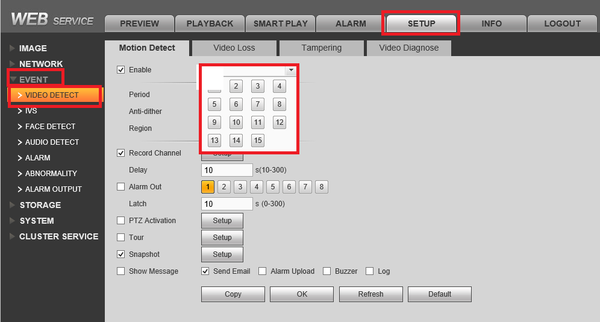
2. Check enable → Choose which cameras you want motion detect set for. You may copy motion settings from one channel to another or from one channel to all by selecting the "Copy" button on the lower left.
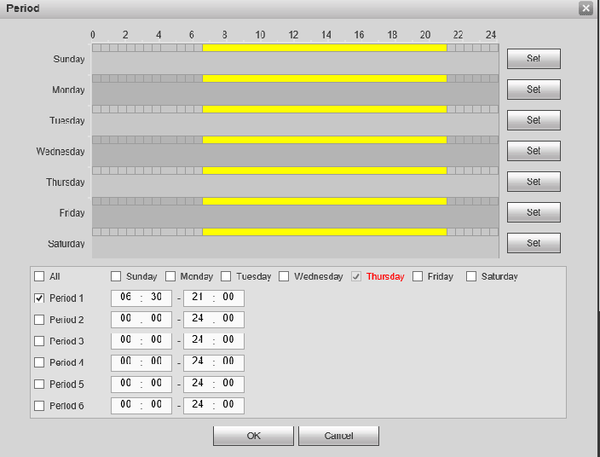
3. Set Period. You can choose what days and times you want motion detect set.
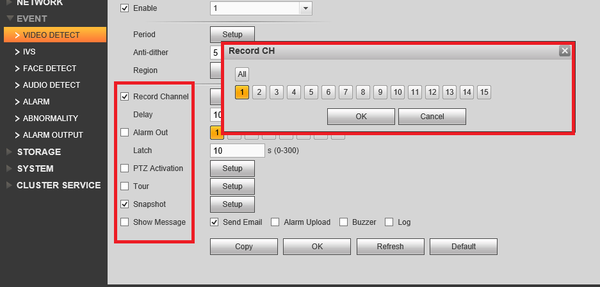
4. Choose which functions you want motion to do when a motion event occurs such as snap shot and record channel. The set up is the same for record channel, snapshot and tour. You may choose which cameras record , snapshot , tour and PTZ activation when a motion event occurs. All or more than one camera maybe selected.
5. Select notification when a motion event occurs. Remember to click "OK" to save settings.
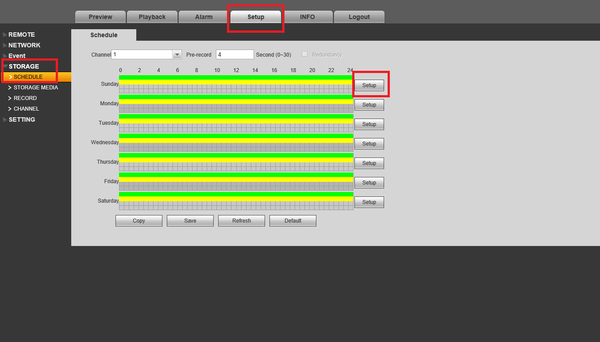
6. Select Setup Tab → Storage → Schedule → Click on Setup button
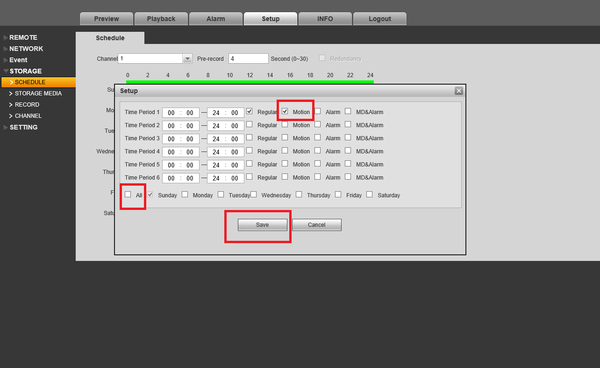
7. Check off Motion, Default time period is 0:00 to 24:00 hours. → Select "All" for recording motion everyday. → Click on "Save" to save schedule settings.
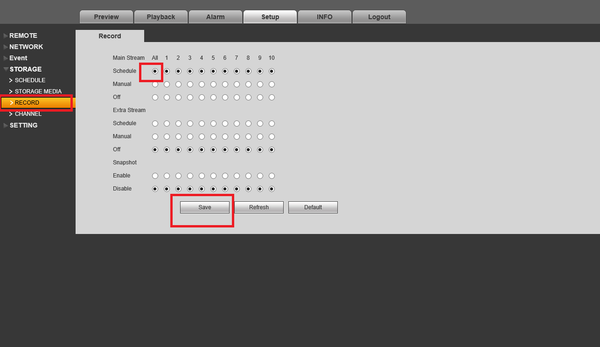
8. Select Record → Select "All" for motion detection to record everyday. You may choose which cameras on which streams record motion. Click on "Save" → to save settings.
Motion Recordings Setup for SmartPSS 1.16.4
Prerequisites
- SmartPSS 1.16
- HDD installed on Recording Device
Video Instructions
Step By Step Instructions
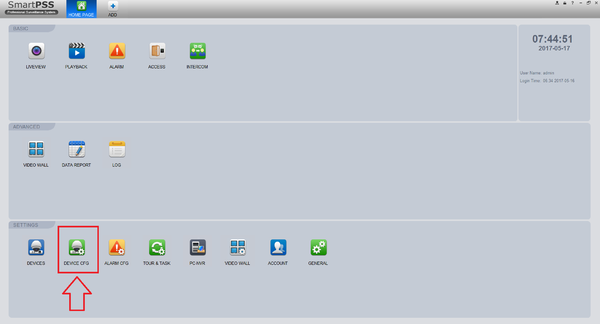
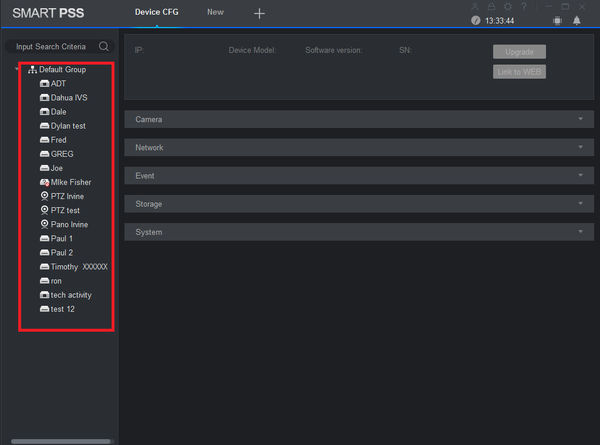
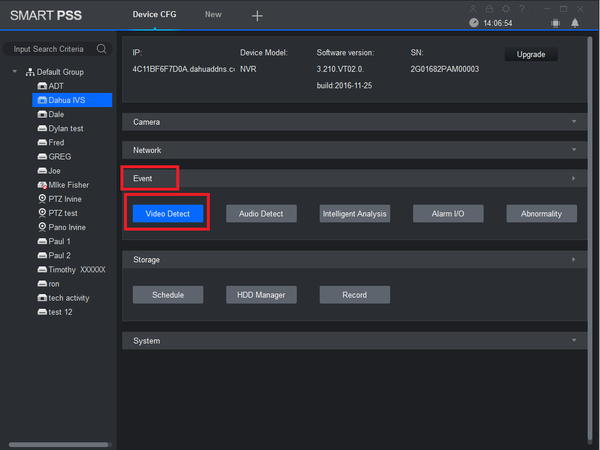
1. From the Main Menu Select "Device CFG" (Device Configuration).
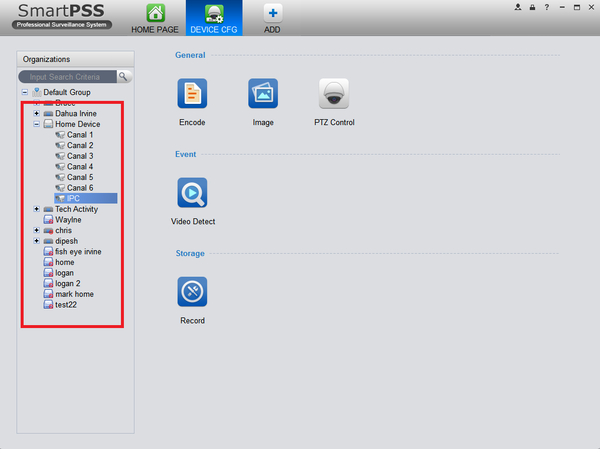
2. From the left hand side select the device the motion scheduled recording is to be set for.
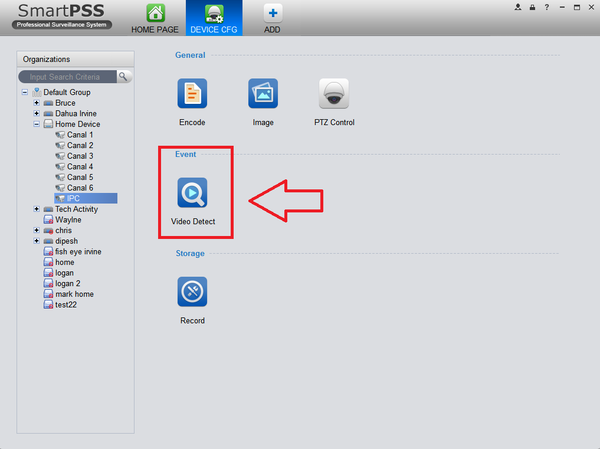
3. Select "Event" -> Select "Video Detect".
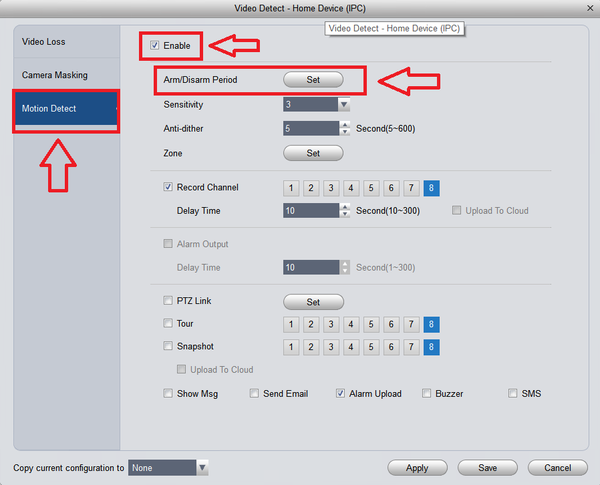
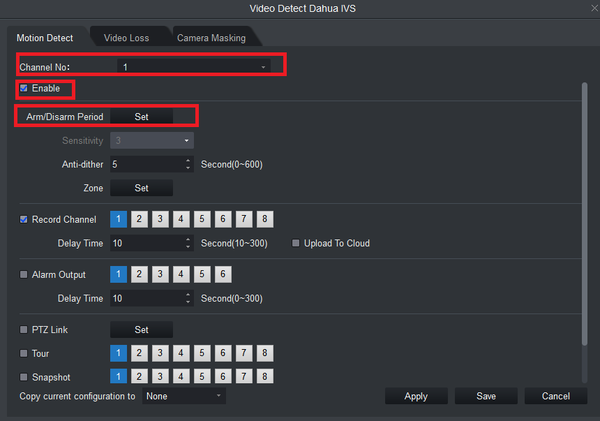
4. Select motion detect -> Check mark the enable box to turn on motion detection -> Select "Set" to set an Arm/Disarm Period.
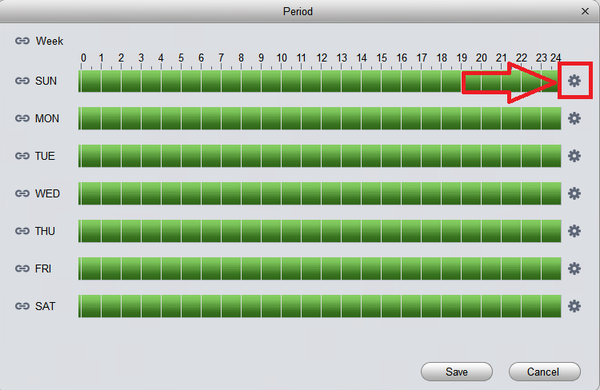
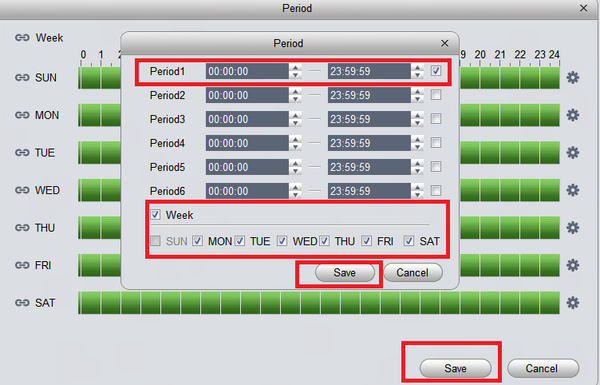
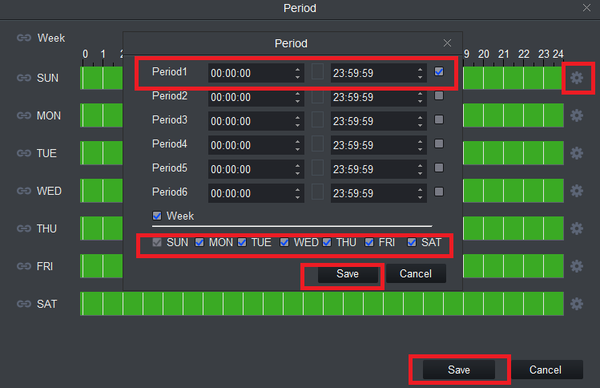
5. Select the settings icon -> Check mark the period -> Select the days that Motion detection is to be armed/disarmed -> Select save -> Select Save.
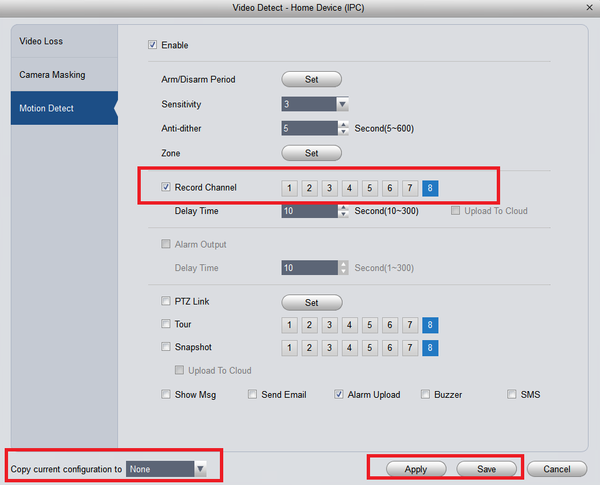
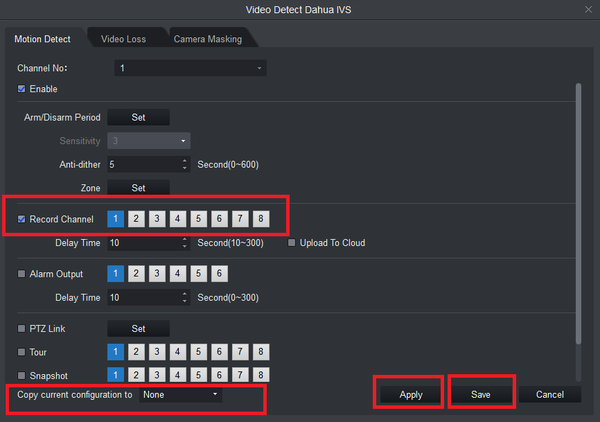
6. Check mark "Record Channel" and select channel it is to be set for -> you can copy the configuration to another channel or all channels -> Select "Apply" and "Save".
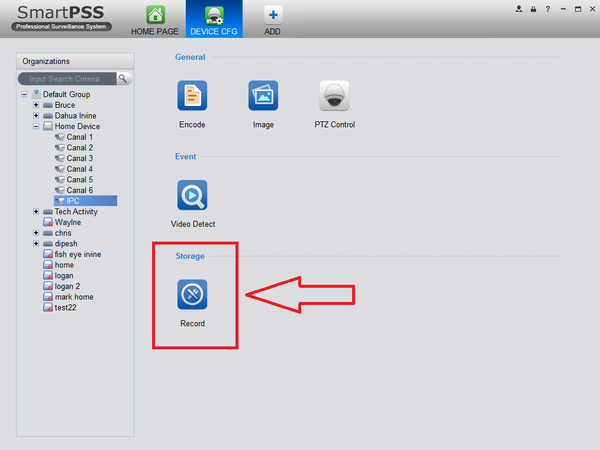
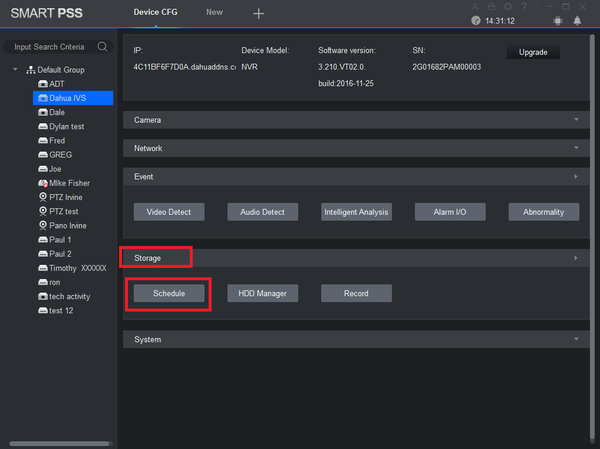
7. Setting a record schedule is required for motion event recordings. Under "Storage" -> Select "Schedule"
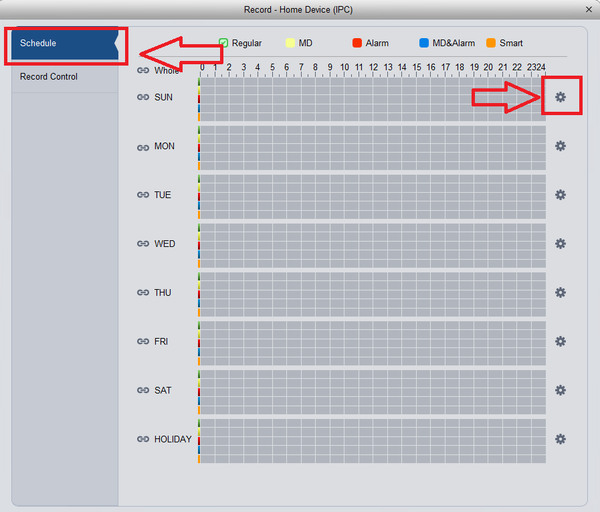
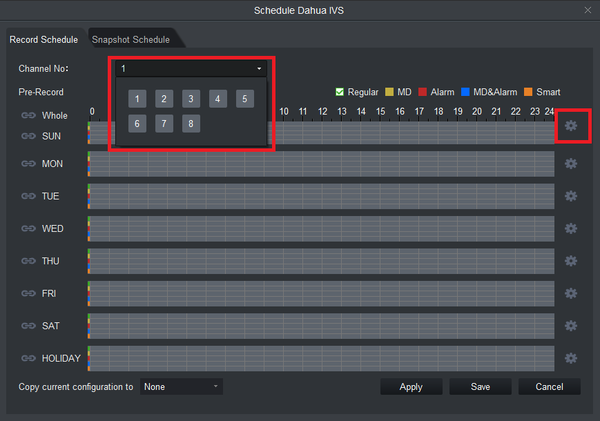
8. Select Schedule -> Select settings icon.
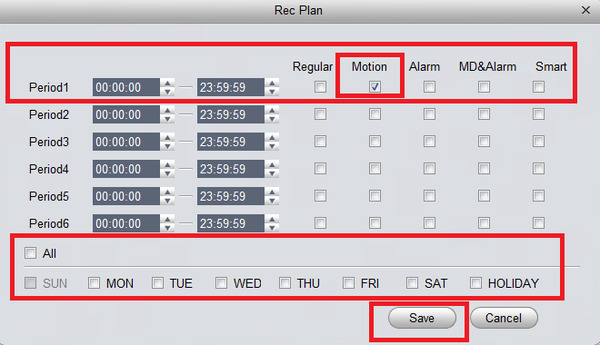
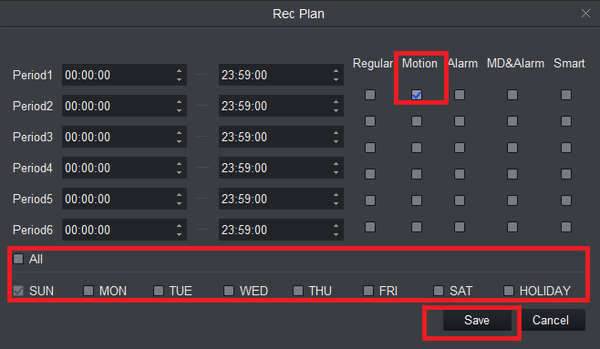
9. For this tutorial we are only setting one period. Check mark Motion (Motion Detection) -> Select Day or days motion is to be recorded -> Select "Save" to save recordings.
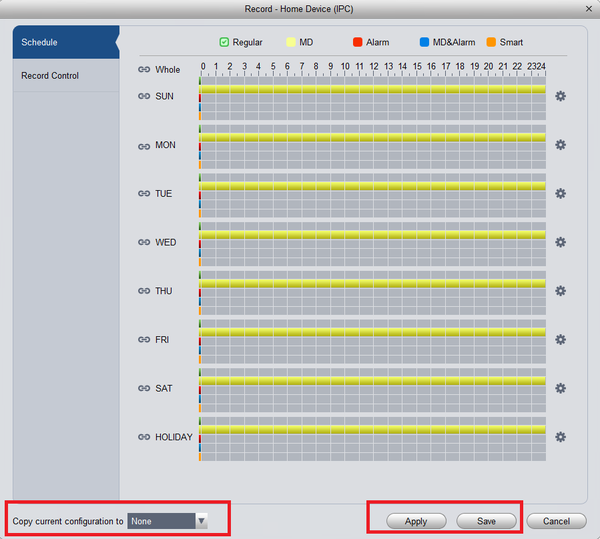
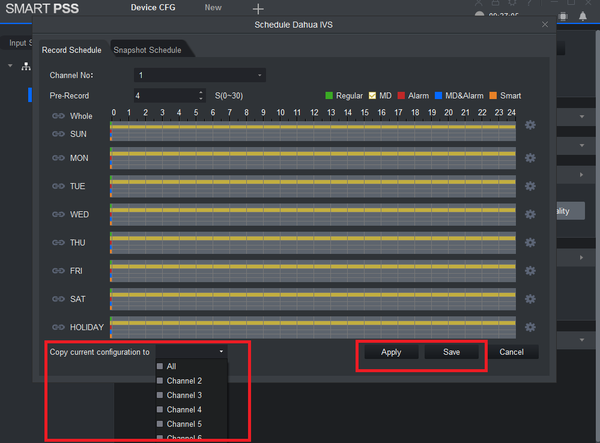
10. Here you see yellow for the days depending on the days motion was set for from the previous step. Yellow represents motion detection. You may copy the configuration to all or another channel -> Select "Apply" and "Save" to save configuration.
Motion Recordings Setup for SmartPSS 2.0
Prerequisites
- SmartPSS 2.0
- HDD installed on Recording Device
Video Instructions
Step By Step Instructions
1. From the Main Menu Select "Device CFG" (Device Configuration).
2. From the left hand side select the device the scheduled recording is to be set for.
3. Select "Event" -> Select "Video Detect".
4. Select and choose channel -> Check mark the enable box to turn on motion detection -> Select "Set" to set an Arm/Disarm Period.
5. Select the settings icon -> Check mark the period -> Select the days that Motion detection is to be armed/disarmed -> Select save -> Select Save.
6. Check mark "Record Channel" and select channel/channels it is to be set for -> you can copy the configuration to another channel or all channels -> Select "Apply" and "Save".
7. Setting a record schedule is required for motion event recordings. Select "Storage" -> Select "Schedule"
8. Select channel -> Select settings icon.
9. For this tutorial we are only setting one period. Check mark Motion (Motion Detection) -> Select Day or days motion is to be recorded -> Select "Save" to save recordings.
10. Here you see yellow for the days depending on the days motion was set for from the previous step. Yellow represents motion detection. You may copy the configuration to all or another channel -> Select "Apply" and "Save" to save configuration.
