Difference between revisions of "SmartPSS/Remote Access P2P"
(Created page with "==Remote Access P2P== ===Description=== Remote Access P2P ===Prerequisites=== Remote Access P2P ===Video Instructions=== <embedvideo service="youtube">X</embedvideo> ==...") |
|||
| (3 intermediate revisions by 2 users not shown) | |||
| Line 1: | Line 1: | ||
| − | == | + | =='''NOTICE'''== |
| + | [https://dahuawiki.com/Discontinuation_of_SmartPSS Notice of Discontinuation of SmartPSS] | ||
| + | ==SmartPSS 2.0 Remote Access P2P== | ||
===Description=== | ===Description=== | ||
| + | Follow the direction below to setup a remotely accessible Dahua device via P2P for SmartPSS 2.0. | ||
| + | ===Prerequisites=== | ||
| + | * A Dahua Device with P2P enabled and Online at a remote internet connection | ||
| + | * A computer with a separate internet connection and SmartPSS 2.0 | ||
| + | ===Video Instructions=== | ||
| + | <embedvideo service="youtube">https://www.youtube.com/watch?v=4ni9aVCGFyg</embedvideo> | ||
| + | ===Step by Step Instructions=== | ||
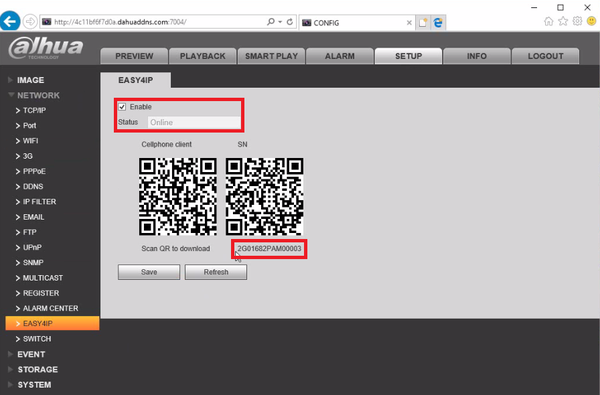
| + | 1. Make sure that your remote Dahua device has an "Online" status under the EASY4IP or P2P menu. After that you will only need the Serial Number, the username, and the password of the device. | ||
| + | |||
| + | [[File:SmartPSS2P2P001.png|600x600px]] | ||
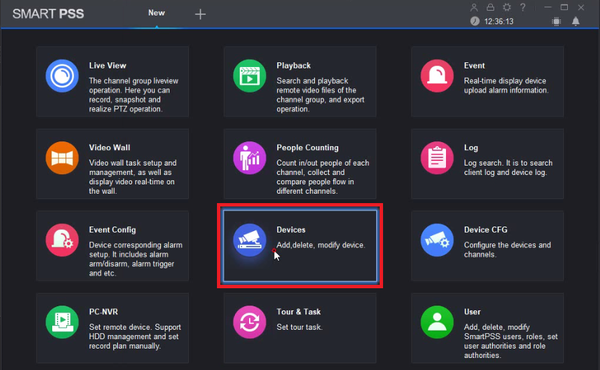
| − | + | 2. Launch SmartPSS 2.0 and from the main menu select the Devices menu. | |
| − | + | [[File:SmartPSS2P2P002.png|600x600px]] | |
| + | |||
| + | 3. Now select "+ Add" in the top left corner. | ||
| + | |||
| + | [[File:SmartPSS2P2P003.png|600x600px]] | ||
| + | |||
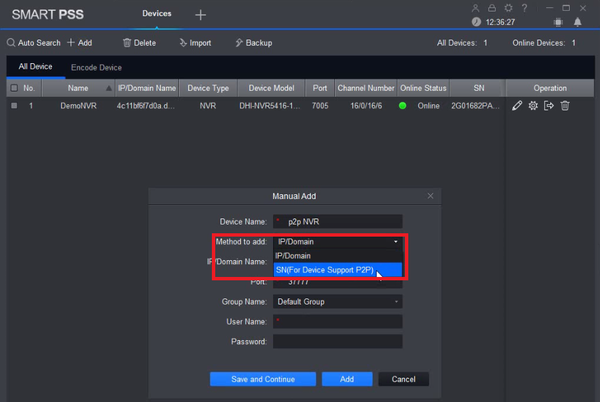
| + | 4. Assign any name under Device Name, then under Method to add select the pull-down menu and select "SN(For Device Support P2P). | ||
| + | |||
| + | [[File:SmartPSS2P2P004.png|600x600px]] | ||
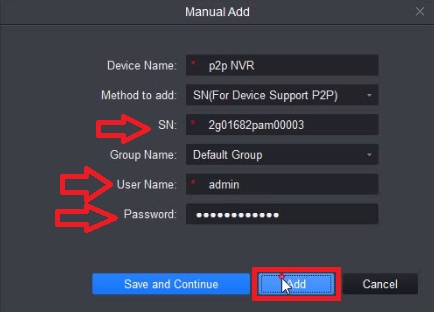
| − | + | 5. Now enter in the SN (Serial Number), the username, the password, and then select Add. | |
| − | + | [[File:SmartPSS2P2P005.png|600x600px]] | |
| − | + | 6. Notice that the Online Status should turn green and state Online. Now select the + to go back to the main menu. | |
| − | + | [[File:SmartPSS2P2P006.png|600x600px]] | |
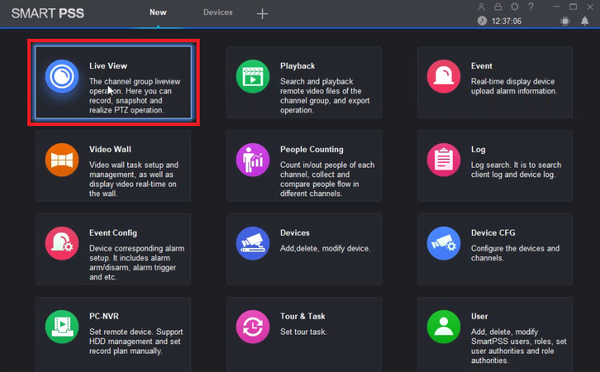
| − | + | 7. Select Live View. | |
| − | + | [[File:SmartPSS2P2P007.png|600x600px]] | |
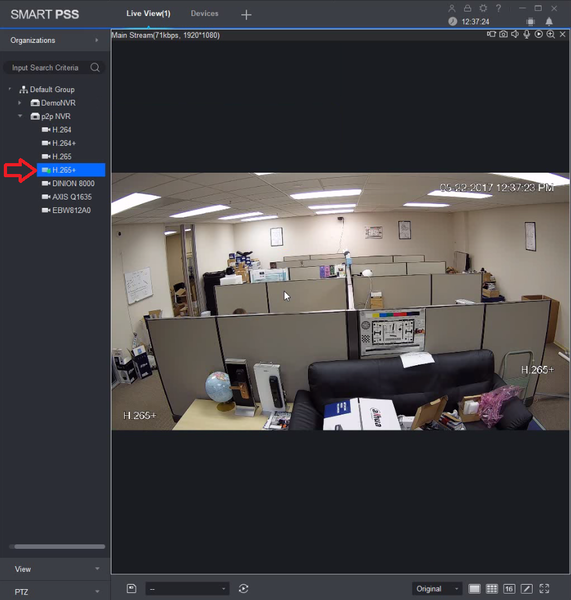
| − | + | 8. Now select a camera stream you would like to load. You have now completed the Remote Access step by step tutorial. | |
| − | + | [[File:SmartPSS2P2P008.png|600x600px]] | |
| − | [[Category: | + | [[Category:SmartPSS]] |
Latest revision as of 22:10, 2 October 2024
Contents
NOTICE
Notice of Discontinuation of SmartPSS
SmartPSS 2.0 Remote Access P2P
Description
Follow the direction below to setup a remotely accessible Dahua device via P2P for SmartPSS 2.0.
Prerequisites
- A Dahua Device with P2P enabled and Online at a remote internet connection
- A computer with a separate internet connection and SmartPSS 2.0
Video Instructions
Step by Step Instructions
1. Make sure that your remote Dahua device has an "Online" status under the EASY4IP or P2P menu. After that you will only need the Serial Number, the username, and the password of the device.
2. Launch SmartPSS 2.0 and from the main menu select the Devices menu.
3. Now select "+ Add" in the top left corner.
4. Assign any name under Device Name, then under Method to add select the pull-down menu and select "SN(For Device Support P2P).
5. Now enter in the SN (Serial Number), the username, the password, and then select Add.
6. Notice that the Online Status should turn green and state Online. Now select the + to go back to the main menu.
7. Select Live View.
8. Now select a camera stream you would like to load. You have now completed the Remote Access step by step tutorial.
