Difference between revisions of "SmartPSS/How To Setup Event Alarm Link"
(→How To Setup Event Alarm Link In SmartPSS) |
|||
| (24 intermediate revisions by one other user not shown) | |||
| Line 1: | Line 1: | ||
| + | =='''NOTICE'''== | ||
| + | [https://dahuawiki.com/Discontinuation_of_SmartPSS Notice of Discontinuation of SmartPSS] | ||
| + | |||
==How To Setup Event Alarm Link In SmartPSS== | ==How To Setup Event Alarm Link In SmartPSS== | ||
| Line 42: | Line 45: | ||
6. Use the tabs on the right to set up the parameters for when the Event is triggered. | 6. Use the tabs on the right to set up the parameters for when the Event is triggered. | ||
| + | [[File:How_To_Setup_Event_Alarm_Link_-12.jpg|600px]] | ||
| + | |||
| + | The different options will be explained below: | ||
| + | |||
| + | ====='''Notify'''===== | ||
| + | |||
| + | ''When the event occurs it can give a notification.'' | ||
[[File:How_To_Setup_Event_Alarm_Link_-5.jpg|600px]] | [[File:How_To_Setup_Event_Alarm_Link_-5.jpg|600px]] | ||
| + | Notification types | ||
| − | + | Alarm Sound: Play sound at local computer | |
| − | Alarm Sound: | ||
| − | EMap Twinkle: | + | EMap Twinkle: Twinkle notification on EMap |
| − | Send Mail | + | Send Mail: Send an email |
| + | ====='''Link Video'''===== | ||
| + | ''When event occurs it can link to a live camera preview or record.'' | ||
[[File:How_To_Setup_Event_Alarm_Link_-6.jpg|600px]] | [[File:How_To_Setup_Event_Alarm_Link_-6.jpg|600px]] | ||
| − | |||
| − | + | Drag and drop a device from device tree into the grid layout in the center of the screen | |
| − | |||
Select from the pre-configured layouts or create your own | Select from the pre-configured layouts or create your own | ||
| + | |||
| + | * Preset point: Allows the user to select a preset point for supported cameras such as PTZ - SmartPSS/How To Use PTZ Preset in SmartPSS | ||
| + | * Stream Type: Select which video stream: Main Stream, Sub Stream1, etc. | ||
| + | * Duration: Time (in seconds) for video . | ||
| + | * Operation: Use the X icon to delete | ||
====='''Alarm Output'''===== | ====='''Alarm Output'''===== | ||
| + | ''When event occurs it can output a signal to trigger an alarm directly on the camera.'' | ||
| + | |||
| + | [[File:How_To_Setup_Event_Alarm_Link_-7.jpg|600px]] | ||
| + | Select the device from the device tree | ||
| + | |||
| + | Set Auto Open | ||
| + | |||
| + | Duration: Enter a time for the alarm output (in seconds) | ||
====='''Defence Time'''===== | ====='''Defence Time'''===== | ||
| + | ''Set a schedule for the Alarm.'' | ||
| + | |||
| + | [[File:How_To_Setup_Event_Alarm_Link_-8.jpg|600px]] | ||
| + | |||
| + | The event will be automatically programmed to run at all times, represented by the Green color | ||
| + | |||
| + | In the center of the screen click and drag the mouse to delete or add time | ||
| + | |||
| + | [[File:animated_schedule_event_alarm.gif|600px]] | ||
| + | |||
| + | OR you can click the Gear to open a pop up menu to define the parameters of the schedule | ||
| + | |||
| + | |||
| + | [[File:How_To_Setup_Event_Alarm_Link_-11.jpg|600px]] | ||
| + | |||
| + | |||
| + | Enter a time range for the schedule | ||
| + | |||
| + | Use the checkbox at the bottom to select which day(s) to set the schedule to. You can use 'Check All' to set the current schedule to all days | ||
| + | |||
| + | Click OK to set the schedule | ||
| + | |||
| + | |||
| + | 7. Once the Event parameters have been configured click 'Save' to save the settings, then click the toggle at the top of the page to enable the event. | ||
| + | |||
| + | [[File:How_To_Setup_Event_Alarm_Link_-10.jpg|600px]] | ||
| + | |||
| + | Once this event is enabled it will begin actively working according to the set parameters. | ||
Latest revision as of 23:23, 2 October 2024
Contents
NOTICE
Notice of Discontinuation of SmartPSS
How To Setup Event Alarm Link In SmartPSS
Description
This article will show you how to setup the Event Alarm Link feature in SmartPSS 2.0
Prerequisites
- SmartPSS
- Devices added to SmartPSS Device List - How To Add Device to SmartPSS
Video Instructions
Coming Soon
Step by Step Instructions
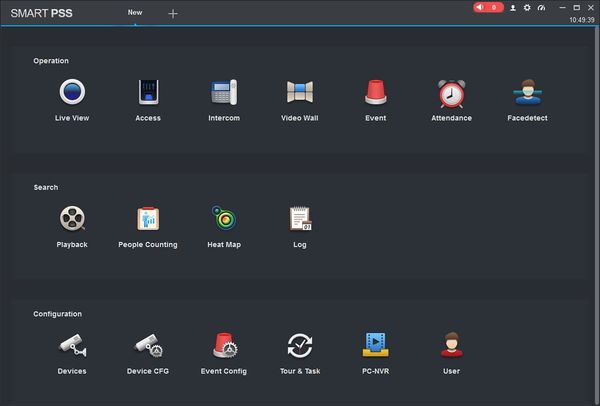
1. Launch SmartPSS.
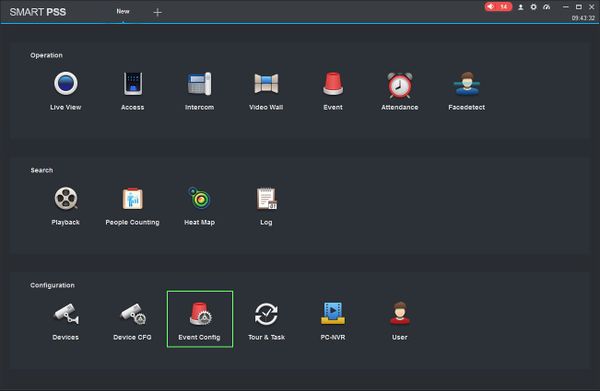
2. Click 'Event Config'
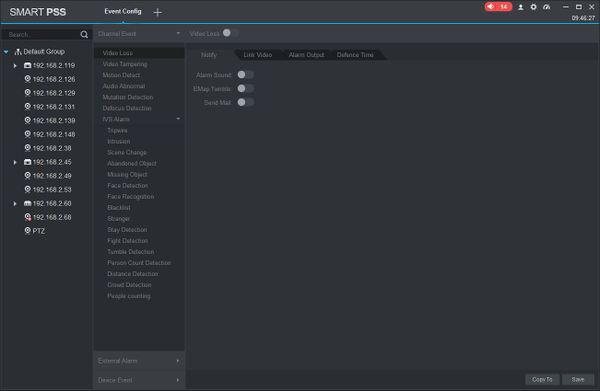
3. The Event Config menu will appear.
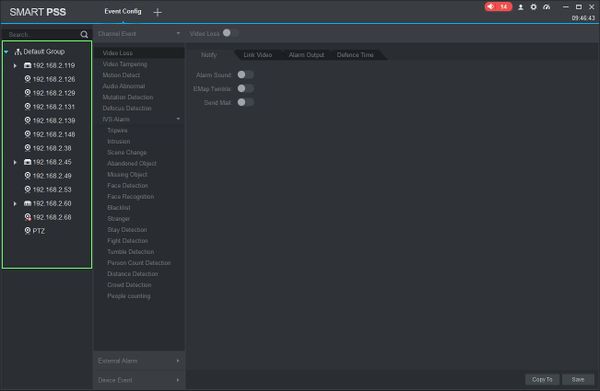
4. Click to select the device you wish to configure from the Device Tree on the left
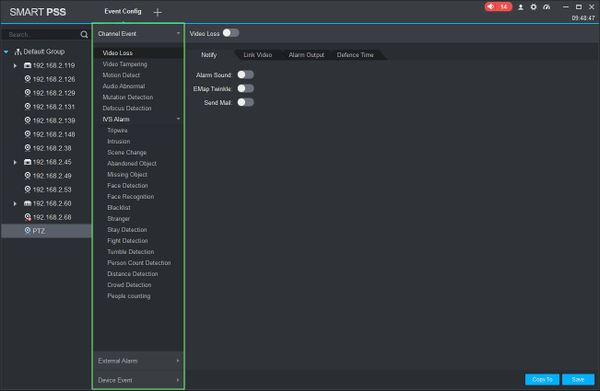
5. Select the Event Type for this camera
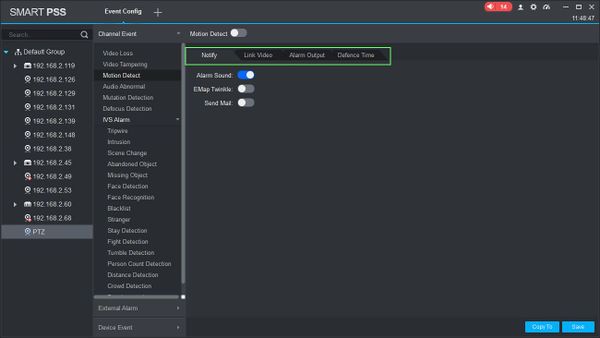
6. Use the tabs on the right to set up the parameters for when the Event is triggered.
The different options will be explained below:
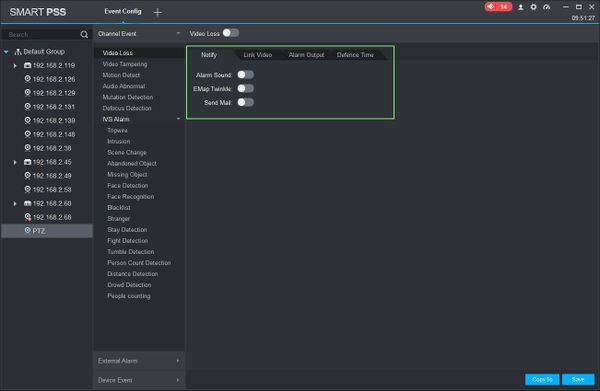
Notify
When the event occurs it can give a notification.
Notification types
Alarm Sound: Play sound at local computer
EMap Twinkle: Twinkle notification on EMap
Send Mail: Send an email
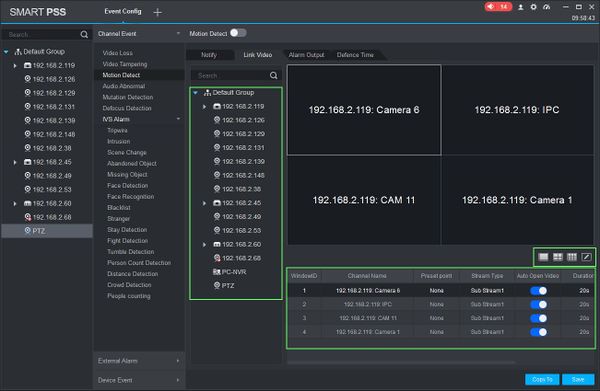
Link Video
When event occurs it can link to a live camera preview or record.
Drag and drop a device from device tree into the grid layout in the center of the screen
Select from the pre-configured layouts or create your own
- Preset point: Allows the user to select a preset point for supported cameras such as PTZ - SmartPSS/How To Use PTZ Preset in SmartPSS
- Stream Type: Select which video stream: Main Stream, Sub Stream1, etc.
- Duration: Time (in seconds) for video .
- Operation: Use the X icon to delete
Alarm Output
When event occurs it can output a signal to trigger an alarm directly on the camera.
Select the device from the device tree
Set Auto Open
Duration: Enter a time for the alarm output (in seconds)
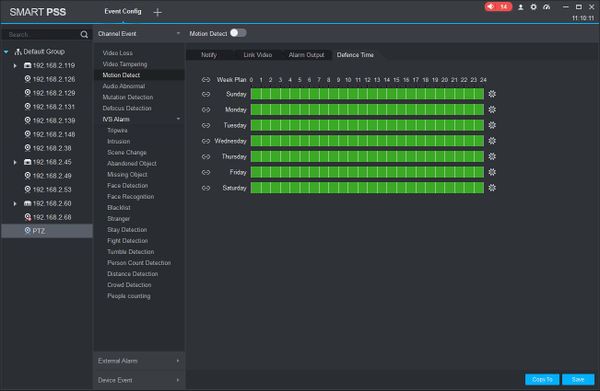
Defence Time
Set a schedule for the Alarm.
The event will be automatically programmed to run at all times, represented by the Green color
In the center of the screen click and drag the mouse to delete or add time
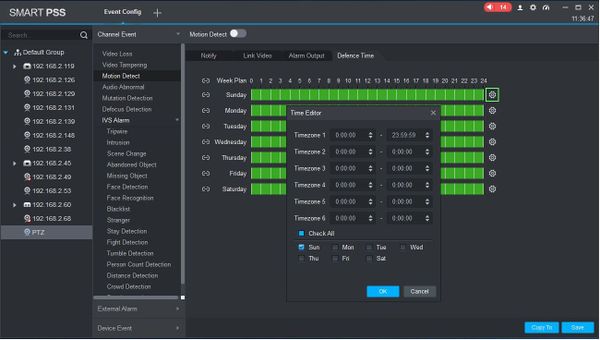
OR you can click the Gear to open a pop up menu to define the parameters of the schedule
Enter a time range for the schedule
Use the checkbox at the bottom to select which day(s) to set the schedule to. You can use 'Check All' to set the current schedule to all days
Click OK to set the schedule
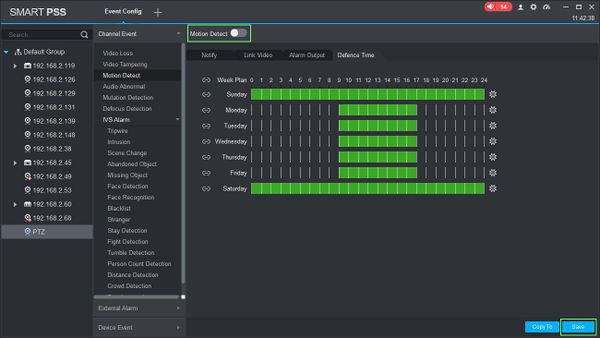
7. Once the Event parameters have been configured click 'Save' to save the settings, then click the toggle at the top of the page to enable the event.
Once this event is enabled it will begin actively working according to the set parameters.
