Difference between revisions of "Template:Schedule Record DSS Express"
(Created page with "===Step By Step Instructions=== 1. From the main menu select '''Config''' 400 2. Under Config under the left-hand side menu expand the...") |
(→Step By Step Instructions) |
||
| (2 intermediate revisions by the same user not shown) | |||
| Line 1: | Line 1: | ||
| − | ===Step By Step Instructions=== | + | |
| + | ===Description=== | ||
| + | Setting up record schedule in DSS Express S | ||
| + | |||
| + | |||
| + | ===Prerequisites=== | ||
| + | * Dahua NVR or DVR | ||
| + | * Internal HDD | ||
| + | * DSS Express Server and Client software | ||
| + | |||
| + | |||
| + | === Step By Step Instructions === | ||
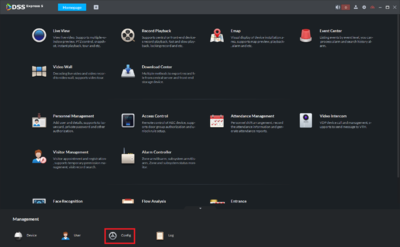
1. From the main menu select '''Config''' | 1. From the main menu select '''Config''' | ||
| − | [[File:DSS_Express_Sched_Rec_1.PNG| | + | [[File:DSS_Express_Sched_Rec_1.PNG|400px]] |
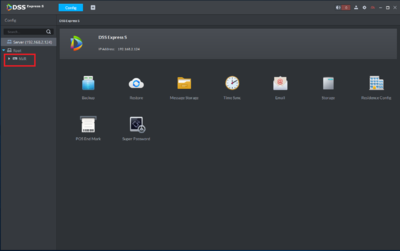
2. Under Config under the left-hand side menu expand the NVR to show all cameras. | 2. Under Config under the left-hand side menu expand the NVR to show all cameras. | ||
| − | [[File:DSS_Express_Sched_Rec_2.PNG| | + | [[File:DSS_Express_Sched_Rec_2.PNG|400px]] |
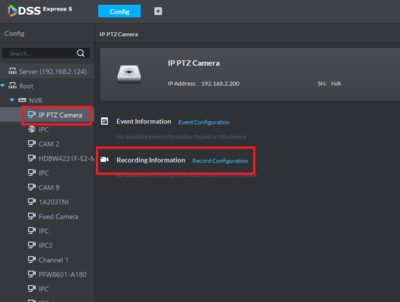
3. Once the cameras are shown, left click to select one and choose '''Recording Configuration''' | 3. Once the cameras are shown, left click to select one and choose '''Recording Configuration''' | ||
| − | [[File:DSS_Express_Sched_Rec_3.PNG| | + | [[File:DSS_Express_Sched_Rec_3.PNG|400px]] |
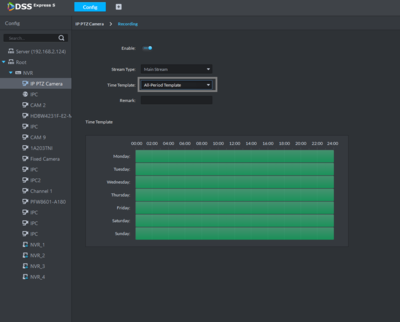
4. From the highlighted drop down menu select '''Manage time template''' to open a new window | 4. From the highlighted drop down menu select '''Manage time template''' to open a new window | ||
| − | [[File:DSS_Express_Sched_Rec_4.PNG| | + | [[File:DSS_Express_Sched_Rec_4.PNG|400px]] |
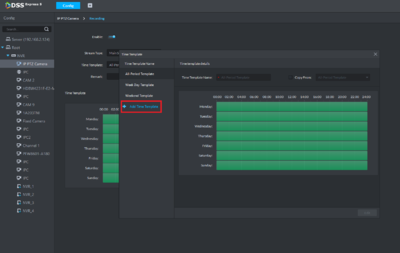
5. In the new window on the left side menu select '''Add time template''' to create a new template. | 5. In the new window on the left side menu select '''Add time template''' to create a new template. | ||
| − | [[File:DSS_Express_Sched_Rec_5.PNG| | + | [[File:DSS_Express_Sched_Rec_5.PNG|400px]] |
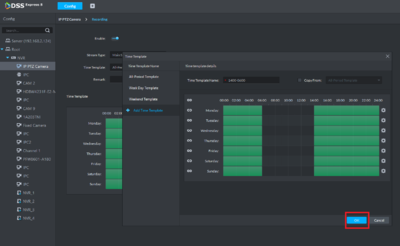
6. Left click with the mouse and hold to erase or add time to the schedule, once complete assign a name and hit Ok. | 6. Left click with the mouse and hold to erase or add time to the schedule, once complete assign a name and hit Ok. | ||
| − | [[File:DSS_Express_Sched_Rec_6.PNG| | + | [[File:DSS_Express_Sched_Rec_6.PNG|400px]] |
| + | |||
| + | |||
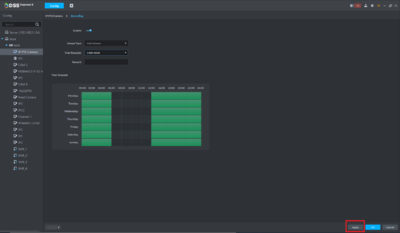
| + | 7. From the Schedule menu select the new Time Template from the Time Template drop down and click apply. | ||
| + | |||
| + | [[File:DSS_Express_Sched_Rec_7.PNG|400px]] | ||
| + | |||
| + | |||
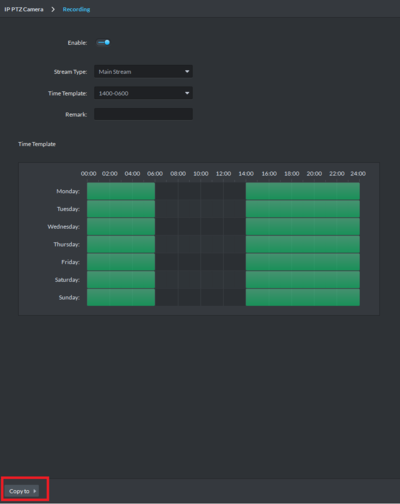
| + | 8. Once applied the schedule can now be copied to other devices. | ||
| + | |||
| + | [[File:DSS_Express_Sched_Rec_8.PNG|400px]] | ||
Latest revision as of 07:13, 7 February 2020
Description
Setting up record schedule in DSS Express S
Prerequisites
- Dahua NVR or DVR
- Internal HDD
- DSS Express Server and Client software
Step By Step Instructions
1. From the main menu select Config
2. Under Config under the left-hand side menu expand the NVR to show all cameras.
3. Once the cameras are shown, left click to select one and choose Recording Configuration
4. From the highlighted drop down menu select Manage time template to open a new window
5. In the new window on the left side menu select Add time template to create a new template.
6. Left click with the mouse and hold to erase or add time to the schedule, once complete assign a name and hit Ok.
7. From the Schedule menu select the new Time Template from the Time Template drop down and click apply.
8. Once applied the schedule can now be copied to other devices.
