Difference between revisions of "NVR/Recording Setup/Schedule Record"
(→SmartPSS 2.0 Schedule Recording Instructions) |
(→SmartPSS 2.0 Schedule Recording Instructions) |
||
| Line 42: | Line 42: | ||
===SmartPSS 2.0 Schedule Recording Instructions=== | ===SmartPSS 2.0 Schedule Recording Instructions=== | ||
| − | 1. From the Main Menu Select "Device | + | 1. From the Main Menu Select "Device CFG" (Device Configuration). |
| + | |||
| + | 2. From the left hand side select the device the scheduled recording is to be set for. | ||
| + | |||
| + | 3. Select "Storage" | ||
| + | |||
| + | 4. From the channel drop down menu select the channel for recording | ||
| + | |||
| + | 5. Click on the settings icon. Here you will see a menu for the days and hours for the scheduled recordings. | ||
| + | |||
| + | 6. For this tutorial we are setting one period. Check mark Regular -> Check mark the day or days recordings are to be set for -> select save. | ||
| + | |||
| + | *Here you can copy the configuration set in the previous step to other channels | ||
| + | |||
| + | 7. Select "Apply" and "Save" to save configuration. | ||
| + | |||
| + | |||
| + | |||
| + | |||
| + | |||
| + | |||
Revision as of 18:31, 1 May 2017
Contents
Schedule Record
Description
Dahua NVRs and DVRs offer a variety of recording options. You can configure recording schedules based on the following methods:
- Regular
- Motion Detection
- Alarm Based
- Motion Detection + Alarm
- IVS if the feature is available depending on the model.
These schedules can be set individually for each camera or copied to all cameras.
Prerequisites
- Dahua NVR or DVR
- Internal HDD
Video Instructions
Step by Step Instructions
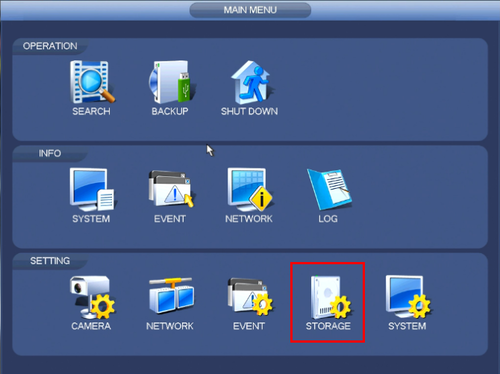
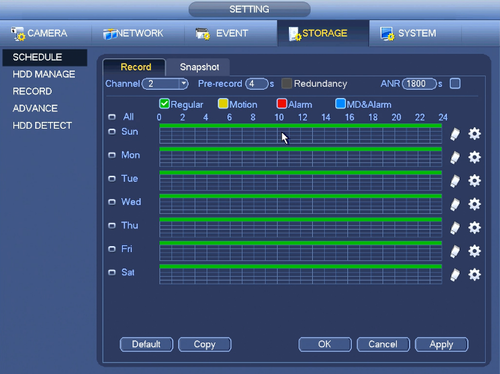
1. From the Main Menu click, "Storage" under, "Settings"
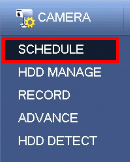
2. Click, "Schedule" on the left hand side.
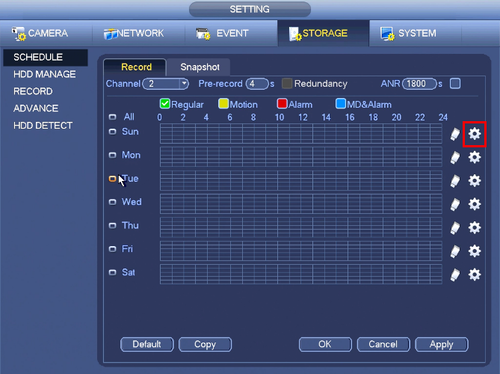
3. Click the Gear icon to the right of any of the graphs.
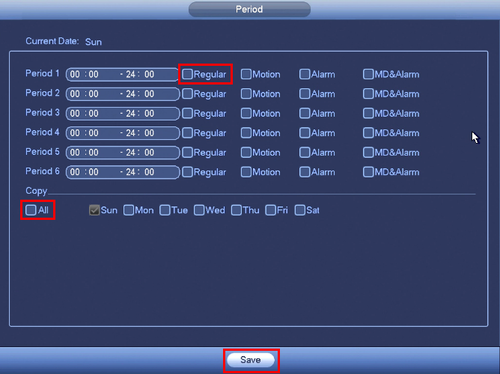
4. Check the box for, "Regular" then click the, "All" box below, "Copy"
5. Click, "Save" This will return you to the previous screen which should look like this.
6. Click, "Apply" and then, "OK"
SmartPSS 2.0 Schedule Recording Instructions
1. From the Main Menu Select "Device CFG" (Device Configuration).
2. From the left hand side select the device the scheduled recording is to be set for.
3. Select "Storage"
4. From the channel drop down menu select the channel for recording
5. Click on the settings icon. Here you will see a menu for the days and hours for the scheduled recordings.
6. For this tutorial we are setting one period. Check mark Regular -> Check mark the day or days recordings are to be set for -> select save.
- Here you can copy the configuration set in the previous step to other channels
7. Select "Apply" and "Save" to save configuration.
