Difference between revisions of "Traffic/ITC413-PW4D-Z Initial Setup"
(Created page with "=ITC413-PW4D-Z Initial Setup= ==Description== This page will show you how to setup an ITC413-PW4D-Z to capture license plates ==Prerequisites== * ITC413-PW4D-Z * A computer...") |
|||
| Line 6: | Line 6: | ||
==Prerequisites== | ==Prerequisites== | ||
* ITC413-PW4D-Z | * ITC413-PW4D-Z | ||
| − | * A computer | + | * A computer connected to the same network as the camera |
==Video Instructions== | ==Video Instructions== | ||
| Line 24: | Line 24: | ||
[[File:ITC413Setup2.png|1400px]] | [[File:ITC413Setup2.png|1400px]] | ||
| − | 3. Grab the center of the line | + | 3. Grab the center of the line labeled '''Snapshot Triggering Line''' to move it around to where you want it. |
<br>Grab the ends of that line to adjust the angle of the snapshot line. This will be the line that triggers license plate snapshots. | <br>Grab the ends of that line to adjust the angle of the snapshot line. This will be the line that triggers license plate snapshots. | ||
<br>For vehicles going toward the camera, that is A to B. For vehicles driving away from the camera, that is B to A. | <br>For vehicles going toward the camera, that is A to B. For vehicles driving away from the camera, that is B to A. | ||
| Line 38: | Line 38: | ||
<br>Adjust the slider next to '''Vehicle Detection Sensitivity''' for how sensitive the license plate capturing is. | <br>Adjust the slider next to '''Vehicle Detection Sensitivity''' for how sensitive the license plate capturing is. | ||
<br>Either enable or disable the slider next to '''Capture Unlicensed Vehicles''' depending on if you want it to capture vehicles that cross the triggering line that don't have license plates visible. | <br>Either enable or disable the slider next to '''Capture Unlicensed Vehicles''' depending on if you want it to capture vehicles that cross the triggering line that don't have license plates visible. | ||
| − | <br>Either enable or disable the slider next to '''Display rules and tracking info''' depending on if you want the visual data to displayed on the captured snapshots. | + | <br>Either enable or disable the slider next to '''Display rules and tracking info''' depending on if you want the visual data to be displayed on the captured snapshots. |
<br>Additionally, if you keep the rules and tracking info turned on, you can check or uncheck the boxes for which rules and tracking info you want saved on the captured snapshots | <br>Additionally, if you keep the rules and tracking info turned on, you can check or uncheck the boxes for which rules and tracking info you want saved on the captured snapshots | ||
<br>When you are done making changes, click on '''Apply''' at the bottom | <br>When you are done making changes, click on '''Apply''' at the bottom | ||
Latest revision as of 22:18, 29 January 2024
Contents
ITC413-PW4D-Z Initial Setup
Description
This page will show you how to setup an ITC413-PW4D-Z to capture license plates
Prerequisites
- ITC413-PW4D-Z
- A computer connected to the same network as the camera
Video Instructions
Step by Step Instructions
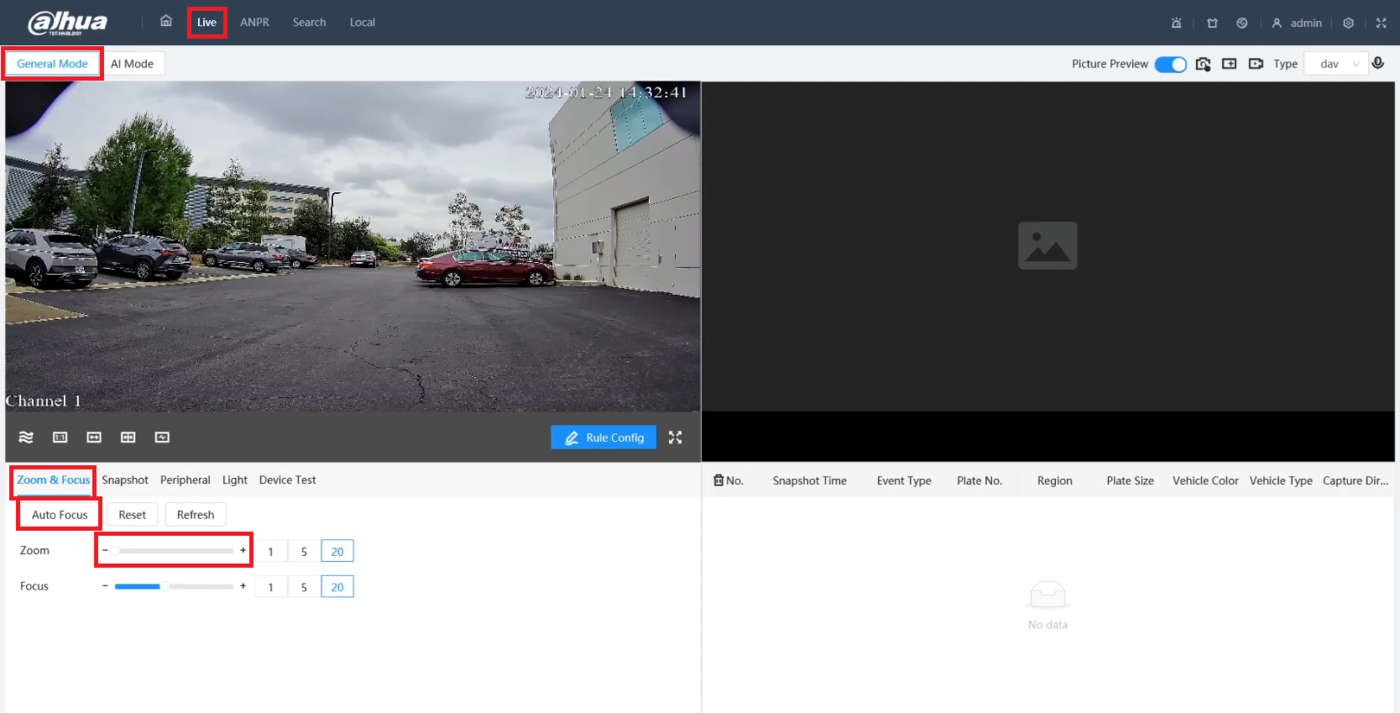
1. Log into the Web UI of the camera in a web browser.
Select Live at the top.
Then select General Mode and then Zoom & Focus.
Drag the slider next to Zoom for the amount you want to zoom in or out.
It should automatically focus after adjusting the zoom. But if not, select Auto Focus
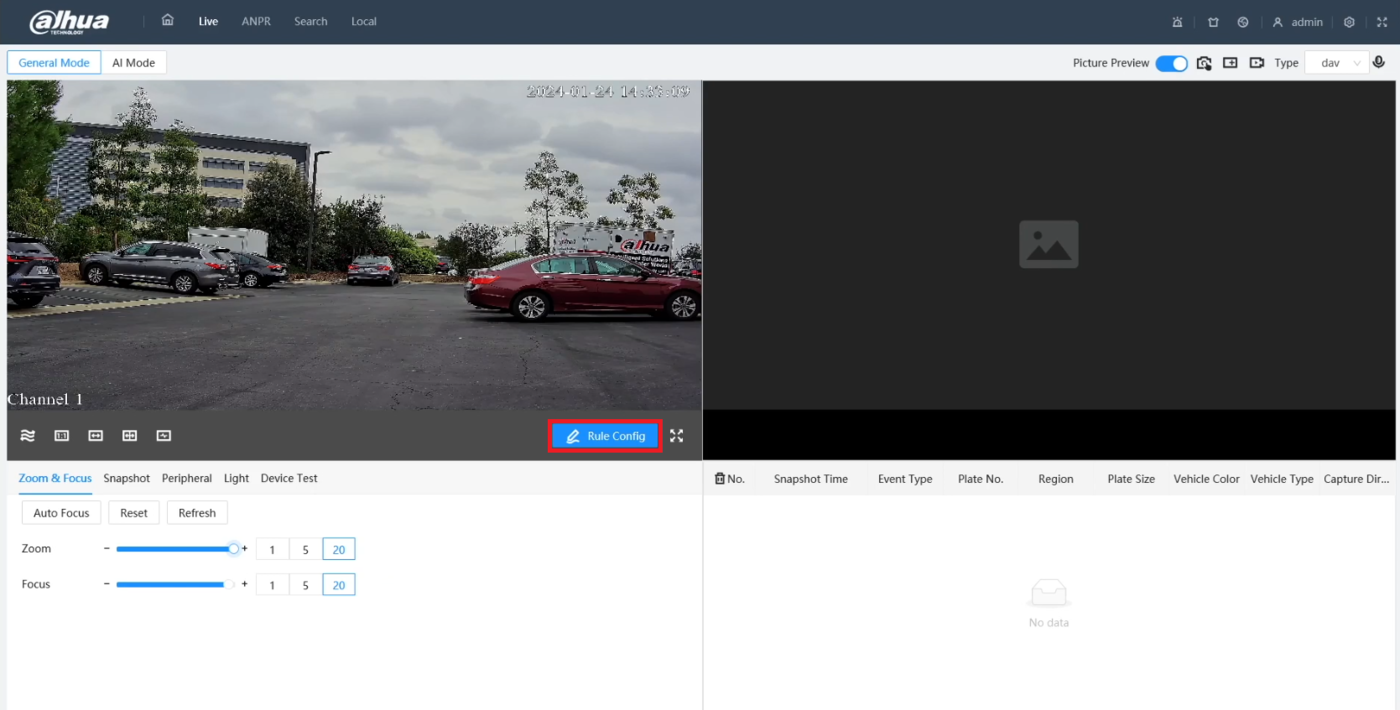
2. Click on Rule Config
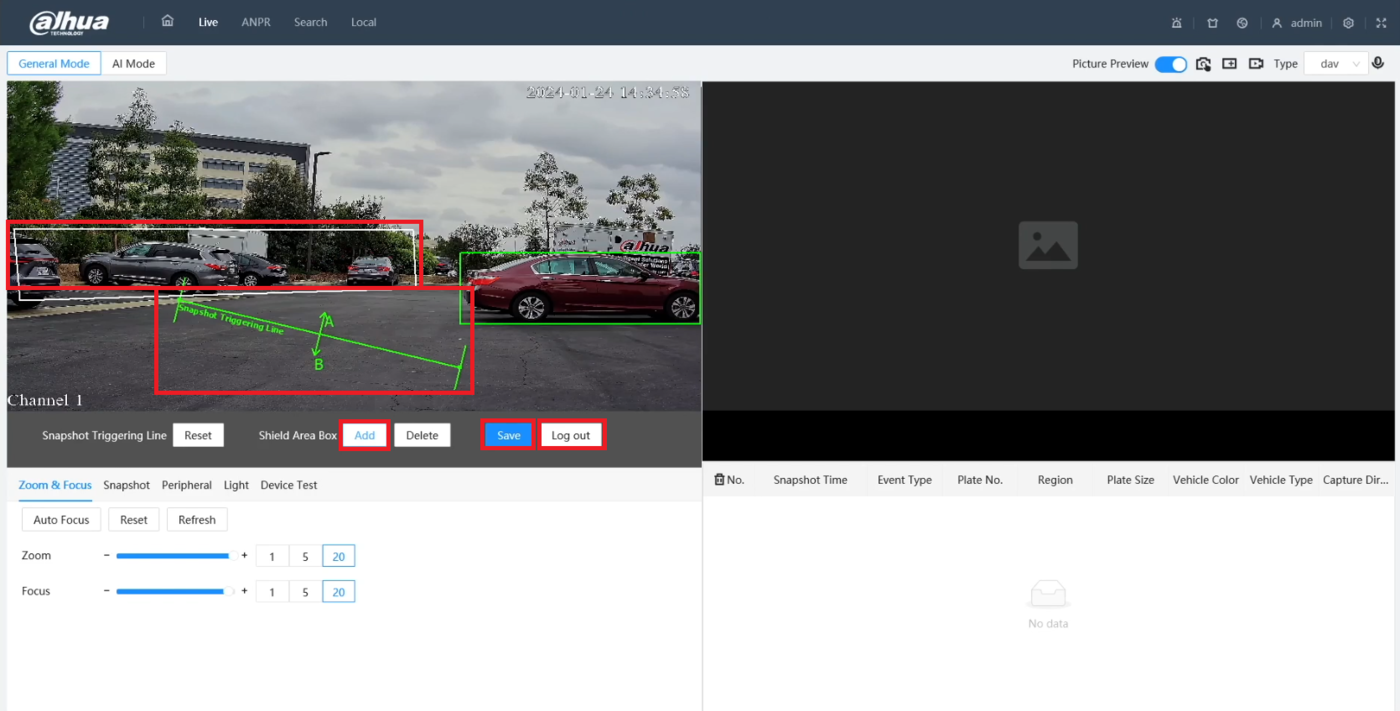
3. Grab the center of the line labeled Snapshot Triggering Line to move it around to where you want it.
Grab the ends of that line to adjust the angle of the snapshot line. This will be the line that triggers license plate snapshots.
For vehicles going toward the camera, that is A to B. For vehicles driving away from the camera, that is B to A.
If you want to block any area from having any license plates captured, click on Add next to Shield Area Box, and then draw a box around the area you want to shield on the live view.
When you are done making changes, click on Save.
Then click on Log Out to finish the editing process
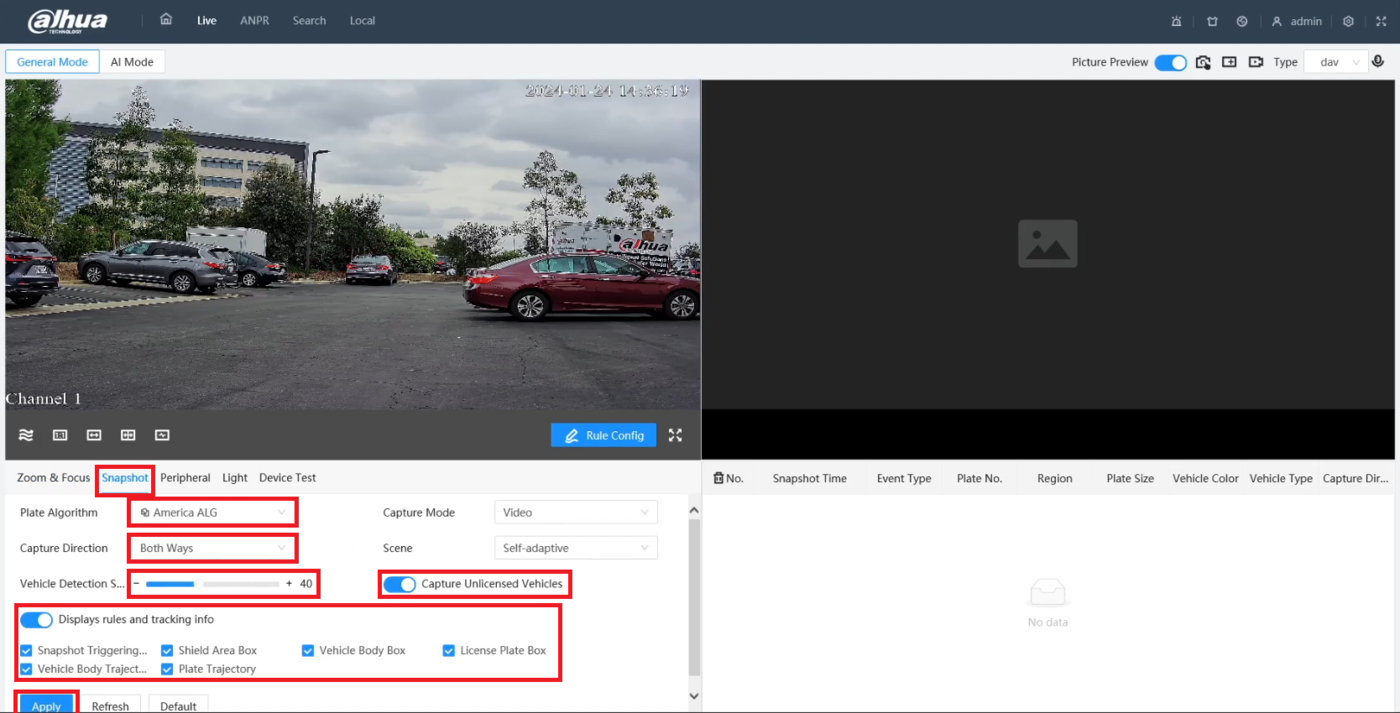
4. Click on Snapshot
To change which country the license plates will be captured from, select it from the drop-down next to Plate Algorithm.
Click on the drop-down next to Capture Direction and choose if you want it to capture license plates going toward the camera, "Approaching", away from the camera, "Departing", or both.
Adjust the slider next to Vehicle Detection Sensitivity for how sensitive the license plate capturing is.
Either enable or disable the slider next to Capture Unlicensed Vehicles depending on if you want it to capture vehicles that cross the triggering line that don't have license plates visible.
Either enable or disable the slider next to Display rules and tracking info depending on if you want the visual data to be displayed on the captured snapshots.
Additionally, if you keep the rules and tracking info turned on, you can check or uncheck the boxes for which rules and tracking info you want saved on the captured snapshots
When you are done making changes, click on Apply at the bottom
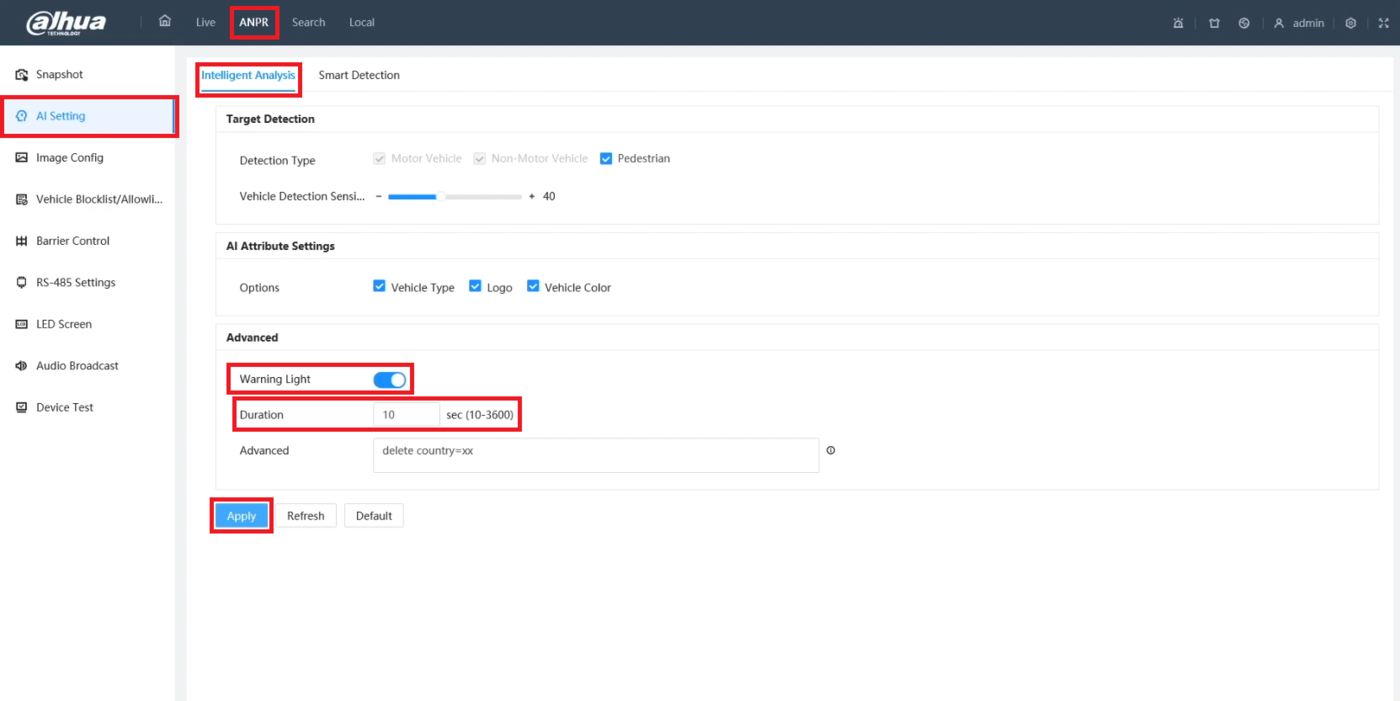
5. Select ANPR at the top.
Then click on AI Setting on the left and Intelligent Analysis at the top.
You can either enable or disable the slider next to Warning Light depending on if you want the red and blue lights on the camera to flash every time it takes a snapshot of a license plate.
If you keep it enabled, you can enter an amount in the field next to Warning Light for how long the lights will flash on the camera, in seconds.
When you are done making changes, click on Apply at the bottom
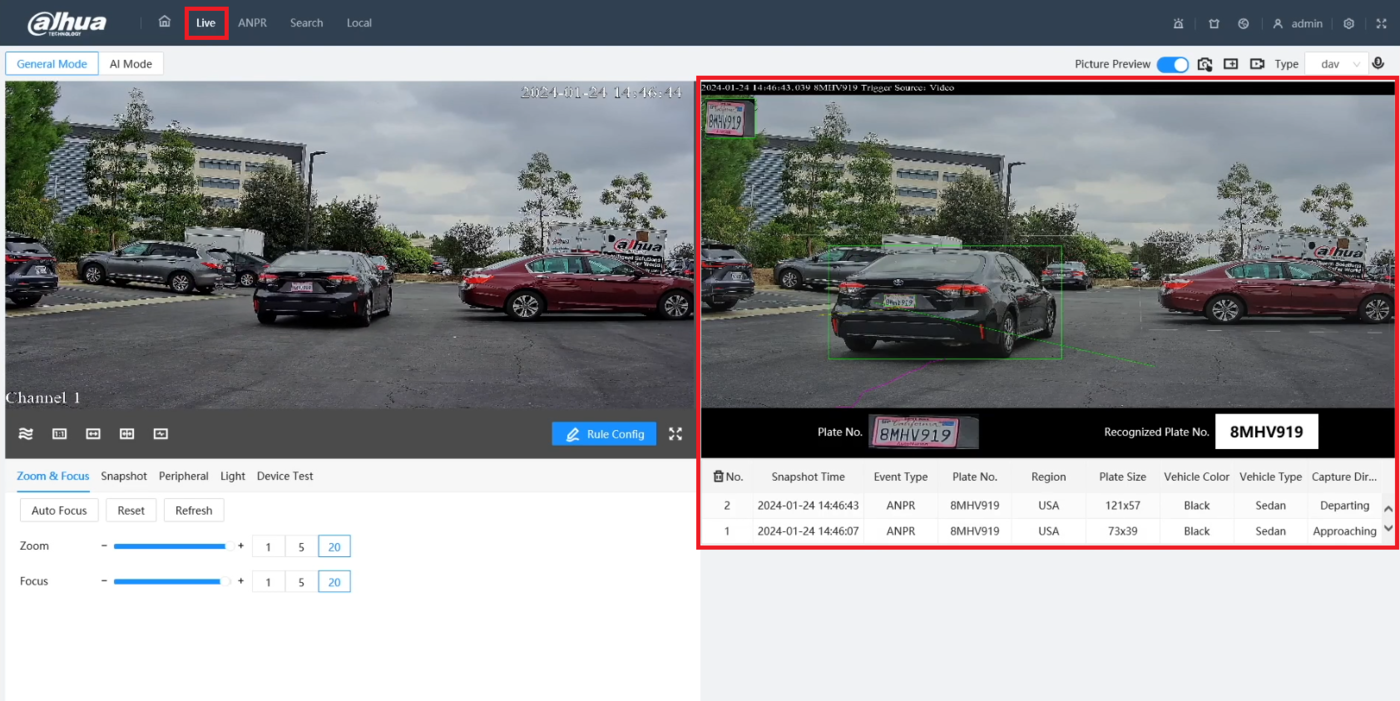
6. Select Live at the top.
As vehicles drive through, you will see the snapshots on the right with the plate number and capture information
