Difference between revisions of "NVR/Backup/Local Backup"
(→Backup via USB) |
|||
| Line 2: | Line 2: | ||
Note: This is for local back up on physical recorder. | Note: This is for local back up on physical recorder. | ||
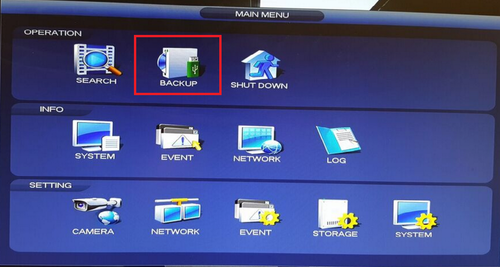
| − | + | 1. From the Main Menu select "Back Up" | |
[[File:localbackup1.png|500px]] | [[File:localbackup1.png|500px]] | ||
| − | + | 2. Plug in USB device such as a flash drive in to one of the USB ports of the recorder. | |
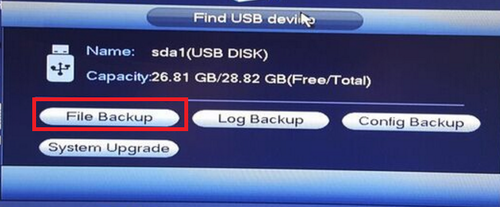
| − | + | 3. A pop up will show → Select "File Back up" | |
[[File:localbackup_2.png|500px]] | [[File:localbackup_2.png|500px]] | ||
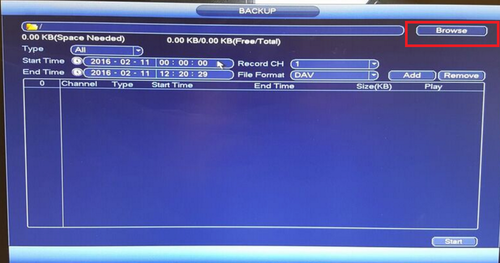
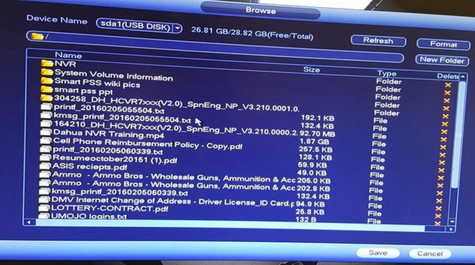
| − | + | 4. Select "Browse" → Select folder to save back file in or create new folder to save back up. | |
[[File:localbackup_3.png|500px]] | [[File:localbackup_3.png|500px]] | ||
| Line 20: | Line 20: | ||
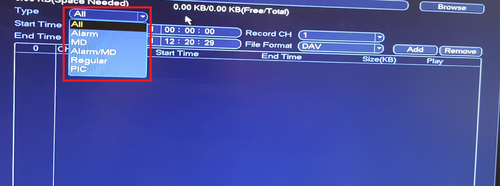
| − | + | 5. Select "Type" such as Alarm or MD (Motion Detect). | |
[[File:localbackup_5.png|500px]] | [[File:localbackup_5.png|500px]] | ||
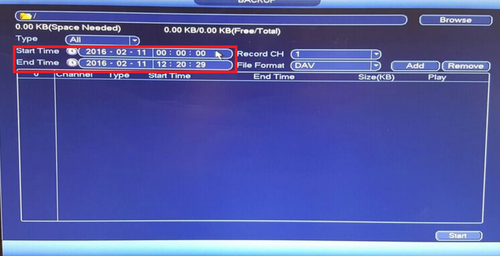
| − | + | 6. Select "Start Time" and "End Time". | |
[[File:localbackup_6.png|500px]] | [[File:localbackup_6.png|500px]] | ||
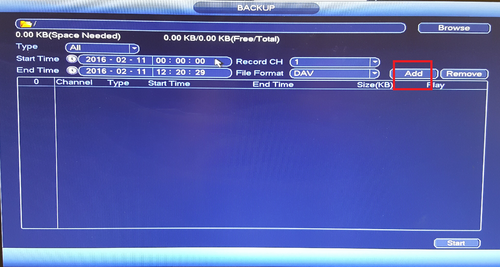
| − | + | 7. Select "Channel" → "Add" to add what you have selected. What you added will be in list form. | |
[[File:localbackup_7.png|500px]] | [[File:localbackup_7.png|500px]] | ||
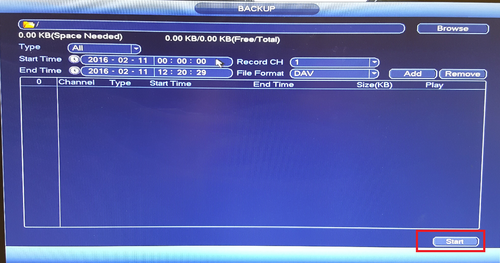
| − | + | 8. Select "Start" to start back up. | |
[[File:localbackup_8.png|500px]] | [[File:localbackup_8.png|500px]] | ||
| Line 44: | Line 44: | ||
===Links=== | ===Links=== | ||
| − | + | ¶¶¶ | |
| − | |||
| − | |||
| − | <DynamicPageList> | + | {| |
| + | |- | ||
| + | ! colspan="3"|Related Articles in [[:Category:Record]] | ||
| + | |- | ||
| + | ||<DynamicPageList> | ||
category = Record | category = Record | ||
count=5 | count=5 | ||
</DynamicPageList> | </DynamicPageList> | ||
| − | + | ||
| − | + | ||
| + | || | ||
<DynamicPageList> | <DynamicPageList> | ||
category = Record | category = Record | ||
| Line 59: | Line 62: | ||
count= 5 | count= 5 | ||
</DynamicPageList> | </DynamicPageList> | ||
| − | |||
| − | |||
| − | <DynamicPageList> | + | ||<DynamicPageList> |
category = Record | category = Record | ||
offset = 10 | offset = 10 | ||
count=5 | count=5 | ||
</DynamicPageList> | </DynamicPageList> | ||
| − | + | ||
| + | |} | ||
Revision as of 14:11, 10 June 2016
Backup via USB
Note: This is for local back up on physical recorder.
1. From the Main Menu select "Back Up"
2. Plug in USB device such as a flash drive in to one of the USB ports of the recorder.
3. A pop up will show → Select "File Back up"
4. Select "Browse" → Select folder to save back file in or create new folder to save back up.
5. Select "Type" such as Alarm or MD (Motion Detect).
6. Select "Start Time" and "End Time".
7. Select "Channel" → "Add" to add what you have selected. What you added will be in list form.
8. Select "Start" to start back up.
Links
¶¶¶
| Related Articles in Category:Record | ||
|---|---|---|
| <DynamicPageList>
category = Record count=5 </DynamicPageList>
|
<DynamicPageList> category = Record offset = 5 count= 5 </DynamicPageList> |
<DynamicPageList>
category = Record offset = 10 count=5 </DynamicPageList> |
