Difference between revisions of "Firmware Update/Firmware Update via Online"
(Created page with "=Recorder Firmware Update via Online= ==Description== This page will show you how to update your Dahua Recorder online. '''Note''': All devices should be "Factory Reset" once...") |
|||
| Line 4: | Line 4: | ||
'''Note''': All devices should be "Factory Reset" once the firmware update is complete. | '''Note''': All devices should be "Factory Reset" once the firmware update is complete. | ||
| − | |||
| − | |||
When the NVR detects there is a newer firmware in the server, a <span style="color: #ff0000;">''''1''''</span> icon will appear at the System icon. | When the NVR detects there is a newer firmware in the server, a <span style="color: #ff0000;">''''1''''</span> icon will appear at the System icon. | ||
The entire process takes about 5 minutes depending on network connection. | The entire process takes about 5 minutes depending on network connection. | ||
| − | |||
| − | |||
| − | |||
| − | |||
| − | |||
| − | |||
| − | |||
==Prerequisites== | ==Prerequisites== | ||
* Dahua device that supports online update | * Dahua device that supports online update | ||
* Internet connection to Dahua device | * Internet connection to Dahua device | ||
| − | |||
| − | |||
| − | |||
| − | |||
==Instructions== | ==Instructions== | ||
| − | |||
| − | |||
| − | |||
| − | |||
| − | |||
<div class="toccolours mw-collapsible mw-collapsed"> | <div class="toccolours mw-collapsible mw-collapsed"> | ||
[[File:Icon_for_type_SystemUI_New.png|250px]]<span style="font-size:180%;">'''SystemUI New'''</span> | [[File:Icon_for_type_SystemUI_New.png|250px]]<span style="font-size:180%;">'''SystemUI New'''</span> | ||
<div class="mw-collapsible-content">{{Template:Update_Firmware_Cloud_SystemUI_NewGUI}}</div> | <div class="mw-collapsible-content">{{Template:Update_Firmware_Cloud_SystemUI_NewGUI}}</div> | ||
| − | |||
| − | |||
| − | |||
| − | |||
| − | |||
</div> | </div> | ||
| Line 47: | Line 24: | ||
<div class="mw-collapsible-content">{{Template:Update_Firmware_Cloud_WebUI_New}}</div> | <div class="mw-collapsible-content">{{Template:Update_Firmware_Cloud_WebUI_New}}</div> | ||
</div> | </div> | ||
| − | |||
| − | |||
| − | |||
| − | |||
| − | |||
| − | |||
| − | |||
| − | |||
| − | |||
| − | |||
| − | |||
| − | |||
| − | |||
| − | |||
| − | |||
| − | |||
| − | |||
| − | |||
| − | |||
| − | |||
| − | |||
| − | |||
| − | |||
| − | |||
| − | |||
| − | |||
| − | |||
| − | |||
| − | |||
| − | |||
| − | |||
| − | |||
| − | |||
| − | |||
| − | |||
| − | |||
| − | |||
| − | |||
| − | |||
| − | |||
| − | |||
| − | |||
| − | |||
| − | |||
| − | |||
| − | |||
| − | |||
| − | |||
| − | |||
| − | |||
| − | |||
| − | |||
| − | |||
| − | |||
| − | |||
| − | |||
| − | |||
| − | |||
| − | |||
| − | |||
| − | |||
| − | |||
| − | |||
| − | |||
| − | |||
| − | |||
| − | |||
| − | |||
| − | |||
| − | |||
| − | |||
| − | |||
| − | |||
| − | |||
| − | |||
| − | |||
| − | |||
| − | |||
| − | |||
| − | |||
| − | |||
| − | |||
| − | |||
| − | |||
| − | |||
| − | |||
| − | |||
| − | |||
| − | |||
| − | |||
| − | |||
| − | |||
| − | |||
| − | |||
| − | |||
| − | |||
| − | |||
| − | |||
| − | |||
| − | |||
| − | |||
| − | |||
| − | |||
| − | |||
| − | |||
| − | |||
| − | |||
| − | |||
| − | |||
| − | |||
| − | |||
| − | |||
| − | |||
| − | |||
| − | |||
| − | |||
| − | |||
| − | |||
| − | |||
| − | |||
| − | |||
| − | |||
| − | |||
| − | |||
| − | |||
| − | |||
| − | |||
| − | |||
| − | |||
| − | |||
| − | |||
| − | |||
| − | |||
| − | |||
| − | |||
| − | |||
| − | |||
| − | |||
| − | |||
Revision as of 17:39, 19 June 2023
Contents
Recorder Firmware Update via Online
Description
This page will show you how to update your Dahua Recorder online.
Note: All devices should be "Factory Reset" once the firmware update is complete.
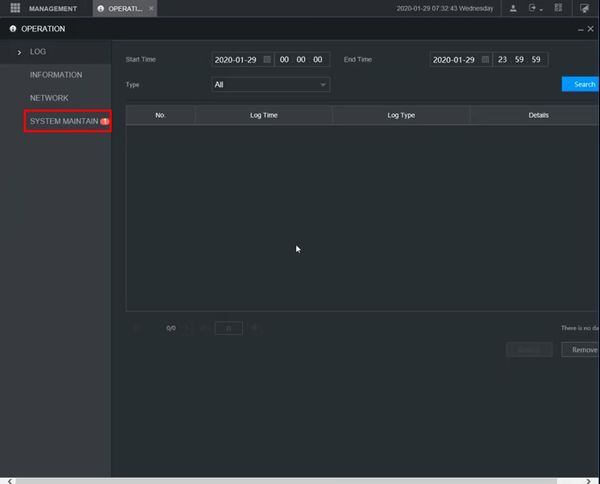
When the NVR detects there is a newer firmware in the server, a '1' icon will appear at the System icon.
The entire process takes about 5 minutes depending on network connection.
Prerequisites
- Dahua device that supports online update
- Internet connection to Dahua device
Instructions
Prerequisites
- Dahua device with internet connection
Video Instructions
Step by Step Instructions
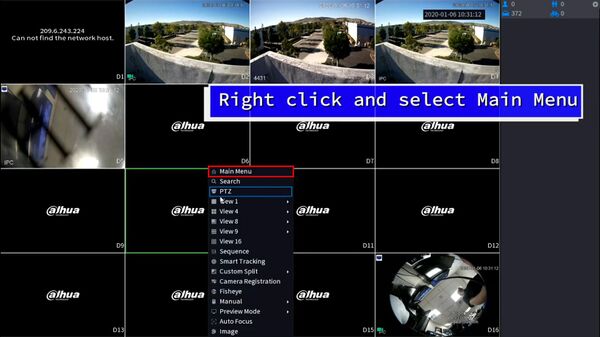
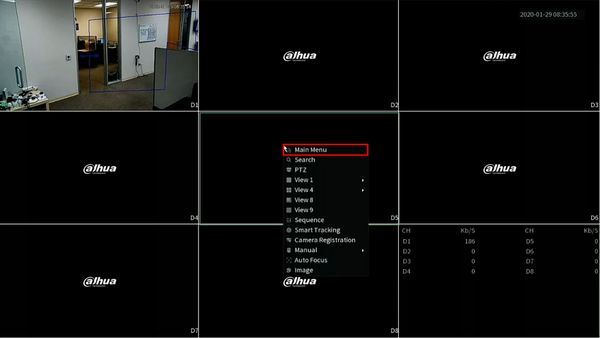
1. From Live View
Right click, select Main Menu
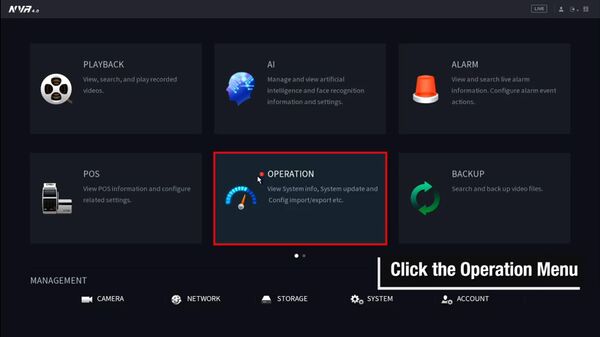
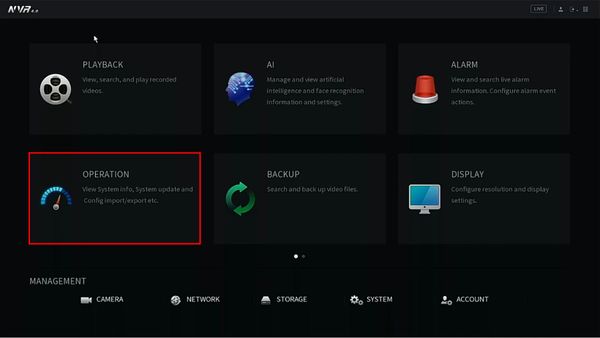
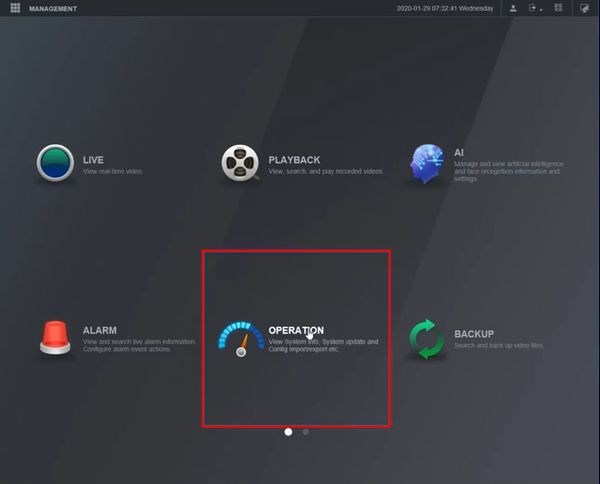
2. Click Operation
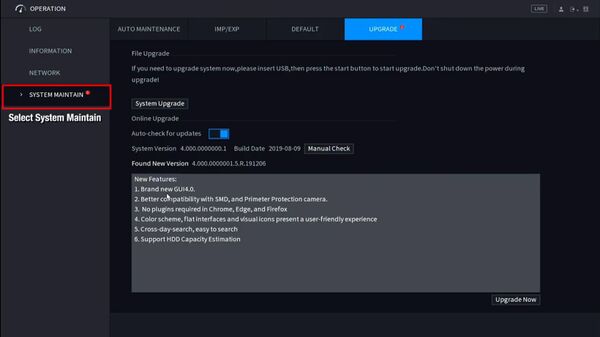
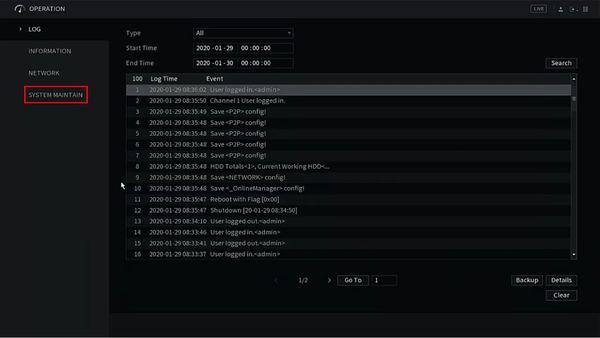
3. Click System Maintain
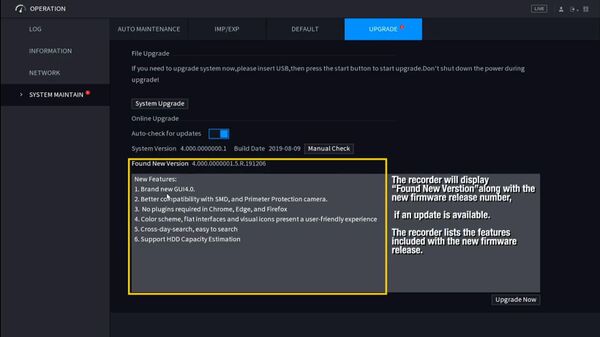
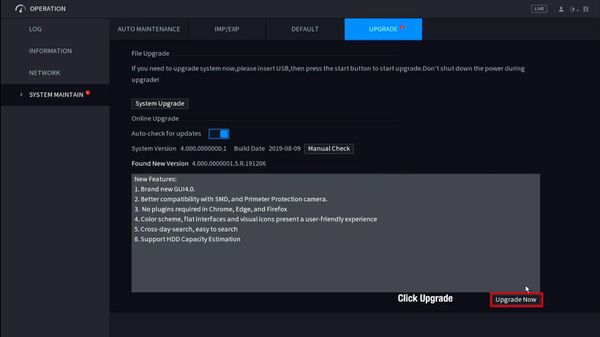
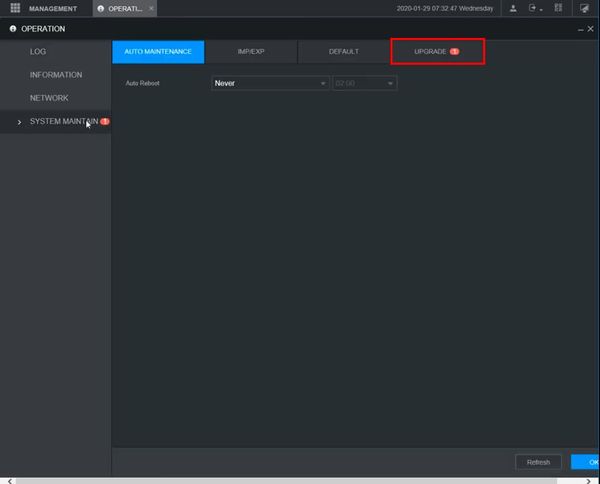
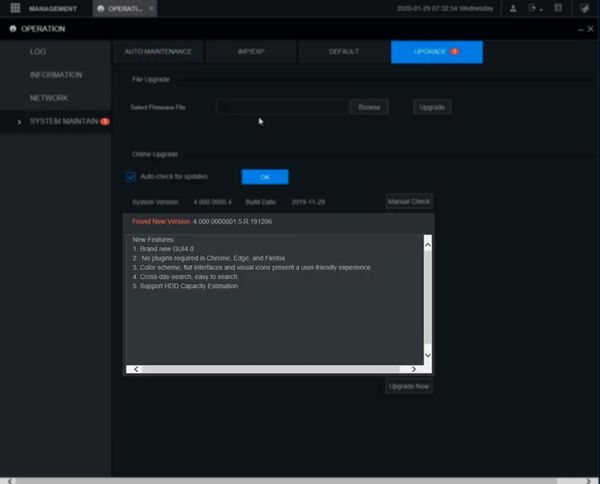
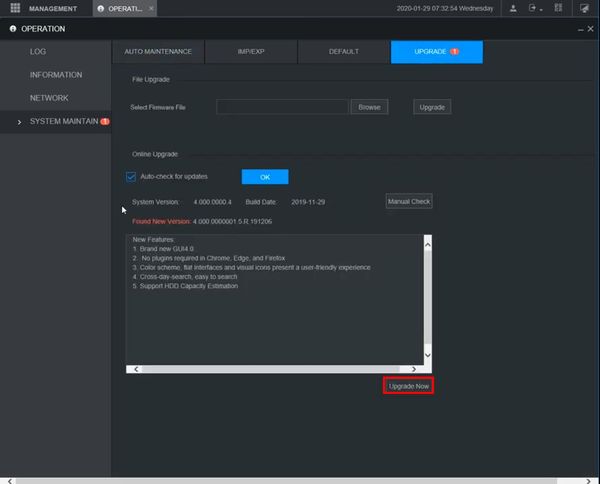
4. The upgrade menu will show if a new firmware version is available
5. Click Upgrade Now to begin the update process
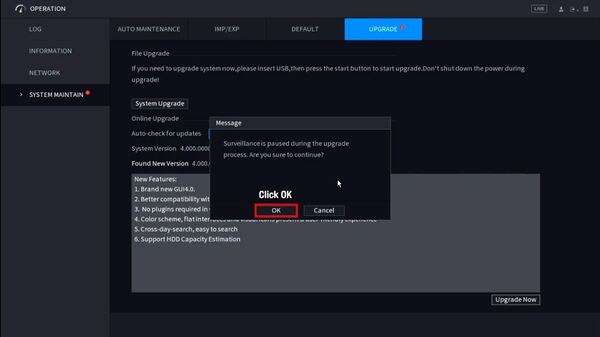
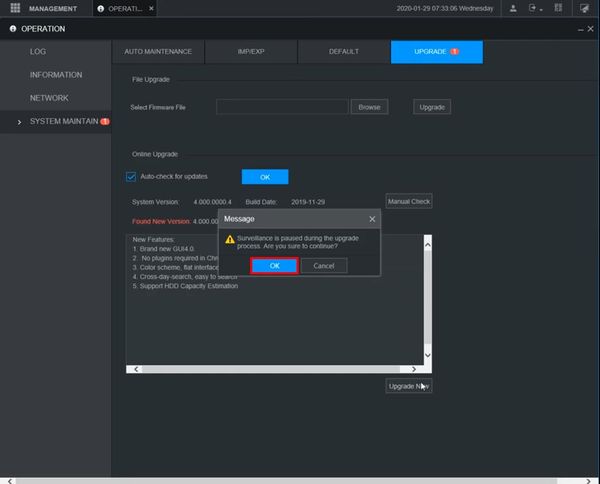
6. A prompt will appear to confirm that Surveillance will be paused during the upgrade process
Click OK
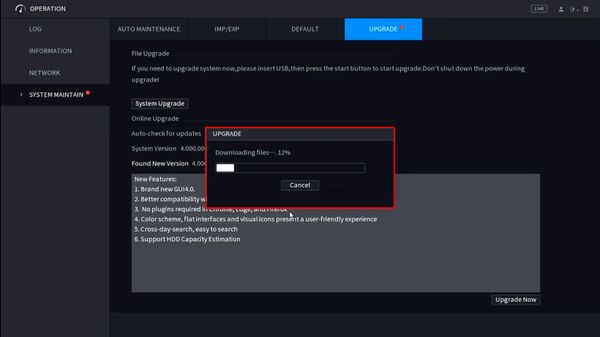
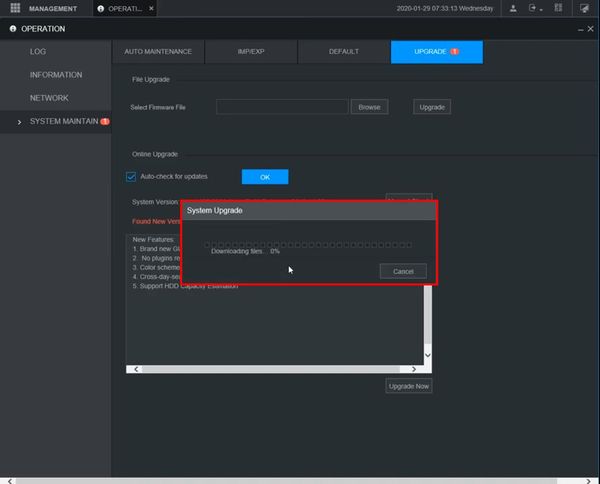
7. The firmware file will begin to download
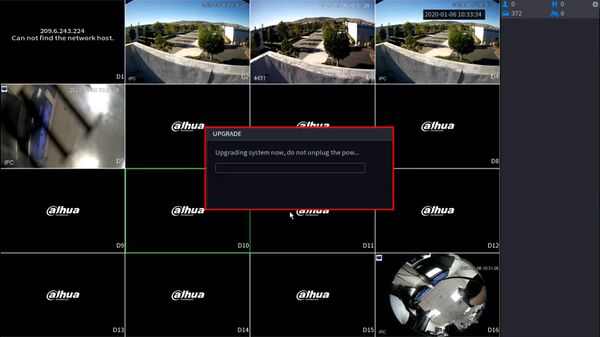
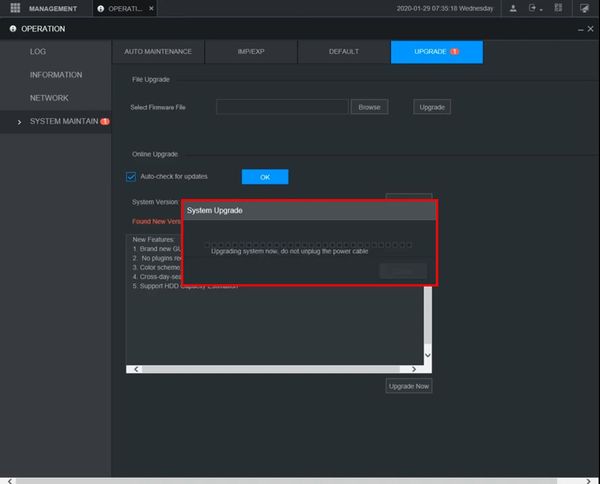
8. After the download is complete the unit will automatically begin the firmware upgrade
9. The unit will reboot as the final step of the upgrade
10. Once the firmware update is complete the unit will reboot. A factory default is recommended after a firmware update
From Live View, right click Select Main Menu
11. Click Operation
12. Click System Maintain
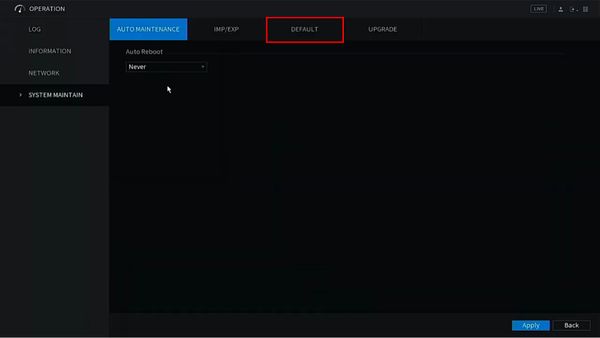
13. Click Default
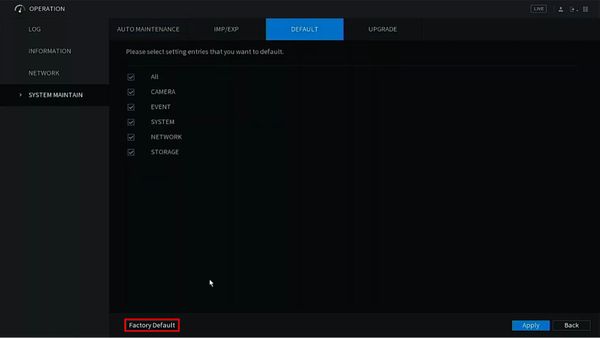
14. Click Factory Default
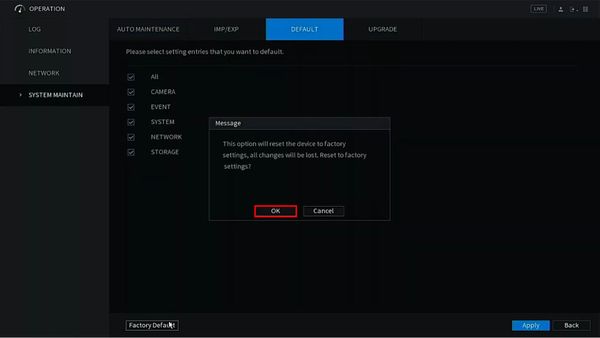
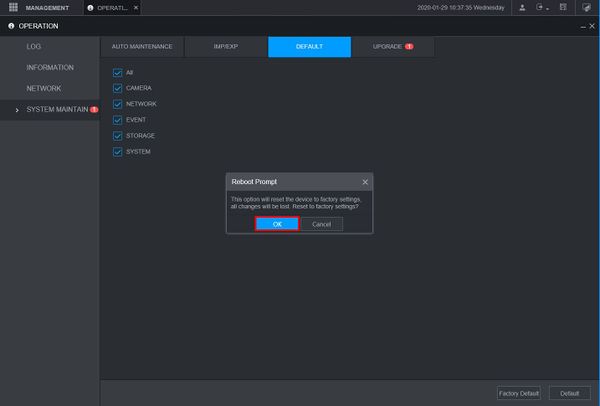
15. A prompt will appear to confirm the factory default
Click OK
16. The unit will reboot
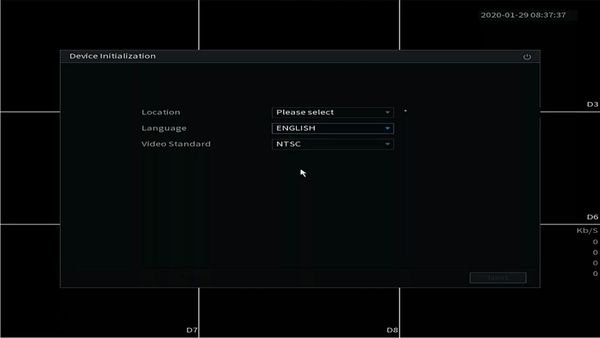
17. When the unit boots back up it will be factory defaulted and ready for the Device Initialization process
Prerequisites
- Dahua device with internet connection
- Local Windows computer
Video Instructions
Step by Step Instructions
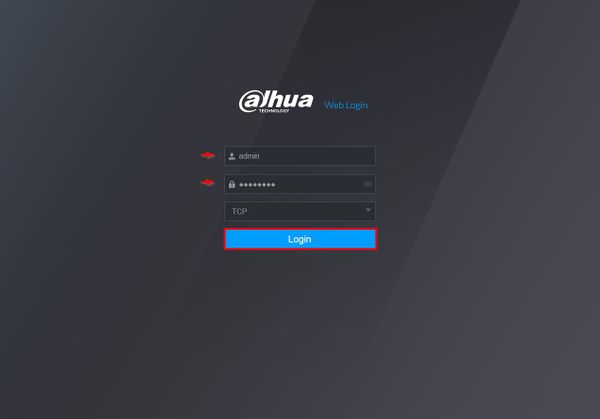
1. Enter the IP of the device into a browser
At the Web Login
Enter the Username and Password
Click Login
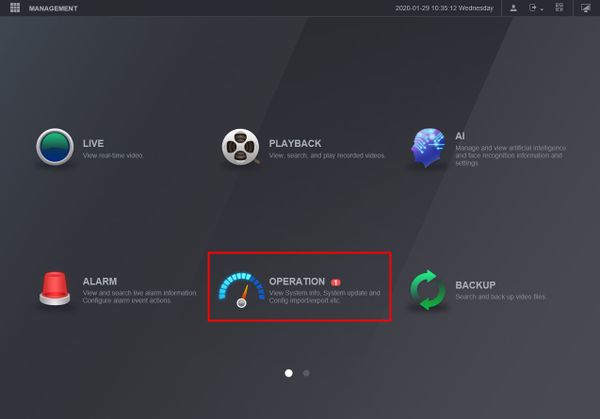
2. Click Operation
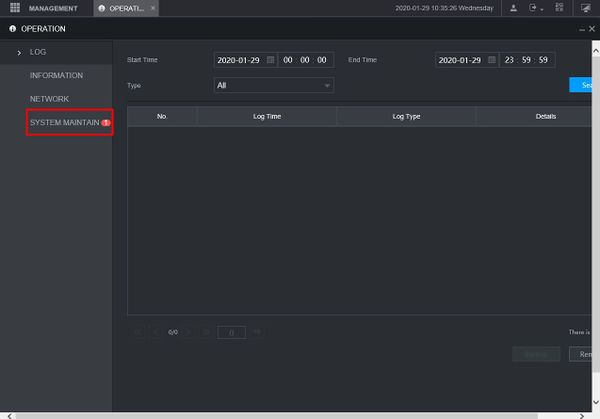
3. Click System Maintain
4. Click Upgrade
5. The upgrade menu will show if a new firmware version is available
6. Click Upgrade Now
7. A prompt will appear to confirm that Surveillance will be paused during the upgrade process
Click OK
8. The firmware file will begin to download
9. After the download is complete the unit will automatically begin the firmware upgrade
10. Once the firmware update is complete the unit will reboot. A factory default is recommended after a firmware update
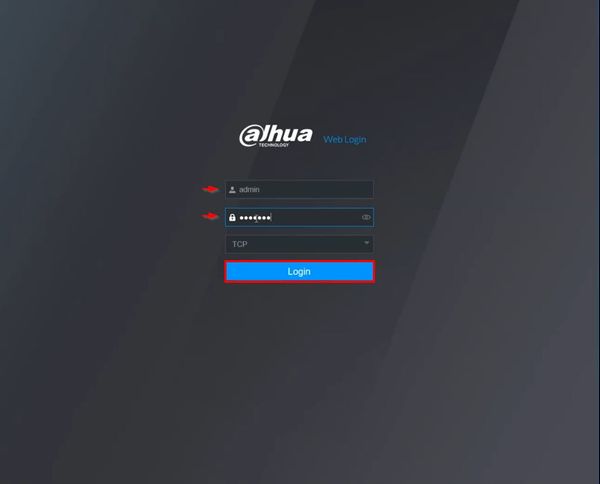
Enter the IP of the device into a browser
At the Web Login
Enter the Username and Password
Click Login
12. Click Operation
13. Click System Maintain
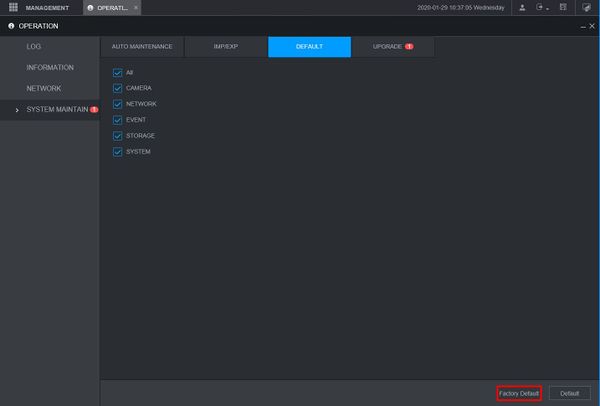
14. Click Default
Click Factory Default
15. A prompt will appear to confirm the factory default
Click OK
The unit will factory default and reboot
When the unit boots back up it will be factory defaulted and ready for the Device Initialization process