Difference between revisions of "IPCamera/TiOC/IP TiOC Camera IVS Setup"
(Created page with "==IP TiOC Camera IVS Setup== ===Description=== This guide will show you how to setup IVS on an IP TiOC Camera ===Prerequisites=== * Dahua IP TiOC Camera * PC ===Step by Ste...") |
|||
| Line 16: | Line 16: | ||
<br>Click on '''Save''' | <br>Click on '''Save''' | ||
| − | [[file:TiOCWebSetup1.png| | + | [[file:TiOCWebSetup1.png|1200px]] |
2. Click on '''IVS''' on the left. | 2. Click on '''IVS''' on the left. | ||
| Line 25: | Line 25: | ||
<br>If you want the light(s) to flash when the IVS rule is triggered, check the '''Warning Light''' box. Then click the '''Mode''' drop-down for how you want the light to flash. Click the Flicker Frequency drop-down to choose how fast the light flickers (if you chose Flicker as the Mode). Then type in the amount of time you want the lights to flash in the '''Duration''' field. If you want to adjust when the light will flash click on the '''Period''' button at the bottom and adjust the schedule. | <br>If you want the light(s) to flash when the IVS rule is triggered, check the '''Warning Light''' box. Then click the '''Mode''' drop-down for how you want the light to flash. Click the Flicker Frequency drop-down to choose how fast the light flickers (if you chose Flicker as the Mode). Then type in the amount of time you want the lights to flash in the '''Duration''' field. If you want to adjust when the light will flash click on the '''Period''' button at the bottom and adjust the schedule. | ||
| − | [[file:TiOCWebSetup2.png| | + | [[file:TiOCWebSetup2.png|1200px]] |
3. Click the '''Draw Rule''' button below the live view. | 3. Click the '''Draw Rule''' button below the live view. | ||
| Line 31: | Line 31: | ||
<br>Click '''Save''' at the bottom | <br>Click '''Save''' at the bottom | ||
| − | [[file:TiOCWebSetup3.png| | + | [[file:TiOCWebSetup3.png|1200px]] |
Revision as of 19:03, 19 June 2023
IP TiOC Camera IVS Setup
Description
This guide will show you how to setup IVS on an IP TiOC Camera
Prerequisites
- Dahua IP TiOC Camera
- PC
Step by Step Instructions
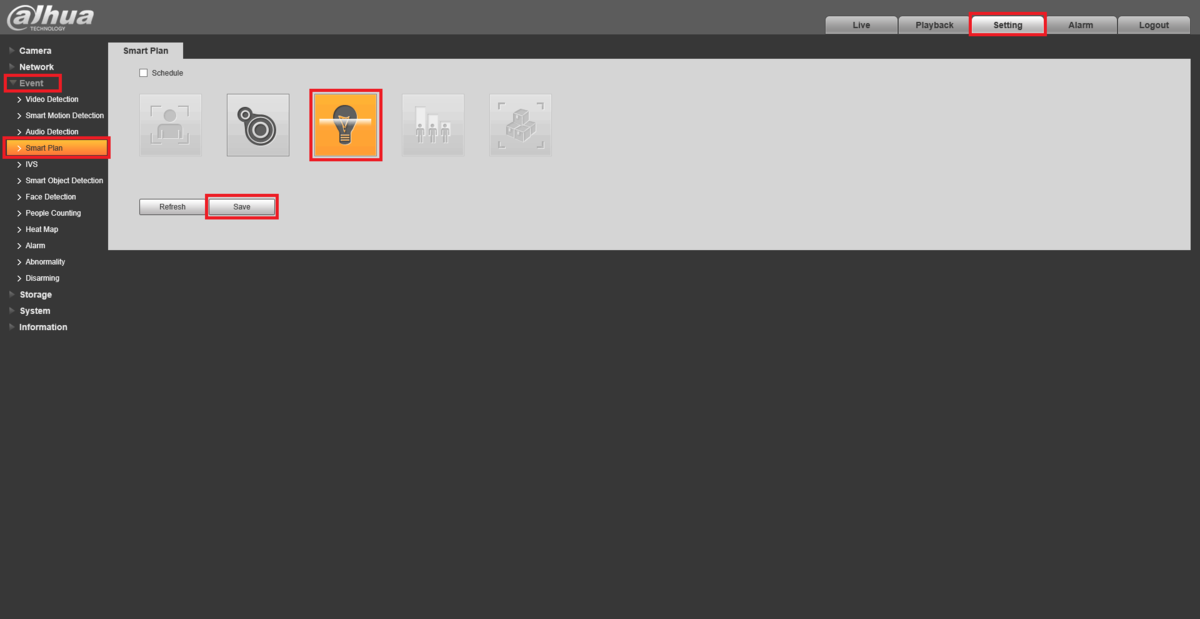
1. Log into the web interface of the TiOC Camera.
Click on the Setting tab at the top.
Expand the Event section on the left.
Select Smart Plan under that.
Click on the IVS Lightbulb icon so that it's highlighted Orange.
Click on Save
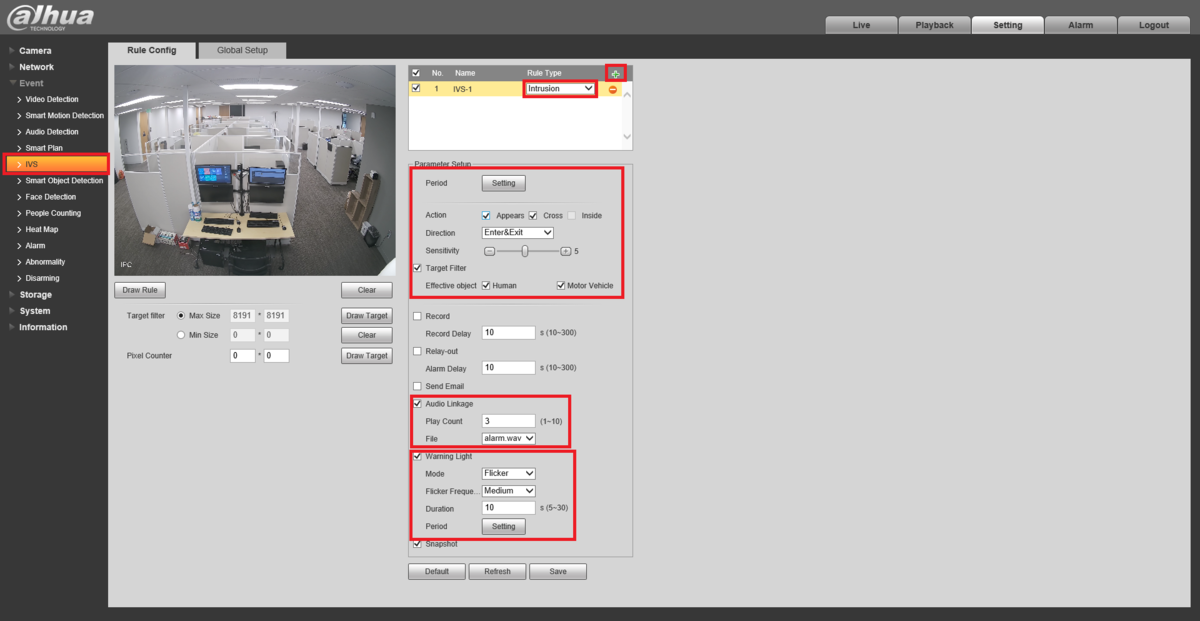
2. Click on IVS on the left.
Press the green + button at the top.
Click on the drop-down under Rule Type and choose the type of IVS rule you want to setup.
Under Parameter Setup set the Period, Action, Direction, Sensitivity, and Target Filter options.
If you want audio to play when the IVS rule is triggered, check the Audio Linkage box. Then type in the number of times you want the audio to play next to Play Count. And then choose the audio file you want to play from the File drop-down.
If you want the light(s) to flash when the IVS rule is triggered, check the Warning Light box. Then click the Mode drop-down for how you want the light to flash. Click the Flicker Frequency drop-down to choose how fast the light flickers (if you chose Flicker as the Mode). Then type in the amount of time you want the lights to flash in the Duration field. If you want to adjust when the light will flash click on the Period button at the bottom and adjust the schedule.
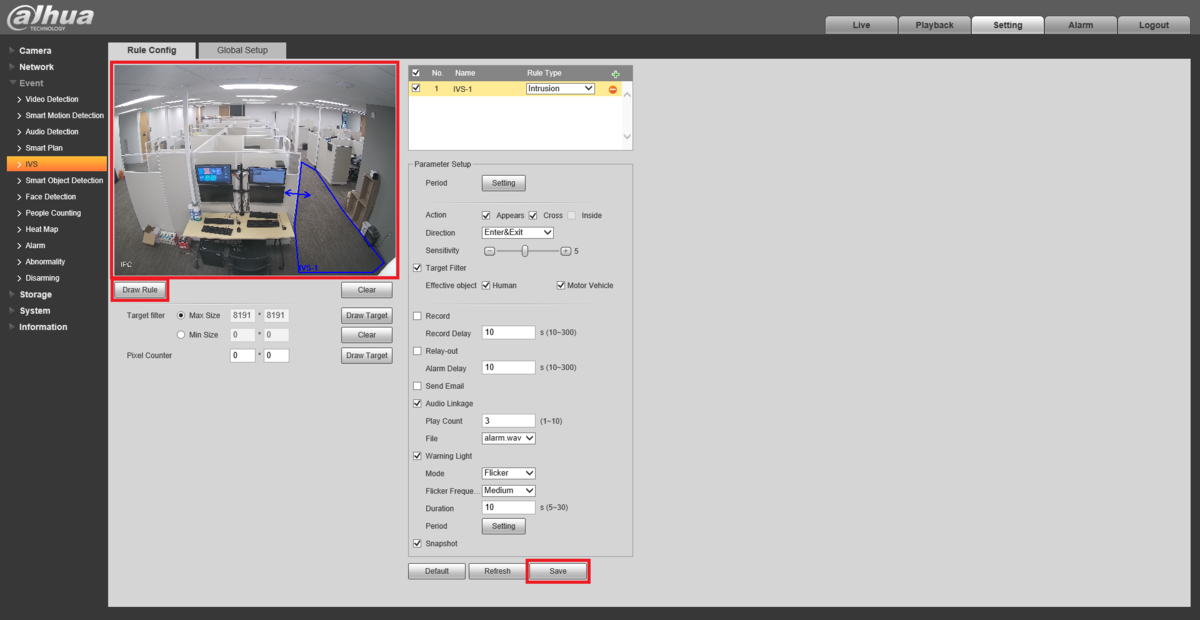
3. Click the Draw Rule button below the live view.
Then left click on the live view to start drawing the IVS rule. Keep left clicking for new segments of the rule. Right click to finish drawing the rule.
Click Save at the bottom


