Video Intercom/VideoAC Intercom DSS
Contents
Description
This article will go over the setup of our Video Access Controller to be used as an Intercom in Combination with DSS Pro v8.4 and the DSS Agile VDP App
DSS Pro V8 will be acting as our SIP Server. The Intercom devices will need to point to the system user on DSS Pro V8.
system user is mainly used for server maintenance. For live monitoring you will want to create a new user with Muilt-client Login disabled.
Prerequisites
- Latest Configtool
- DSS Pro V8 *With the necessary licenses
- DHI-ASI8213SA-W
Step by Step Instructions
Initializing the Video Intercom Devices
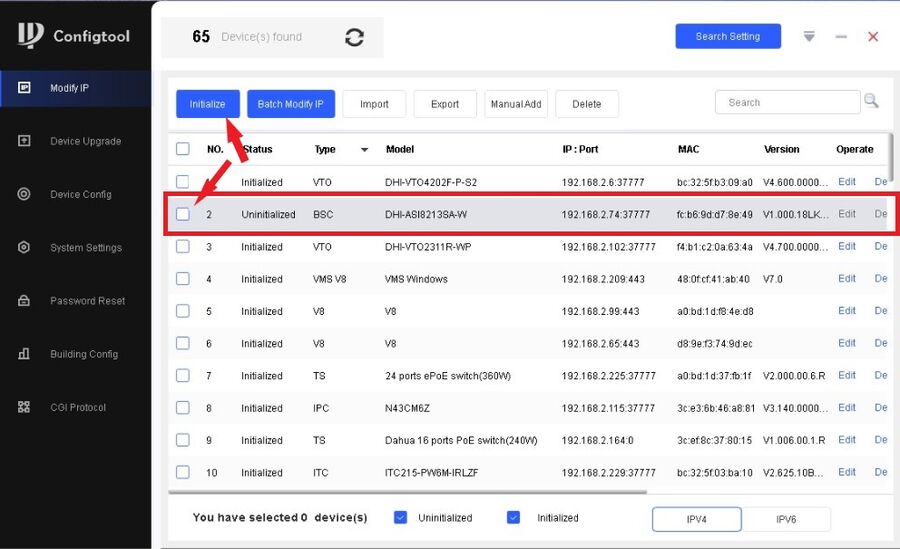
1. Open Configtool and initialize the Video Access Controller first. Add a checkmark to all the Video Access Controllers on your network and click on Initialize. (In this case we just have the one)
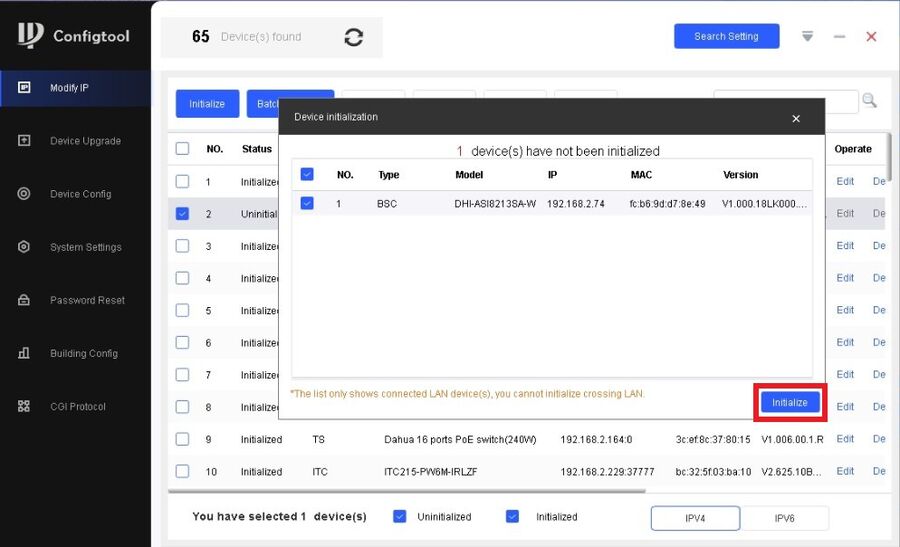
2. Click on Initialize again
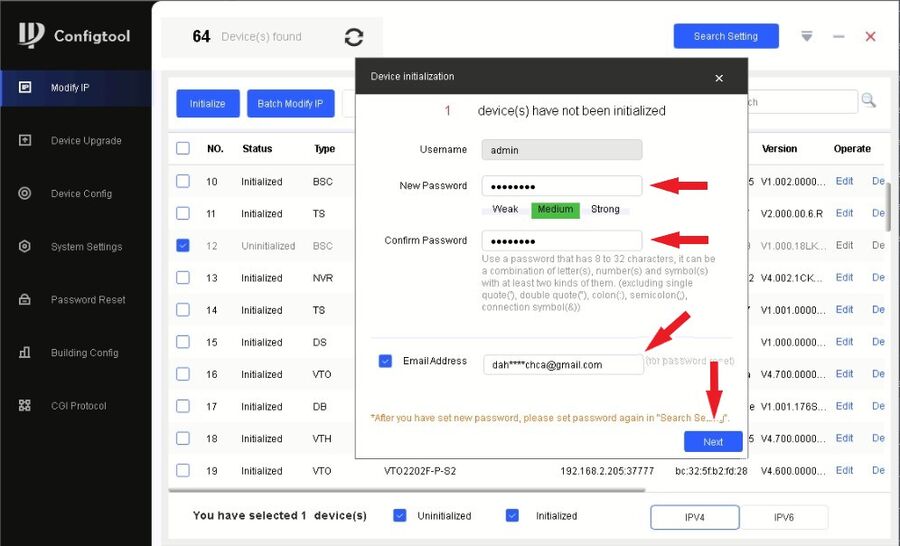
3. Enter the password and confirm it. Do NOT forget to enter an email. Entering an email will help you reset the password when needed. Click on Next to proceed.
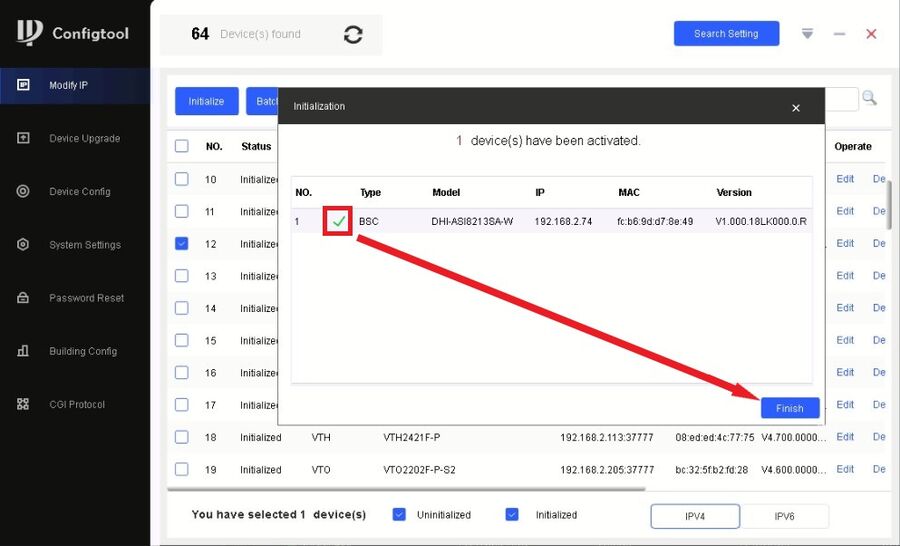
4. Click on Finish once you see the green check marks.
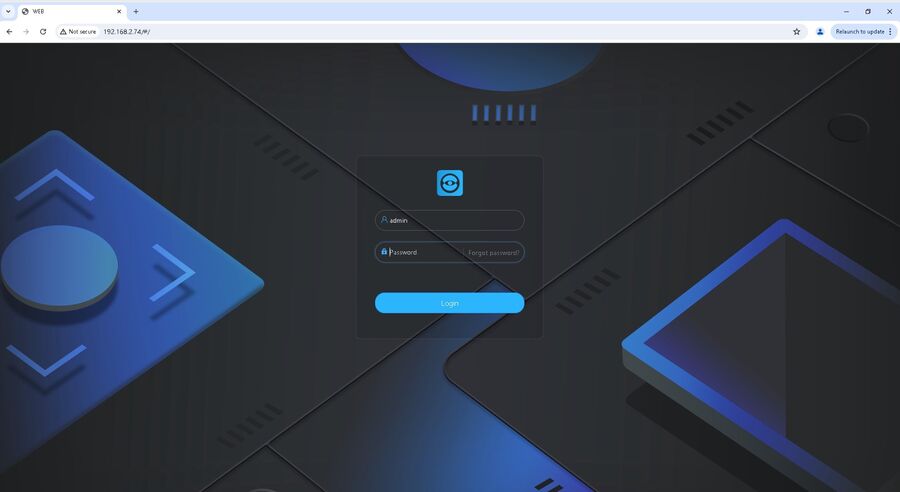
5. Now we need to log into the WebUI of the DHI-ASI8213SA. Go to your browser such as chrome, and then enter the IP Address and you will get to a login page like below. Login with the Admin and the password you created during the initialization.
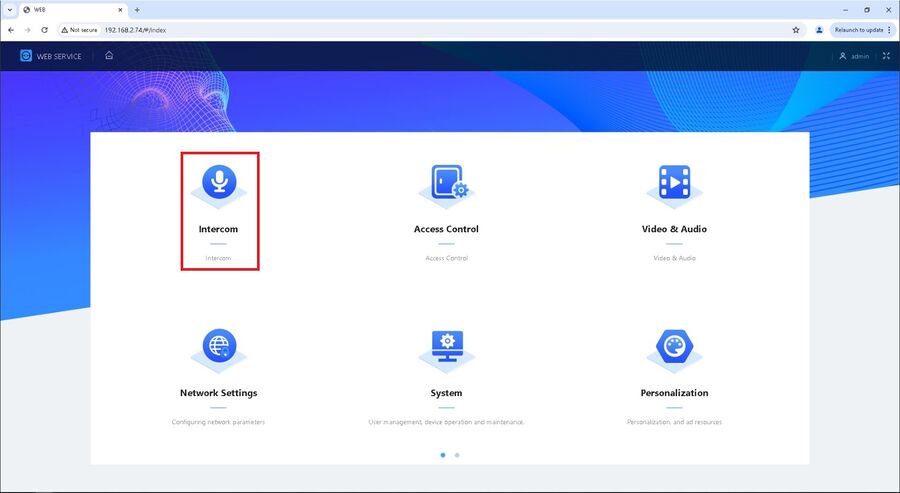
6. Next we want to go to the Intercom section.
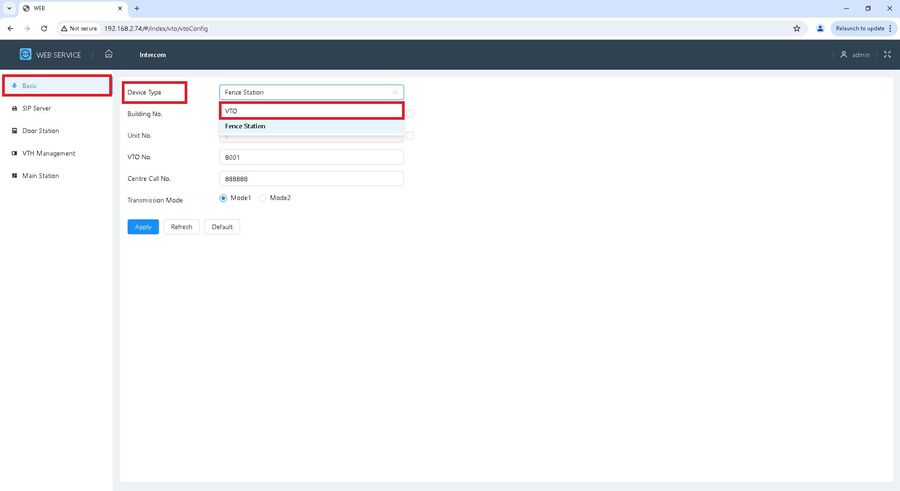
7. Once in the intercom section, you want to be on the "Basic" section. From here click the device type drop down, and choose the VTO option.
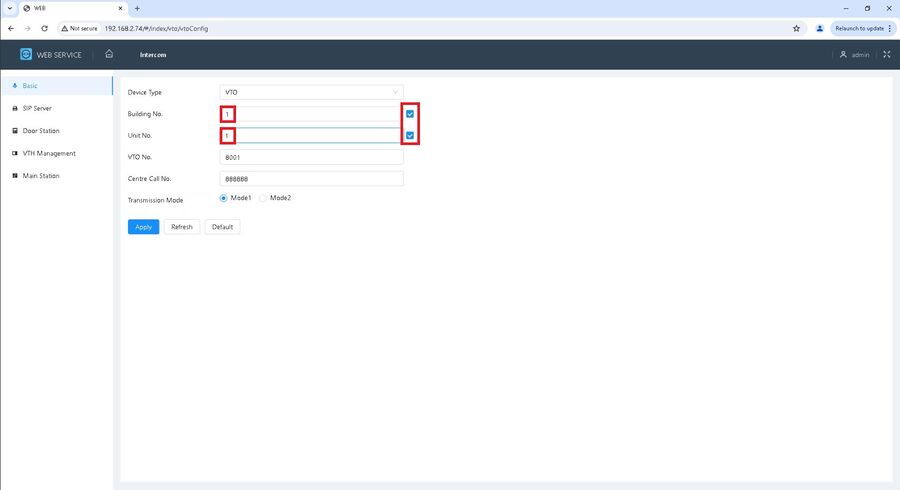
8. Next what we want to do is put a check in the boxes to the right of the Building No. and the Unit No. Now that you have checks in those boxes you can provide a building number and Unit Number. Since we only have 1 device, it doesn't really matter what we put there, but if you were using multiple of these you would want to make sure you change the 8001 to 8002, 8003 etc on additional units. The building information is a requirement for DSS, but also allows you to layout the location of the devices. As an example you may have 3 buildings with one of these in each, to make it easier for you to know which one, you could give one of them building 1, the 2nd building 2 and so on.
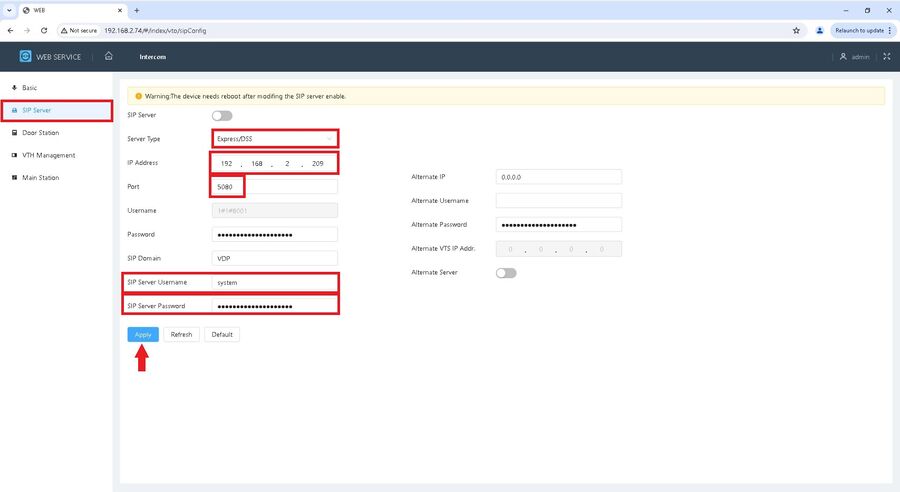
9. The next step is to click on the "SIP Server" option on the left. Once there, you will want to make sure your "Server Type" is set to Express/DSS. Then you want to input the IP Address of your DSS Server as the DSS Server will be acting as the SIP. You want to match your port to be the same as the SC Port on DSS, the default is 5080. The last thing you need to make sure is correct is the SIP Username and Password. The SIP user and password will be the same credentials you use to login as the system user to DSS. Once you fill out the boxes I have highlighted you can then click apply to save.
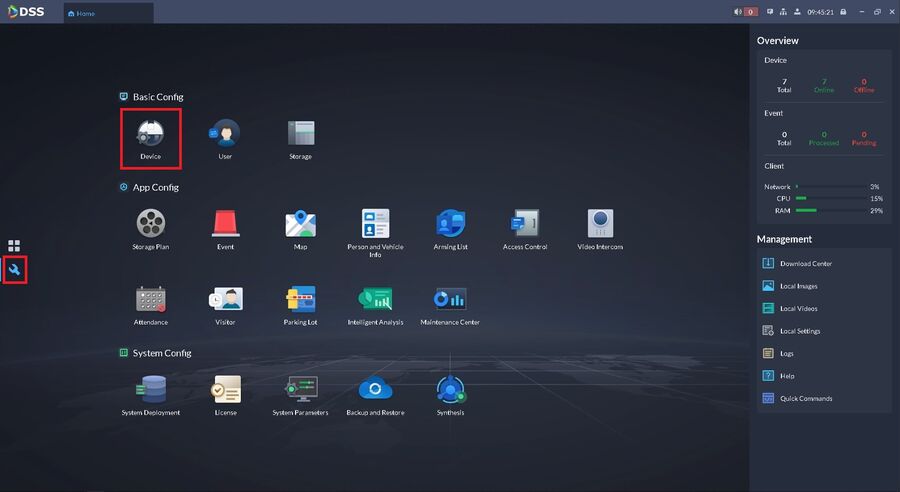
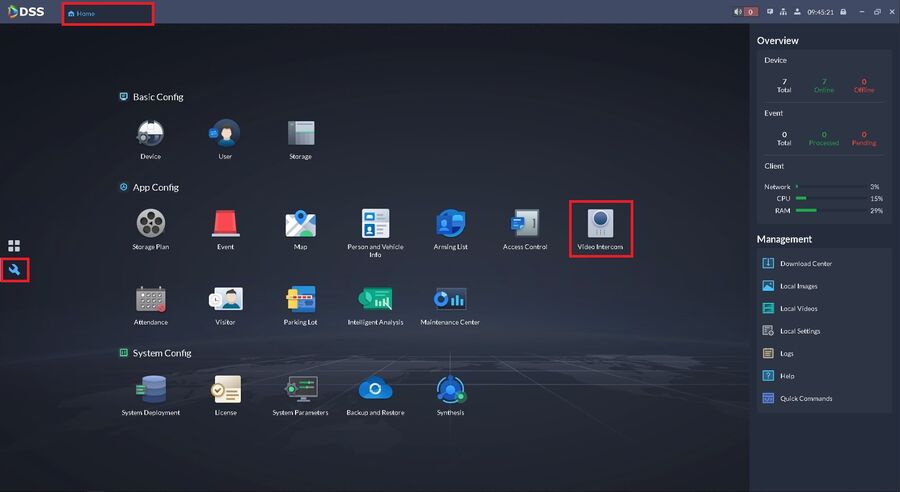
10. The next step is to load into your DSS v8 client, click the little wrench to go down to the other options. Then click on Devices to load into the location to add devices.
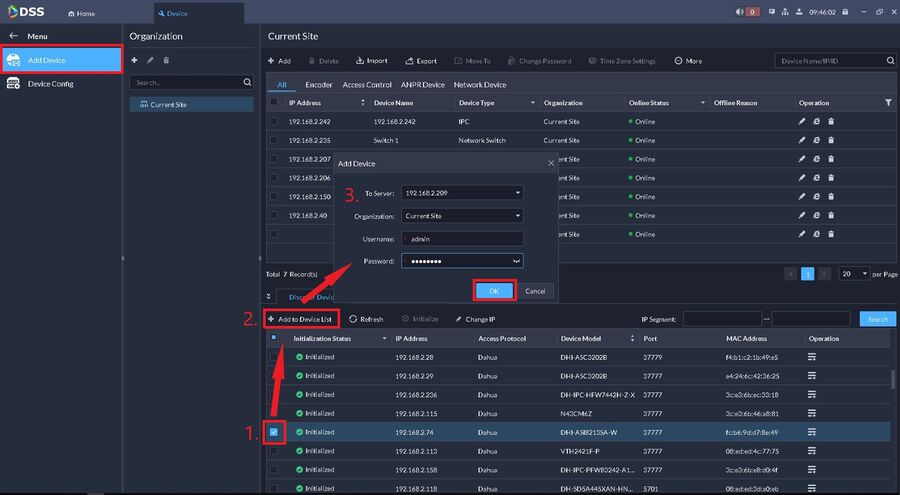
11. On the device page make sure you are on the "Add Device" page. Then from here at the bottom you want to look through your list of devices until you find the device you want to add. You then want to add a check to the device and click on "Add to Device List". After you click on that it will pop up with the add device box. fill in the username and password and click ok. You should now see your device added in the top section with a green dot.
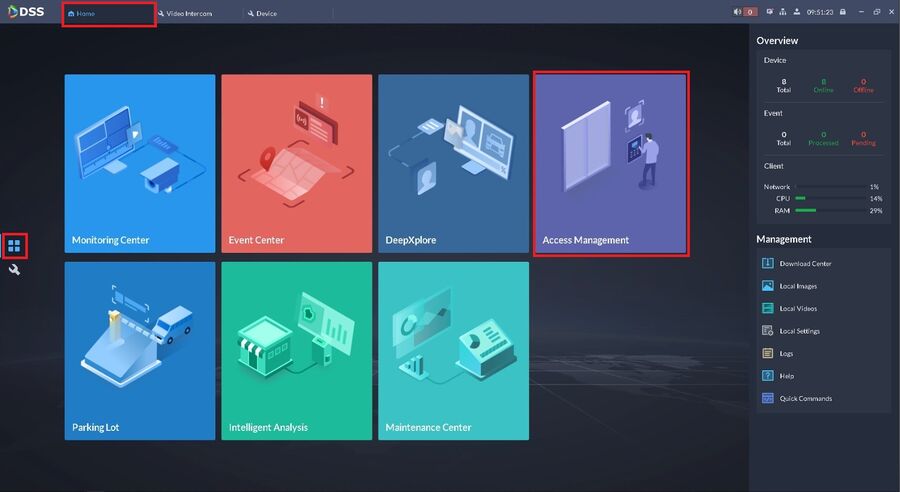
12. Now we want to check if the device is showing communicating with the SIP Server. Click the home tab at the top, then make sure you are on the 4 square option on the left. From there you want to click on Access Management.
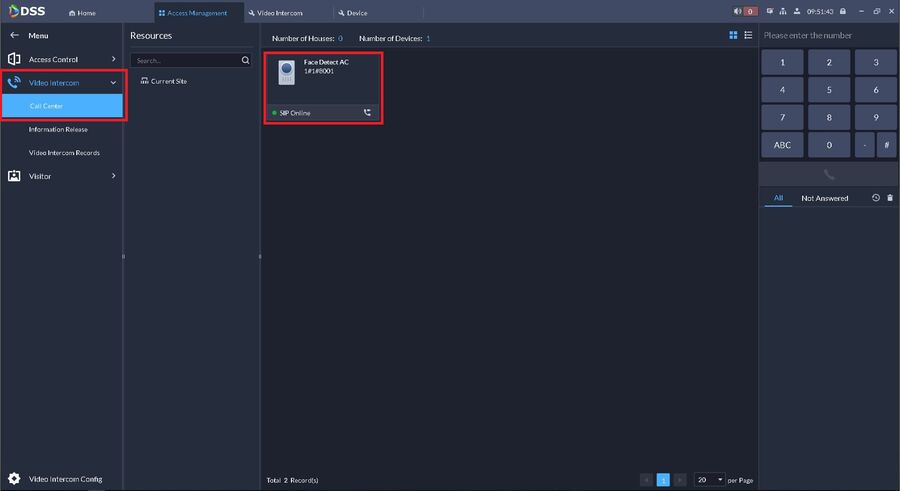
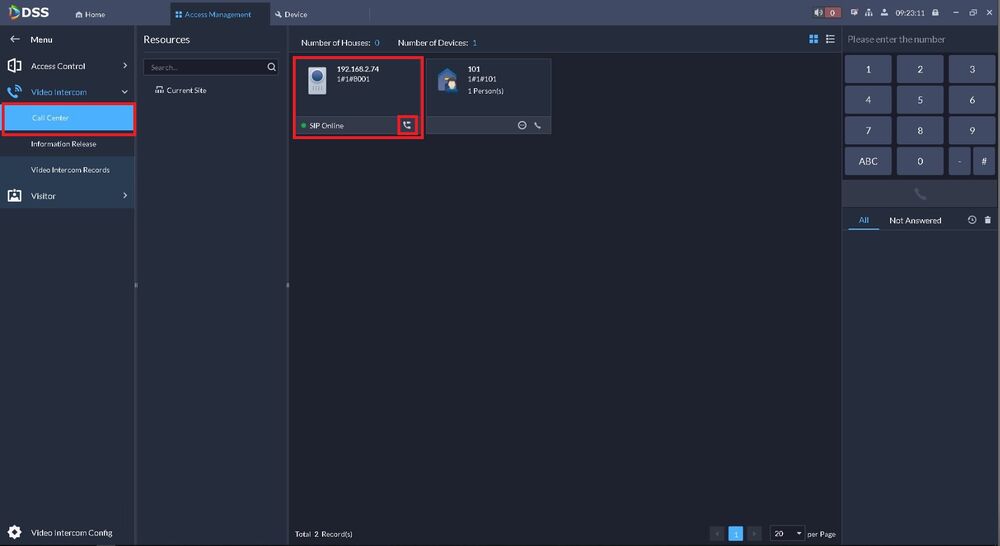
13. Once in Access Management, click on the Video Intercom section and then choose "Call Center". On the right you should see the Intercom device and we want to make sure it shows SIP Online.
14. Now we want to go to the video intercom section to check a couple settings. You want to click Home along the top again, then the wrench on the left, and then choose the Video Intercom option.
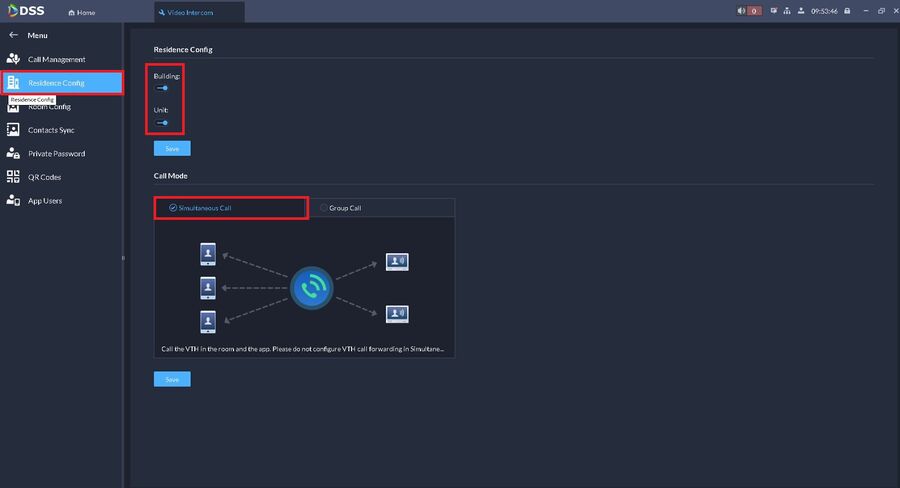
15. Once in the Video Intercom section, we want to choose the Residence Config on the left. We want to make sure that the building and unit toggles are turned on. Then below that we need to make sure that it is set to Simultaneous call.
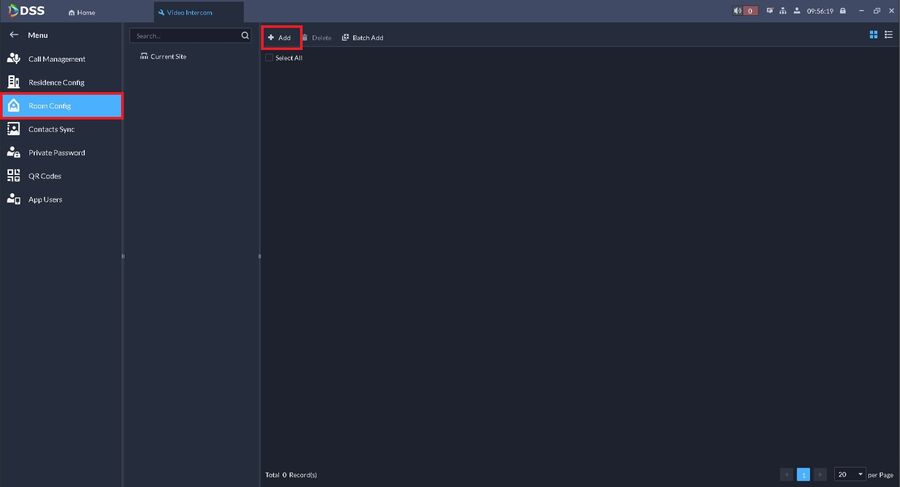
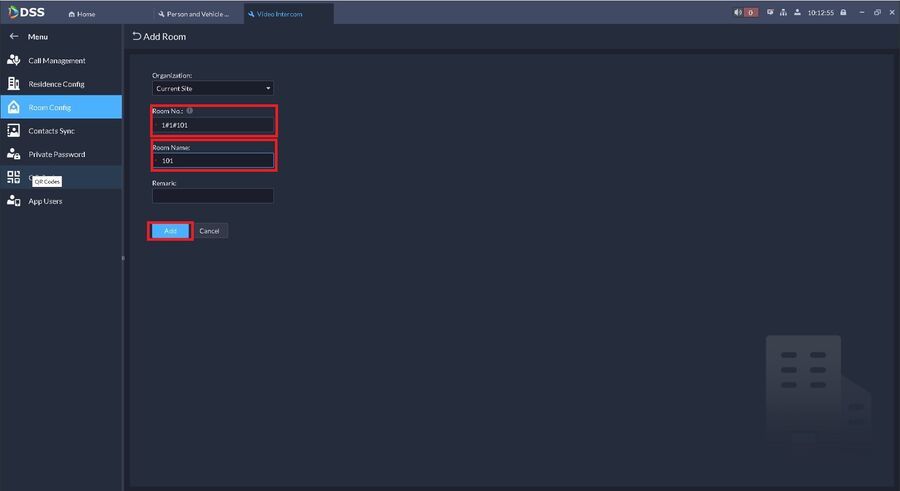
16. Now we want to go to "Room Config" on the left to create rooms that we can use for the DSS Agile App. Once in room config, click the add button to start adding rooms.
17. The room information will follow the same pattern as the intercom. We previously had set the actual intercom at Building 1 and Unit 1, so we will do the same here 1#1# and then after that give it a room number. The room number can be pretty much anything you want, in this case I set it as 101. Also its a good idea to set a good room name to make it easy to know when you see it on the intercom contacts list. I used 101 which is universal, but if this is used on the outside of an apartment, it may be easier to put in the tenants name etc. Once you have filled it in, you can click add.
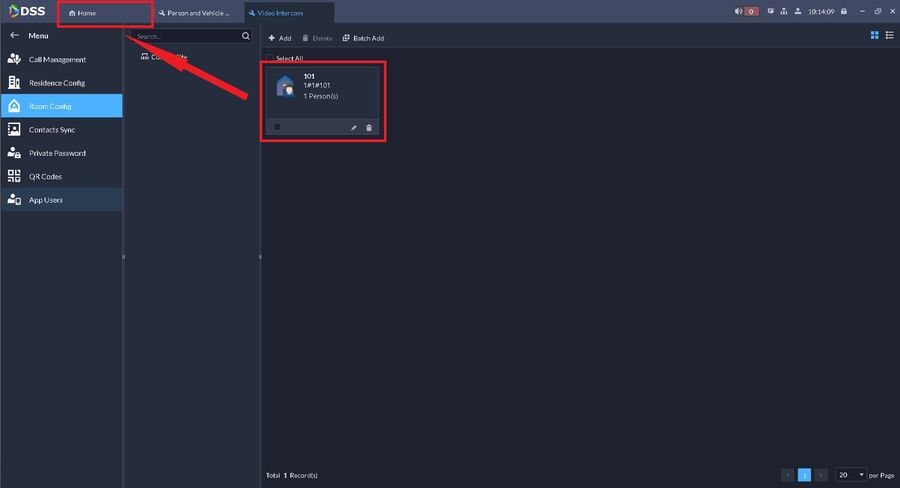
18. You will now see the room you have created, of note mine shows 1 person already in the room, however yours should show as 0 right after creating. If you need to create more rooms you can do so before moving on from this page. Once you have created all the rooms you need, from here you can click on the home button to get back to the main menu.
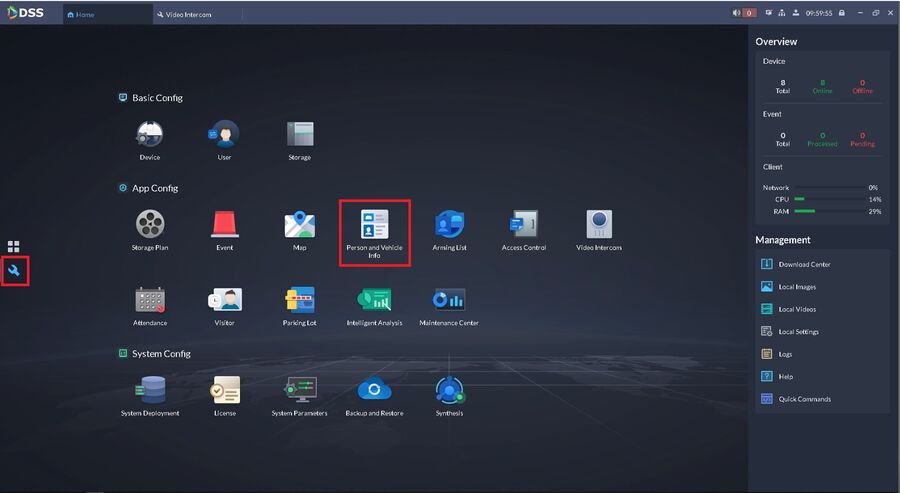
19. From the main menu, make sure you are selected on the wrench and then you want to choose Person and Vehicle Info.
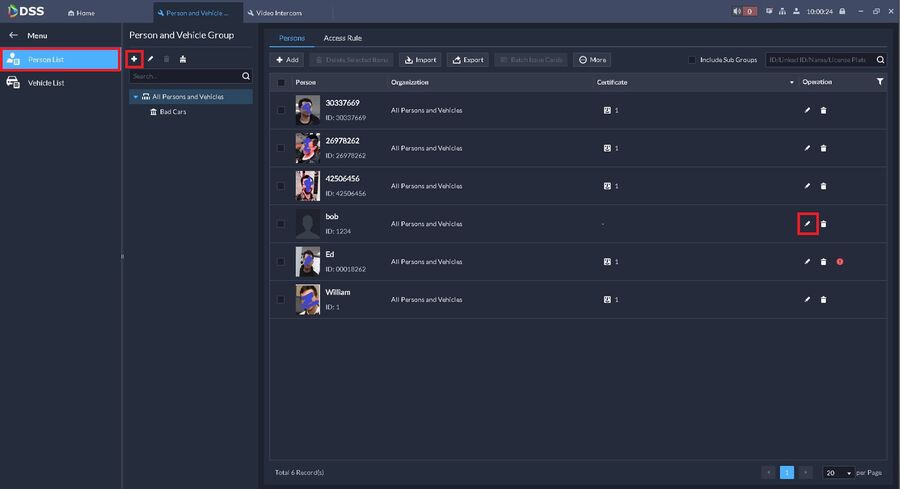
20. Once in the persons and vehicle list, you will want to make sure you are selected on the person list. From here you can click on the plus to create a whole new person, or if you already have a person created, you can click on the little pencil to the right of the person.
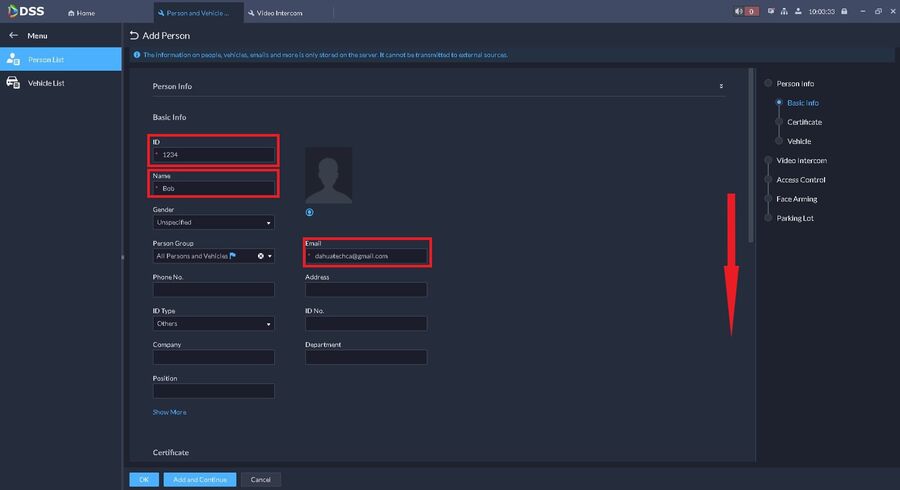
21. Once in the Edit/Add Person page there are certain fields that are mandatory in general and then other fields that are mandatory for the intercom rooms to function. The first 2 fields that are required are your ID and Name fields. If the person list will also be used for access control, you want to start with low IDs and work your way up. The next mandatory field required to use these rooms is the email field. If you have the email function set up in DSS then once you create the user and add them to a room, it will automatically email that user a temporary password, if you don't have the email function set up, then you will see later how you will provide a password. Next scroll down.
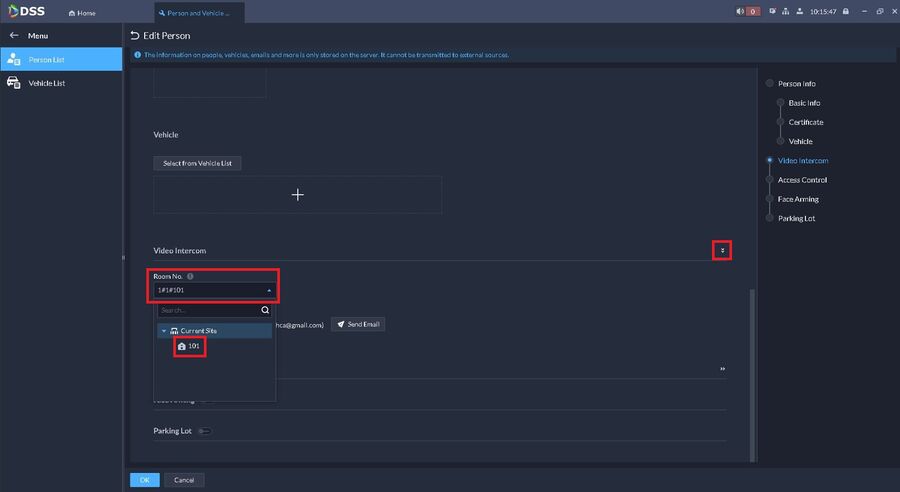
22. As you scroll down you will see a Video Intercom section. By default this will be minimized so you will need to click on the little arrows to the right to expand it so you can see more options. Once expanded you will see a Room No. option. If you haven't created rooms yet you will not have the option to drop down and choose a room. If you followed the prior steps then when you click the drop down arrow you will see a list of rooms you created. In the drop down it will show the room by the name, once you choose the room, up above it will show the room in its # format like in the picture. Once you select the room, it will hide the drop down menu where you will find the next step.
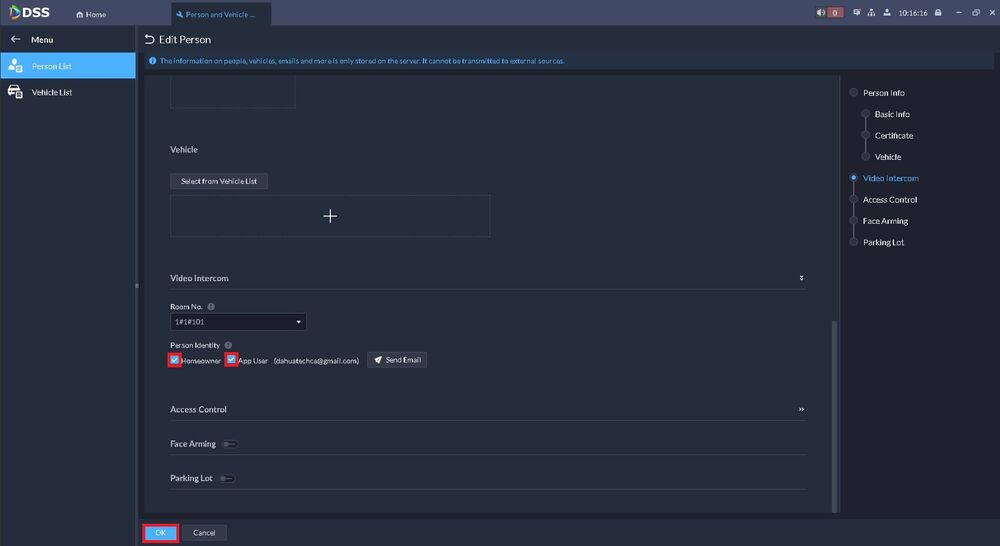
23. After choosing the room, the next step is to put a check in the 2 boxes below. The first person you add into the room you want to be the home owner, basically this is the person that should have control over the room as that person will also be able to invite people to also have access to the room. You also need to make sure you put a check in the box for App User as this gives them the ability to log into the DSS Agile VDP app in order to receive calls from the intercom. If you add additional people to the same room, you would only choose App User as you can only have 1 home owner. Also of note, each room as a maximum of 5 users inside. Once this is done click ok to save.
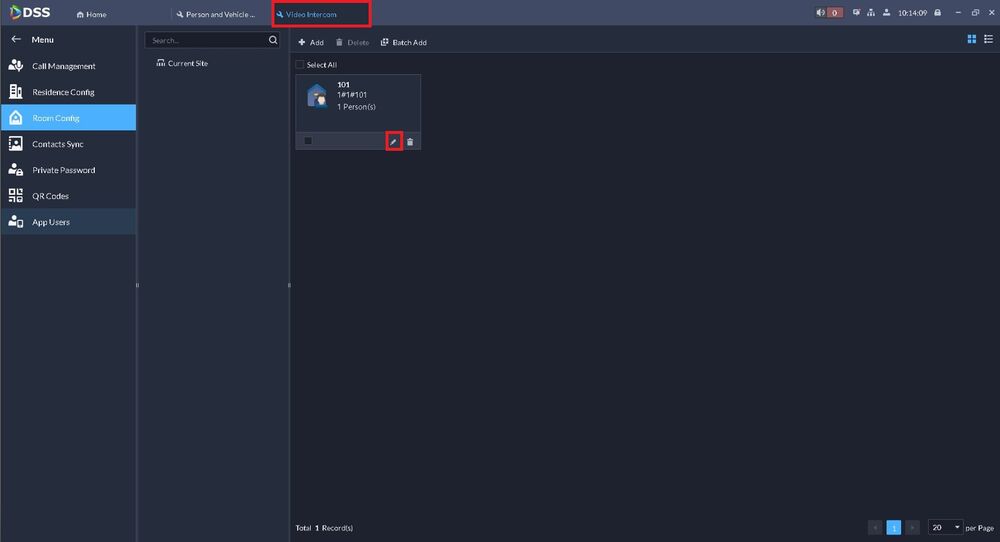
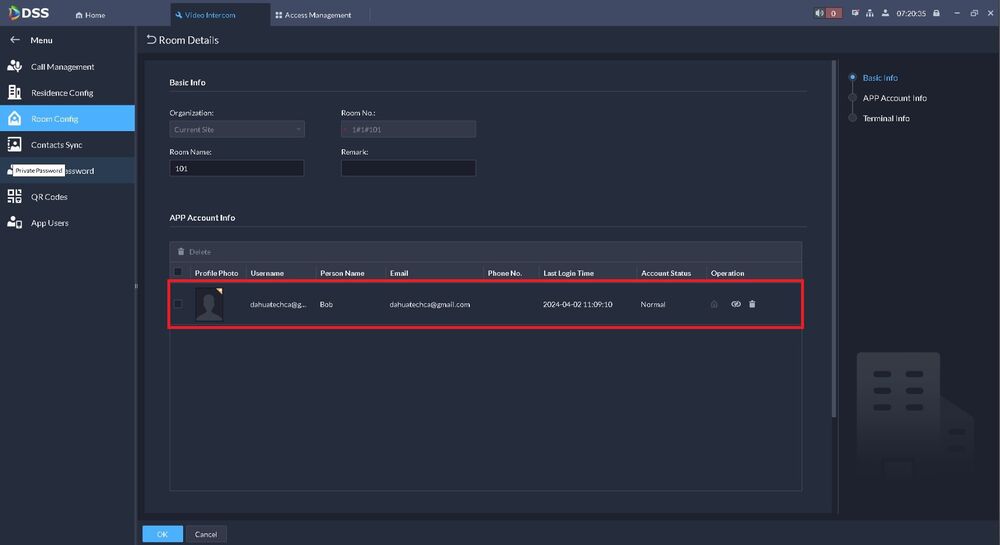
24. Next we will just confirm that the user or users were added successfully into the room. Head back to the video intercom section. Now don't worry if when you first get there if it says 0 persons in the room, it just hasn't refreshed. Click on the pencil to edit and you should see the person or people you have added to the room. Click ok to close out of here.
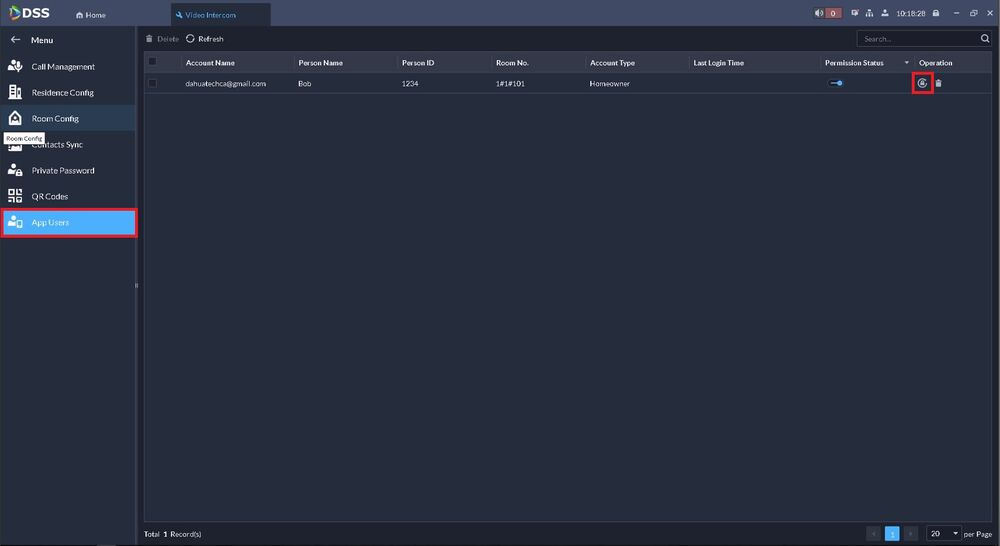
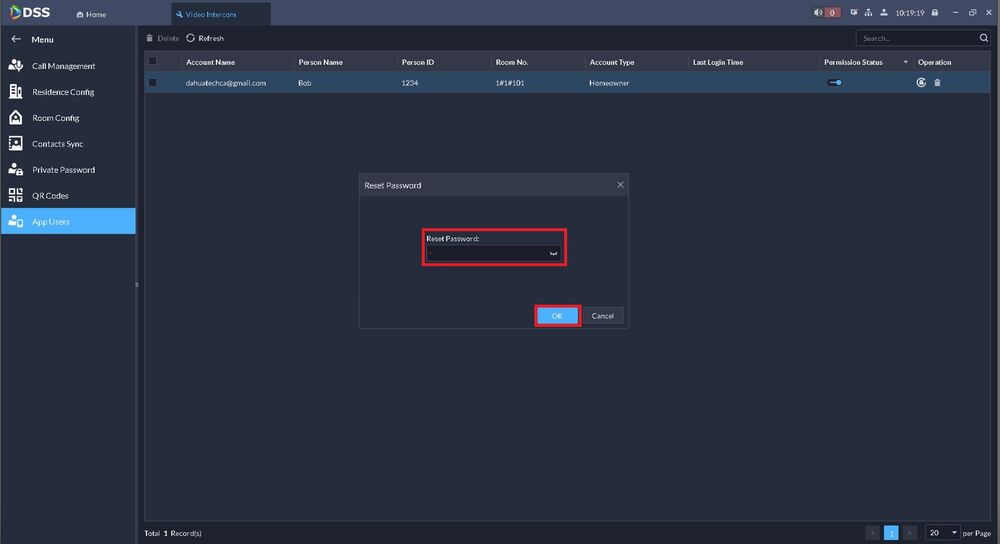
25. Next we want to go down to App Users in the Video Intercom section. Now we want to create a temporary password for the user so they can log into the app. To do this click on the little lock icon on the right side. It will then pop up and ask you to put in a reset password. Type in what you want to use as a temporary password and click ok. When the user uses this password to log in, it will ask them to create their own password after. (Of note, if the customer ever forgets their App login password, this is the same spot you would reset it)
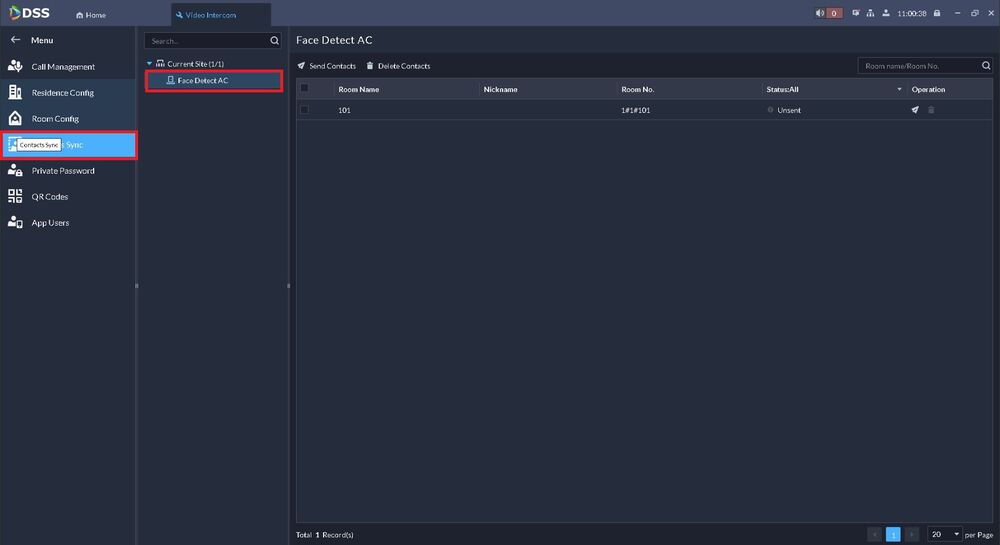
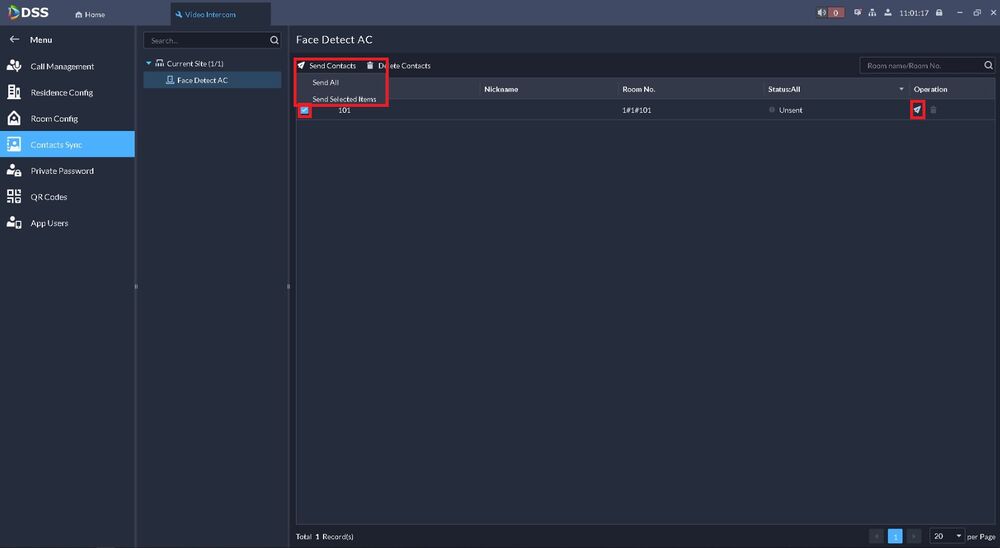
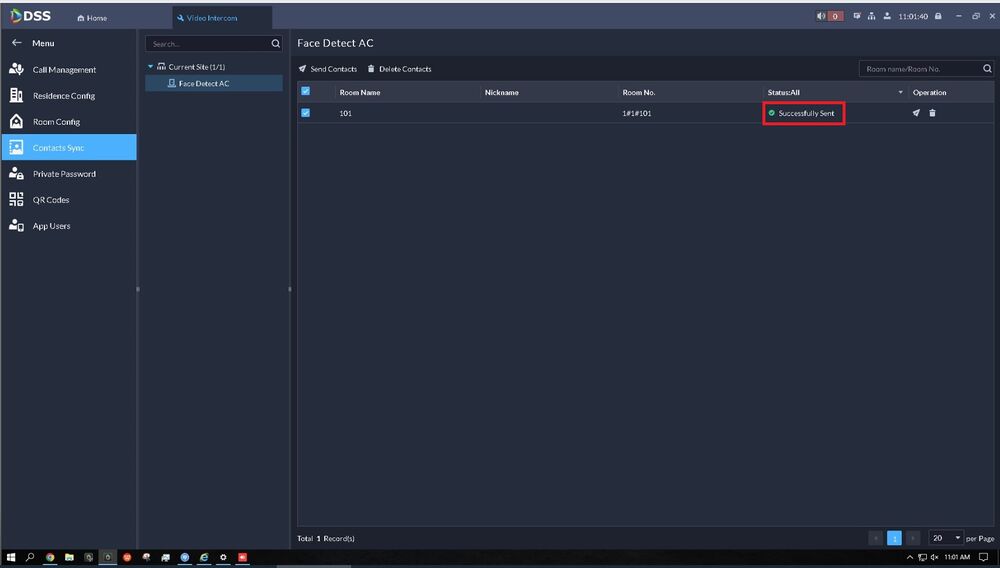
26. Next step is to go to the Contacts Sync section within Video Intercom. On this page you will see a list of all of the rooms you created. Anytime you create new rooms you will need to follow this process to send the room information over to the device. To do this, first select the device under current site, then put a check in the box of the rooms you want to send over, then you can click on send contacts and choose to send the selected contacts or send them all. You can also click on the paper airplane icon to the far right to send only that room. You have multiple options to do this as there may be times where you only want certain rooms to show up on certain devices. Once you send the rooms over, they should show up under contacts on the device.
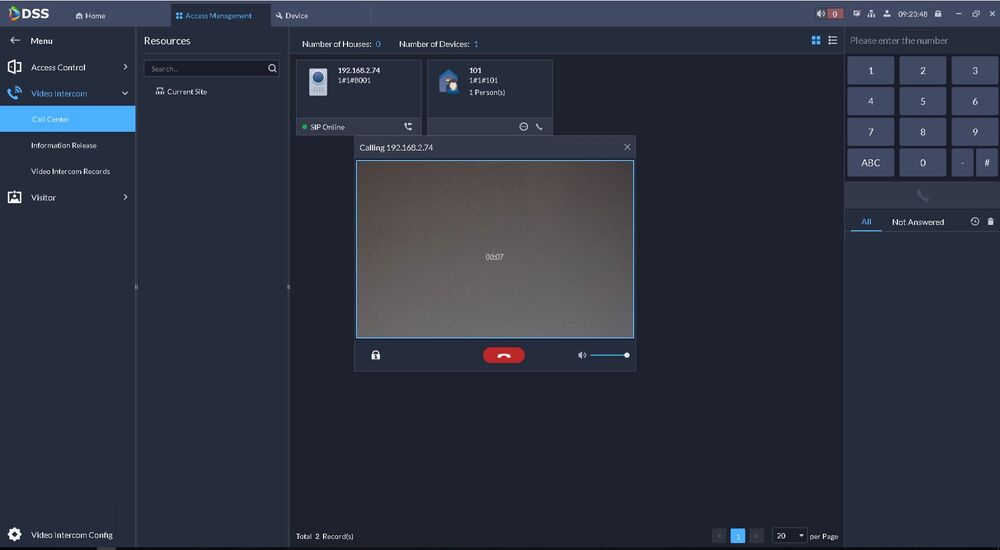
27. Go to Access management, then Video Intercom and then Call Center. You should see the intercom as well as the room you created. To make sure it is working, you can click the little phone icon and it should link up with the intercom. You should see the display pop up from the intercom.
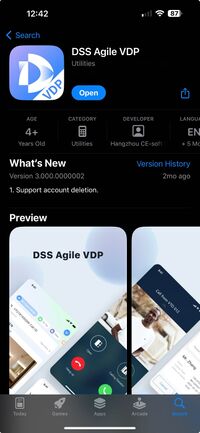
28. Next we want to download the DSS Agile VDP App. This is from the iOS App store, but it will be the same on the Google Play Store for Android.
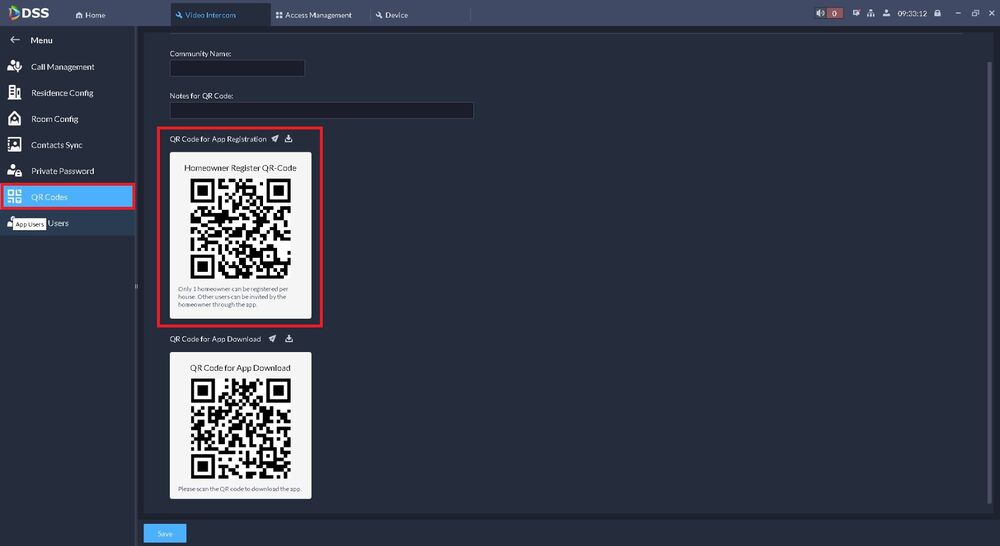
29. The easiest way to get the users to add the DSS Linkage to their phone is by using the QR Code from within DSS > Video Intercom > QR Codes. The user would scan the top QR code. Essentially all this does is automatically fill in the servers IP address as well as the port.
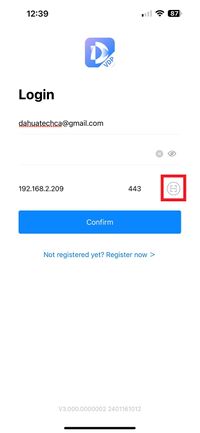
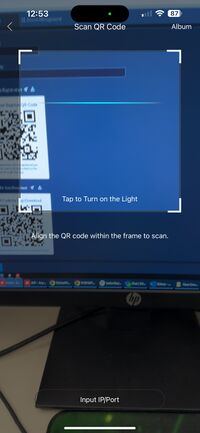
30. Open the Agile VDP app on the phone. Then on the right side of the app which you see highlighted in the picture is the button to bring up the QR scanner. Use the scanner to scan the top QR code. As mentioned this will automatically fill in the server information. You would then need to type in your username and password. The username will be the email address that you added to the user, and the password is the password that you generated during the prior steps.
