Difference between revisions of ":Step by Step Test"
(→Step by Step Instructions) |
(→Step by Step Instructions) |
||
| Line 17: | Line 17: | ||
File:NVRDeviceInitialization7.jpg|4. '''Password Protection''' - Input an E-mail address to be able reset the password. Answer the security questions to complete the password protection setup. | File:NVRDeviceInitialization7.jpg|4. '''Password Protection''' - Input an E-mail address to be able reset the password. Answer the security questions to complete the password protection setup. | ||
File:NVRDeviceInitialization10.jpg|5. '''End-User License Agreement''' - Read through the End-User License Agreement, when ready check the agreement box to enable "Next". | File:NVRDeviceInitialization10.jpg|5. '''End-User License Agreement''' - Read through the End-User License Agreement, when ready check the agreement box to enable "Next". | ||
| + | File:NVRDeviceInitialization11.jpg|6. '''Firmware Updates''' - Check the "Enable auto detect" box to automatically check the latest firmware. | ||
| + | File:NVRDeviceInitialization12.jpg|7. '''General Settings''' - You can set common general settings here. Click on "Apply" then "Next" when finished. | ||
| + | File:NVRDeviceInitialization16.jpg|8. '''Date and Time''' - Make sure to properly set up your time zone to assure accurate time readings. You can also configure Daylight Saving Time (DST). When finished click on "Apply" and then click "Next" to proceed. | ||
| + | File:NVRDeviceInitialization17.jpg|9. '''TCP/IP''' - To edit the IP Address on the recorder's NIC click on the pencil icon. You can now set a Static IP or enable DHCP to let the recorder grab an IP Address from the network, once done click "OK" and then "Next" to finish the setup. | ||
</gallery> | </gallery> | ||
'''Warning''' - Do not ignore this step, it's your only way to reset the password. Master Codes no longer work. | '''Warning''' - Do not ignore this step, it's your only way to reset the password. Master Codes no longer work. | ||
| − | |||
| − | |||
| − | |||
| − | |||
| − | |||
| − | |||
| − | |||
| − | |||
| − | |||
| − | |||
| − | |||
| − | |||
| − | |||
| − | |||
| − | |||
| − | |||
| − | |||
| − | |||
| − | |||
| − | |||
| − | |||
| − | |||
| − | |||
| − | |||
10. '''Remote Access''' - P2P (Easy4IP): By checking this box, it will connect you to Dahua's P2P server and will allow you to remote to your device. If TCP/IP was set properly for your network, the status will show as "online". | 10. '''Remote Access''' - P2P (Easy4IP): By checking this box, it will connect you to Dahua's P2P server and will allow you to remote to your device. If TCP/IP was set properly for your network, the status will show as "online". | ||
Revision as of 02:10, 14 February 2018
Contents
Step by Step Test
Device Initialization
NVR Device Initialization
WARNING!
Failure to setup, "Device Initialization" will result in an RMA, if you forget your password, and skipped this setup process.
Prerequisites
- Dahua NVR, DVR, or XVR running the latest firmware
- A display connected to your Dahua recorder
Video Instructions
Step by Step Instructions
1. Connect the NVR to the display and power it on.
2.Enter Password - You will be prompted to change the default admin password. Make sure it's at least 8 characters long and contain letters, numbers, and symbols. (At least two of the three types.)
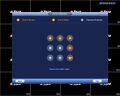
3. Unlock Pattern - Alternatively, you can unlock the recorder with a pattern to avoid having to type in the password. Click and drag on the circles to draw your pattern and re-draw the pattern to complete the setup.
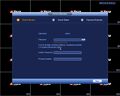
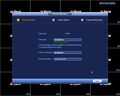
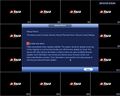
4. Password Protection - Input an E-mail address to be able reset the password. Answer the security questions to complete the password protection setup.
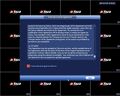
5. End-User License Agreement - Read through the End-User License Agreement, when ready check the agreement box to enable "Next".
6. Firmware Updates - Check the "Enable auto detect" box to automatically check the latest firmware.
7. General Settings - You can set common general settings here. Click on "Apply" then "Next" when finished.
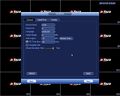
8. Date and Time - Make sure to properly set up your time zone to assure accurate time readings. You can also configure Daylight Saving Time (DST). When finished click on "Apply" and then click "Next" to proceed.
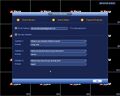
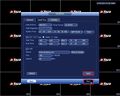
9. TCP/IP - To edit the IP Address on the recorder's NIC click on the pencil icon. You can now set a Static IP or enable DHCP to let the recorder grab an IP Address from the network, once done click "OK" and then "Next" to finish the setup.


Warning - Do not ignore this step, it's your only way to reset the password. Master Codes no longer work.
10. Remote Access - P2P (Easy4IP): By checking this box, it will connect you to Dahua's P2P server and will allow you to remote to your device. If TCP/IP was set properly for your network, the status will show as "online".
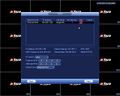
NOTE The QR code on the left will direct you to the smartphone application. The QR code on the right will allow you scan the SN of your device.

11.Camera Registration - To initialize the device from the NVR check the camera(s) that you want and click on "Initialize" - Keep the box checked if you want to sync the password and E-mail to the camera and click on "Next"


Modify the IP Address and click on "Next" - Wait for the initialization to finish and the "Finished" button will activate, click on it to proceed.


Check the camera you just initialized and click on "Add"
