Difference between revisions of "NVR/Basic Setup/Connect WiFi Camera And NVR"
| Line 1: | Line 1: | ||
| − | ==How to Connect a WiFi Camera to | + | ==How to Connect a WiFi Camera to WiFi NVR== |
===Description=== | ===Description=== | ||
| − | This shows you how to connect a | + | This shows you how to connect a WiFi Camera to WiFi NVR. |
===Prerequisites=== | ===Prerequisites=== | ||
| − | *WiFi Camera | + | *A WiFi Camera |
| − | *NVR | + | *A WiFi NVR |
===Video Instructions=== | ===Video Instructions=== | ||
| Line 16: | Line 16: | ||
2. Open the [[ConfigTool|ConfigTool]] and locate your NVR and IP Camera. | 2. Open the [[ConfigTool|ConfigTool]] and locate your NVR and IP Camera. | ||
| − | 3. Login to both using Internet Explorer. We will open these on two separate tabs | + | 3. Login to both using Internet Explorer. We will open these on two separate tabs. These two IP networks, one wireless and the other wired, will have the following ip scheme for this test: |
| + | * NVR Wired IP: 172.16.13.106 | ||
| + | * NVR Wireless IP: 11.1.1.1 (SSID: NVR2.4G) | ||
| + | * Camera Wired IP: 172.16.13.108 | ||
| + | * Camera Wireless IP: 11.1.1.108 | ||
| − | + | 4. Configure the NVR via the Settings->Network->WIFI AP menu, here is all of the information that you will need for addressing wireless cameras. The wireless NVR's AP is hosting the network much like a router, to configure the IP address/default gateway use the IP Config area. For addressing the Wifi Camera's to an IP address the DHCP Server section will allow you to specify a range withing your default gateway. We will use the default of 11.1.1.(100-200). | |
| − | IP Camera | ||
| − | [[ | + | [[File:wificam2wifinvr026.jpg|500x500px]] |
| − | |||
| − | + | 5. Configure the Camera via the Setup->Network->TCP/IP and select the wireless Ethernet card. | |
| − | [[ | + | [[File:wificam2wifinvr027.jpg|500x500px]] |
| − | + | 6. Select DHCP, or Configure the IP address to match the Default Gateway and Subnet mask configured in step 4, then enter in an IP within the DHCP range. For this example we will use our designated IP address from step 3 (11.1.1.108). Then select Save. | |
| − | + | [[File:wificam2wifinvr028.jpg|500x500px]] | |
| − | + | 7. Navigate on the Camera to Setup->Network->WiFi, this is the menu that needs to be used to connect the device to the Wireless NVR AP's SSID of NVR2.4G. Select Add SSID and enter the password and select connect, or if the SSID is hidden Manually add the SSID and password. Select refresh to see if you have connected to the AP. After this the Wireless camera has been connected to the AP, but not added to it's devices yet. | |
| − | + | [[File:wificam2wifinvr029.jpg|500x500px]] | |
| − | + | 8. Navigate on the wireless NVR to the SETTING->CAMERA->REGISTRATION menu, here is where you can see devices that are connected via wireless and on the wired network. If you see your camera here select the green plus sign to add it, make sure you have the appropriate login information. If you cannot see your camera here please select the manual add button and input the camera's appropriate login information and select Save. | |
| − | + | [[File:wificam2wifinvr030.jpg|500x500px]] | |
| − | + | 9. After the camera is added you might need to wait for the video feed to cache, select the Refresh button to make sure the Status indication is GREEN and not RED. | |
| − | + | [[File:wificam2wifinvr031.jpg|500x500px]] | |
| − | + | 10. Select Preview and then the Camera that was added to ensure the stream is running correctly. At this time you can disconnect the wireless camera from the wired network and install it where there is wireless coverage. | |
| − | |||
| − | |||
| − | |||
| − | |||
| − | |||
| − | |||
| − | |||
| − | |||
| − | |||
| − | |||
| − | |||
| − | |||
| − | |||
| − | |||
| − | |||
| − | |||
| − | |||
| − | |||
| − | |||
| − | |||
| − | |||
| − | |||
| − | |||
| − | |||
| − | |||
| − | |||
| − | |||
| − | |||
| + | [[File:wificam2wifinvr032.jpg|500x500px]] | ||
Revision as of 01:17, 29 November 2016
Contents
How to Connect a WiFi Camera to WiFi NVR
Description
This shows you how to connect a WiFi Camera to WiFi NVR.
Prerequisites
- A WiFi Camera
- A WiFi NVR
Video Instructions
Step by Step Instructions
Note: These instructions only apply for WiFi NVRs and Cameras.
1. Connect the NVR and IP Camera directly to your router, switch, or modem with a CAT5 cable.
2. Open the ConfigTool and locate your NVR and IP Camera.
3. Login to both using Internet Explorer. We will open these on two separate tabs. These two IP networks, one wireless and the other wired, will have the following ip scheme for this test:
- NVR Wired IP: 172.16.13.106
- NVR Wireless IP: 11.1.1.1 (SSID: NVR2.4G)
- Camera Wired IP: 172.16.13.108
- Camera Wireless IP: 11.1.1.108
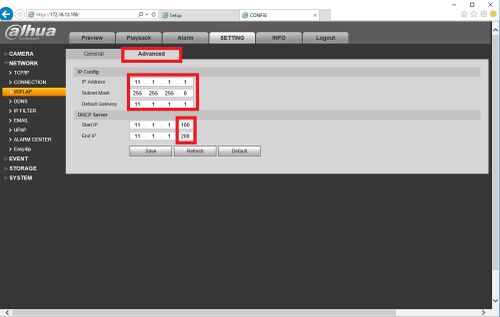
4. Configure the NVR via the Settings->Network->WIFI AP menu, here is all of the information that you will need for addressing wireless cameras. The wireless NVR's AP is hosting the network much like a router, to configure the IP address/default gateway use the IP Config area. For addressing the Wifi Camera's to an IP address the DHCP Server section will allow you to specify a range withing your default gateway. We will use the default of 11.1.1.(100-200).
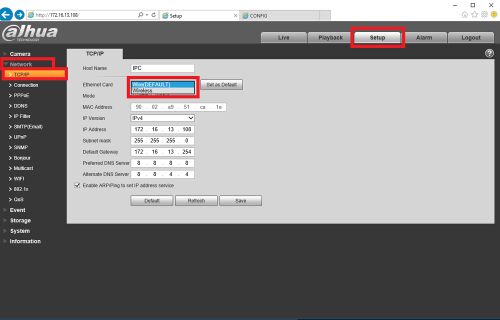
5. Configure the Camera via the Setup->Network->TCP/IP and select the wireless Ethernet card.
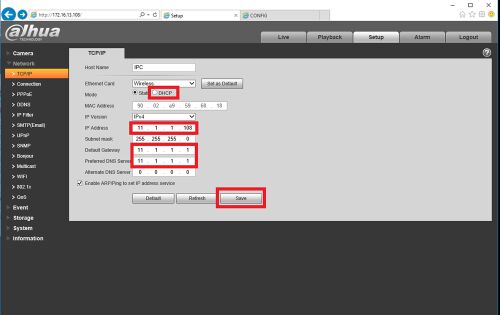
6. Select DHCP, or Configure the IP address to match the Default Gateway and Subnet mask configured in step 4, then enter in an IP within the DHCP range. For this example we will use our designated IP address from step 3 (11.1.1.108). Then select Save.
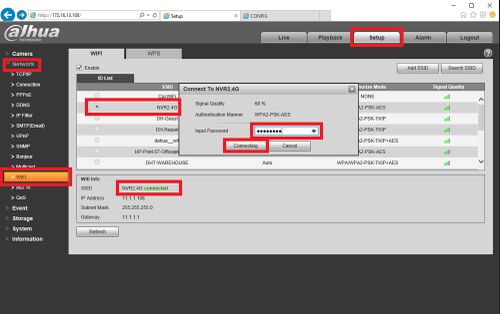
7. Navigate on the Camera to Setup->Network->WiFi, this is the menu that needs to be used to connect the device to the Wireless NVR AP's SSID of NVR2.4G. Select Add SSID and enter the password and select connect, or if the SSID is hidden Manually add the SSID and password. Select refresh to see if you have connected to the AP. After this the Wireless camera has been connected to the AP, but not added to it's devices yet.
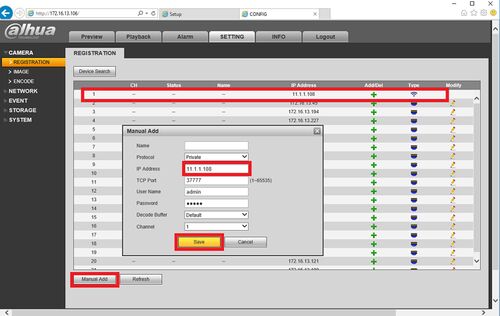
8. Navigate on the wireless NVR to the SETTING->CAMERA->REGISTRATION menu, here is where you can see devices that are connected via wireless and on the wired network. If you see your camera here select the green plus sign to add it, make sure you have the appropriate login information. If you cannot see your camera here please select the manual add button and input the camera's appropriate login information and select Save.
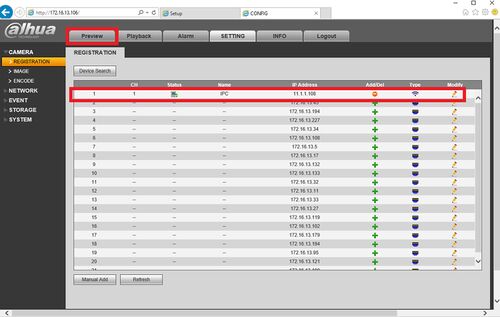
9. After the camera is added you might need to wait for the video feed to cache, select the Refresh button to make sure the Status indication is GREEN and not RED.
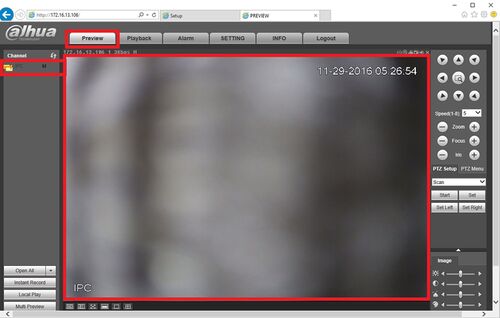
10. Select Preview and then the Camera that was added to ensure the stream is running correctly. At this time you can disconnect the wireless camera from the wired network and install it where there is wireless coverage.
