Difference between revisions of "Video Intercom/SIP 2.0/Multiple VTH and VTO One-Key Config Setup"
| (2 intermediate revisions by the same user not shown) | |||
| Line 12: | Line 12: | ||
==Step by Step Instructions== | ==Step by Step Instructions== | ||
| − | 1. Select the | + | 1. Select your region by tapping on the country |
| − | [[ | + | [[file:2.0 Multiple VDP One Key Config-1.png|900px]] |
| − | 2. | + | 2. Select the country and tap on '''OK''' |
| − | [[ | + | [[file:2.0 Multiple VDP One Key Config-2.png|900px]] |
| − | 3. | + | 3. Then tap on '''OK''' |
| − | [[ | + | [[file:2.0 Multiple VDP One Key Config-3.png|900px]] |
| − | 4. | + | 4. Tap on '''Villa''' before clicking on '''OK''' |
| − | [[ | + | [[file:2.0 Multiple VDP One Key Config-4.png|900px]] |
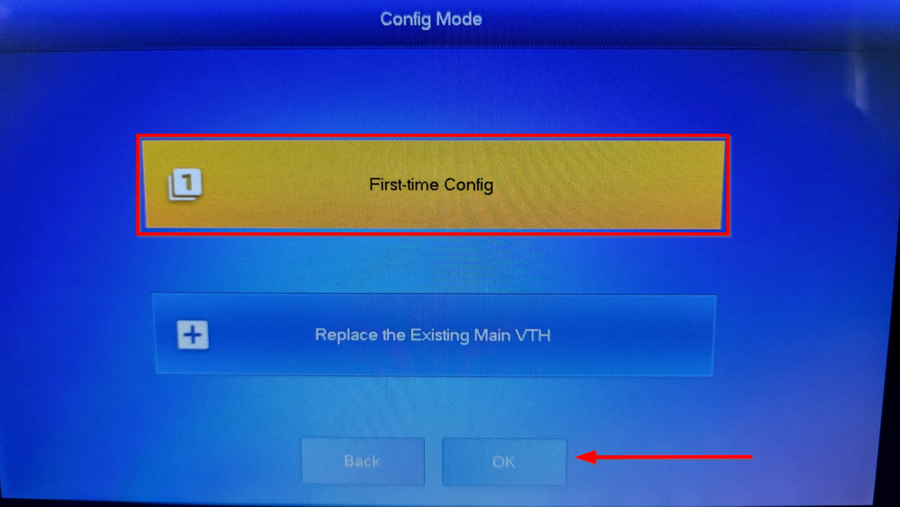
| − | 5. | + | 5. Select '''First-time Config''' and then '''OK''' |
| − | |||
| − | [[ | + | [[file:2.0 Multiple VDP One Key Config-5.png|900px]] |
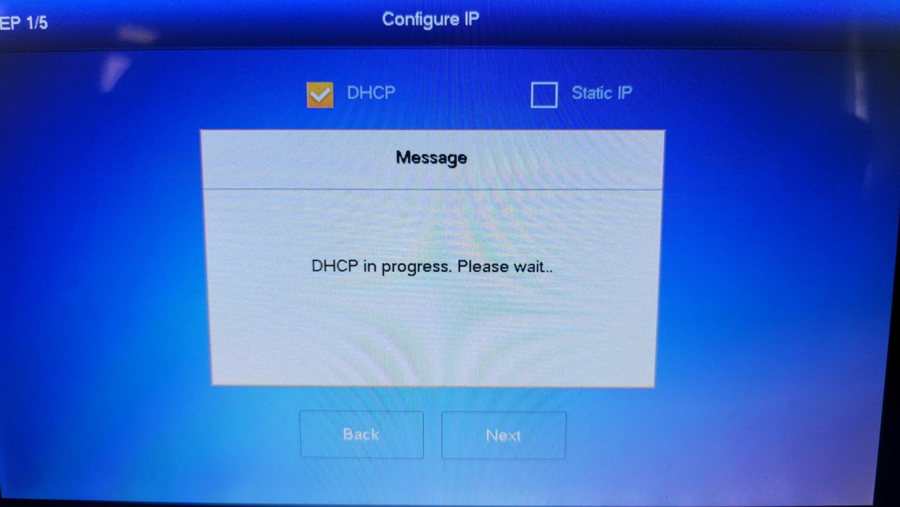
| − | 6. | + | 6. The VTH will then receive a DHCP address from the network |
| − | [[ | + | [[file:2.0 Multiple VDP One Key Config-6.png|900px]] |
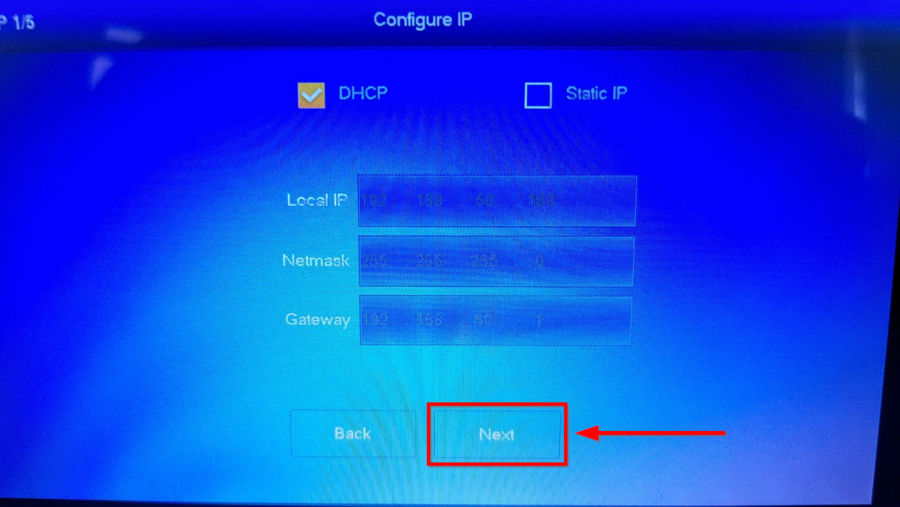
| − | 7. | + | 7. Click on '''Next''' or select Static IP if you have a specific IP to give it |
| − | [[ | + | [[file:2.0 Multiple VDP One Key Config-7.png|900px]] |
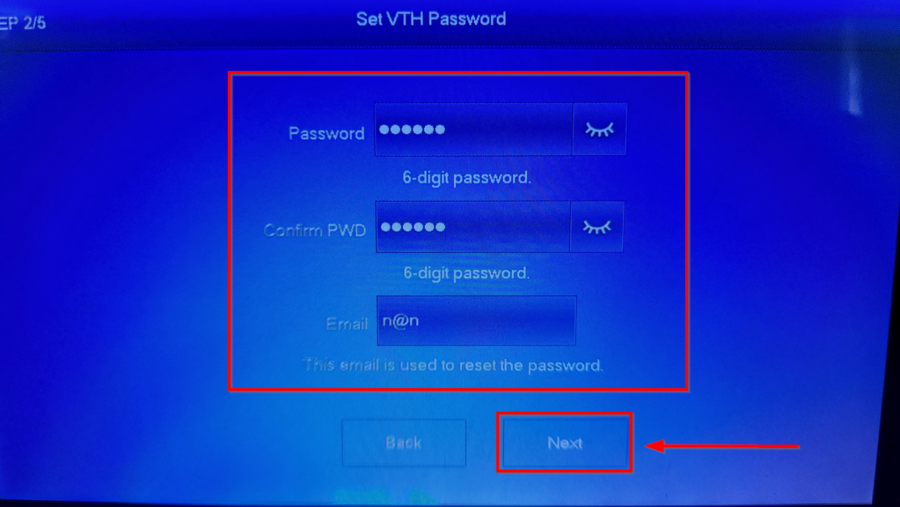
| − | 8. | + | 8. '''Set VTH Password''' Will initialize all the VTHs on the network with this password. Also enter an E-Mail to reset passwords. Tap on '''Next''' |
| − | + | '''Note: VTHs will require a 6-digit numerical password''' | |
| − | + | [[file:2.0 Multiple VDP One Key Config-8.png|900px]] | |
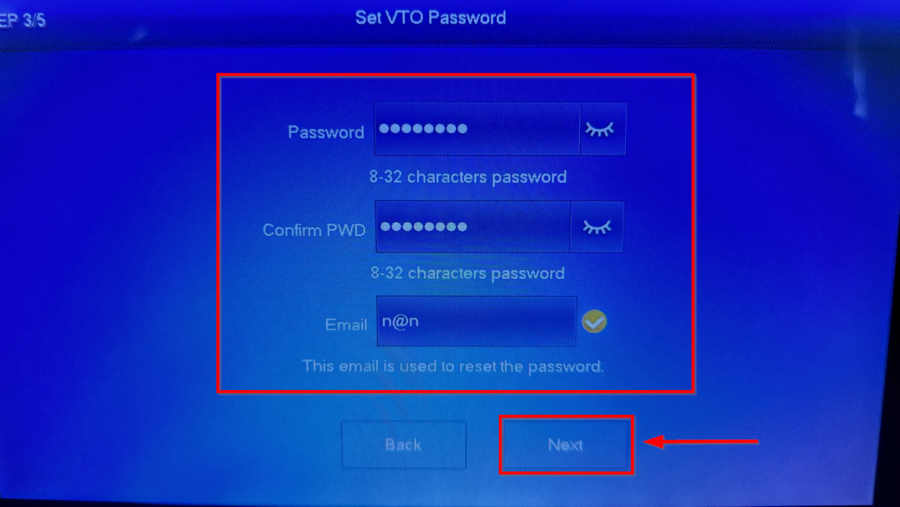
| − | + | 9. '''Set VTO Password''' Will initialize all the VTOs on the network with this password. The E-Mail will re-enter itself. Tap on '''Next''' | |
| − | + | '''Note: The VTO password requires a 8-character password. The password must be alpha-numerical''' | |
| − | [[ | + | [[file:2.0 Multiple VDP One Key Config-9.png|900px]] |
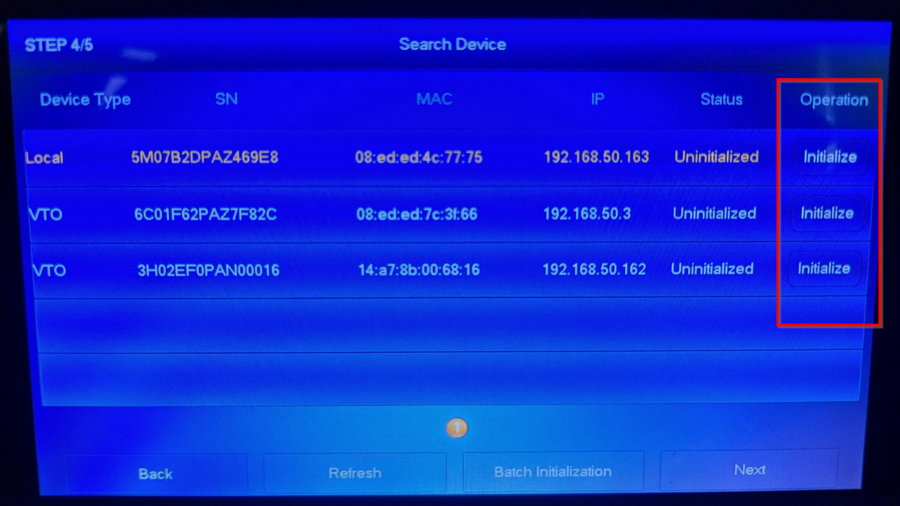
| − | + | 10. Click on '''Initialize''' on all the VDP devices on the network. The VTH will then initialize them with the passwords we previously entered. | |
| − | [[ | + | [[file:2.0 Multiple VDP One Key Config-10.png|900px]] |
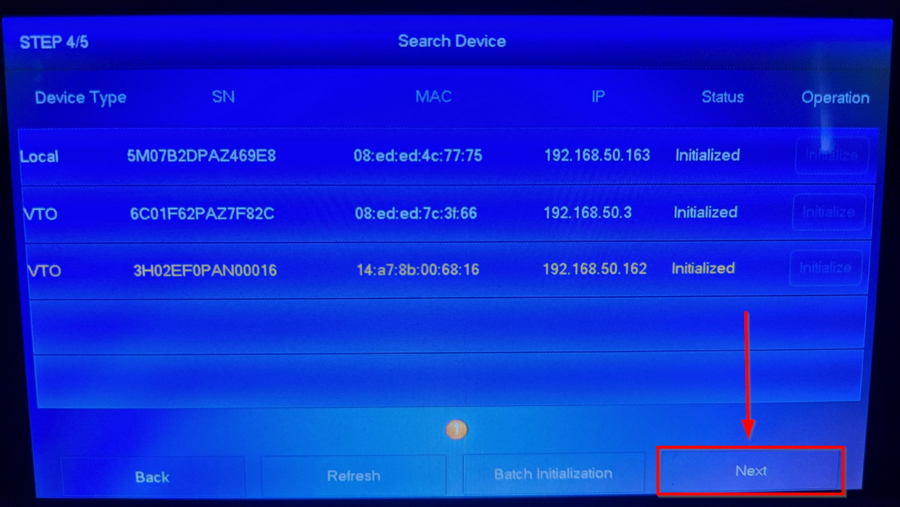
| − | + | 11. Make sure all units say '''Initialized''' before clicking on '''Next''' | |
| − | [[ | + | [[file:2.0 Multiple VDP One Key Config-11.png|900px]] |
| − | + | 12. The VTH will now force a DHCP address to the VDP devices. It will also assign suggested main and subs to each device on the network. | |
| − | [[ | + | [[file:2.0 Multiple VDP One Key Config-12.png|900px]] |
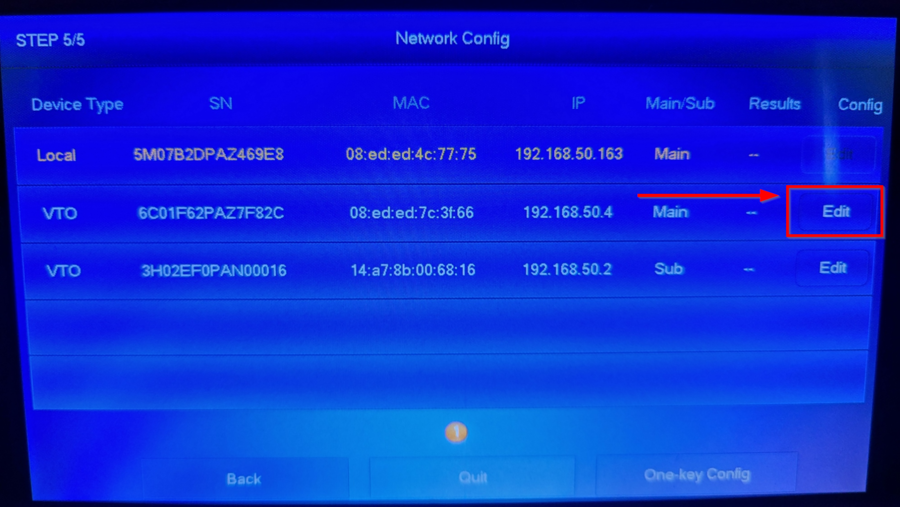
| − | + | 13. This page will require you to edit every device we initialized. Local is the VTH we are on. So you don't need to edit. Select the First VTO and tap on '''Edit''' | |
| − | + | '''The VTH will suggest the Main/Sub devices but you will still need to tap edit on each one to confirm the setup. If you skip this step you may encounter an Environment error''' | |
| − | + | [[file:2.0 Multiple VDP One Key Config-13.png|900px]] | |
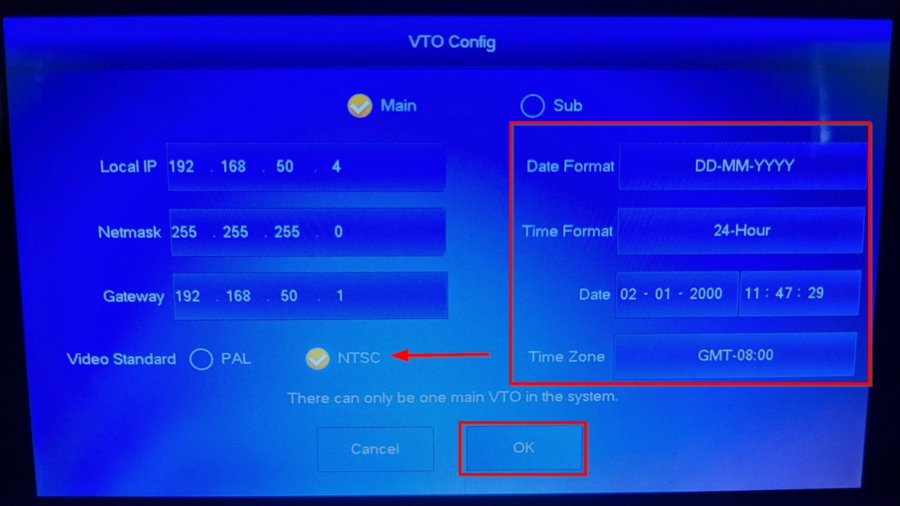
| − | + | 14. Make sure the first VTO is the Main unit. Change the video standard to NTSC for USA standards. Set the time and date to the VTO then tap on '''OK''' | |
| − | + | [[file:2.0 Multiple VDP One Key Config-14.png|900px]] | |
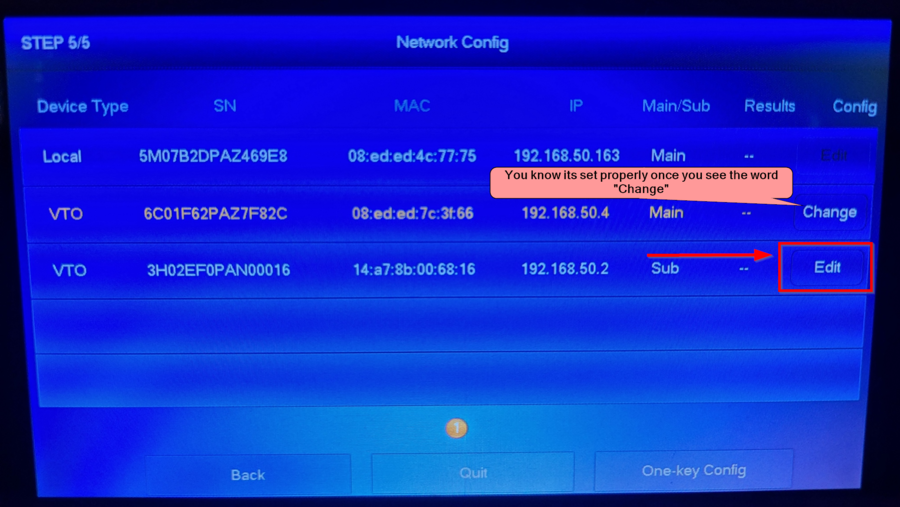
| − | + | 15. Now select the second VTO and tap on '''Edit''' | |
| − | + | '''The VTH will suggest the Main/Sub devices but you will still need to tap edit on each one to confirm the setup. If you skip this step you may encounter an Environment error''' | |
| − | [[ | + | [[file:2.0 Multiple VDP One Key Config-15.png|900px]] |
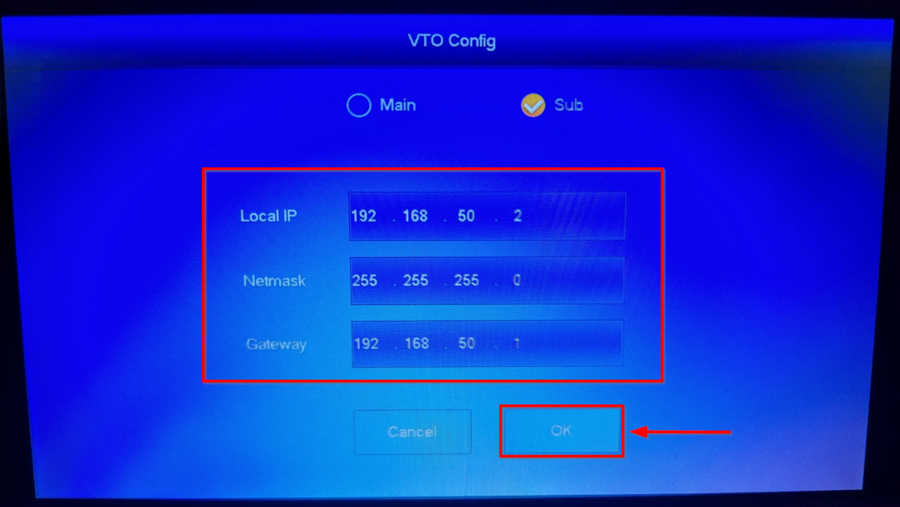
| − | + | 16. Enter a new IP if the DHCP address is not wanted. Then tap on '''OK''' | |
| − | [[ | + | [[file:2.0 Multiple VDP One Key Config-16.png|900px]] |
| + | |||
| + | 17. Once you see all the VDP device say '''Change''' you can tap on '''One-key Config''' | ||
| + | |||
| + | [[file:2.0 Multiple VDP One Key Config-17.png|900px]] | ||
| + | |||
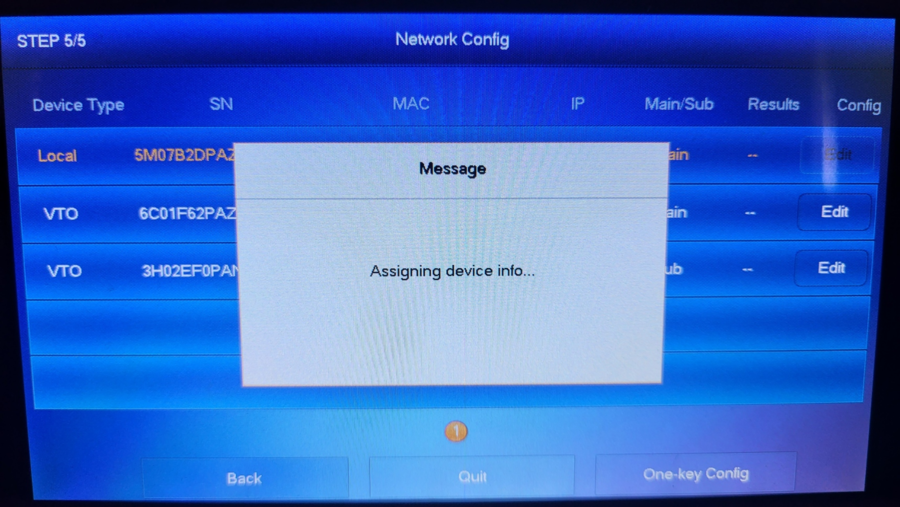
| + | 18. The VTH will now send the configurations to all the devices. The progress will stay stuck on a progress percentage until all the devices boot back up. | ||
| + | |||
| + | [[file:2.0 Multiple VDP One Key Config-18.png|900px]] | ||
| + | |||
| + | 19. Once the devices boot back up you will be sent to the VTH home page, Click on '''Monitor''' to make sure you can see all the VTO's we setup | ||
| + | |||
| + | [[file:2.0 Multiple VDP One Key Config-19.png|900px]] | ||
| + | |||
| + | 20. Tap on the entries | ||
| + | |||
| + | [[file:2.0 Multiple VDP One Key Config-20.png|900px]] | ||
| + | |||
| + | 21. If you can see video and initiate a two-way talk you know everything went through properly. | ||
| + | |||
| + | [[file:2.0 Multiple VDP One Key Config-21.png|900px]] | ||
| + | |||
| + | 22. VTHs can now receive calls from the VTOs | ||
| + | |||
| + | [[file:2.0 Multiple VDP One Key Config-22.png|900px]] | ||
Latest revision as of 21:54, 1 November 2021
Contents
How to Setup One Key Config
Description
This article will go over the new One Key Config setup with multiple devices.
Prerequisites
- VTH with the One Key Config feature
- VTOs with SIP 2.0 Firmware
Video Instructions
Step by Step Instructions
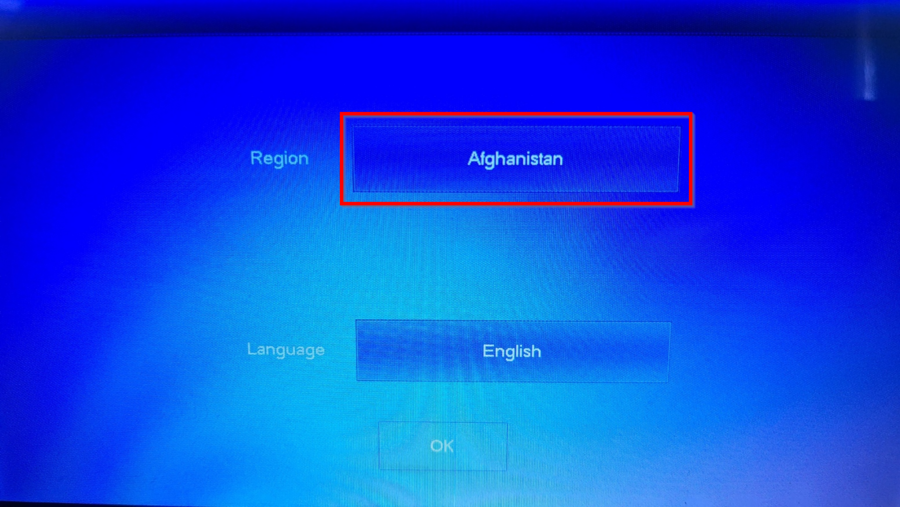
1. Select your region by tapping on the country
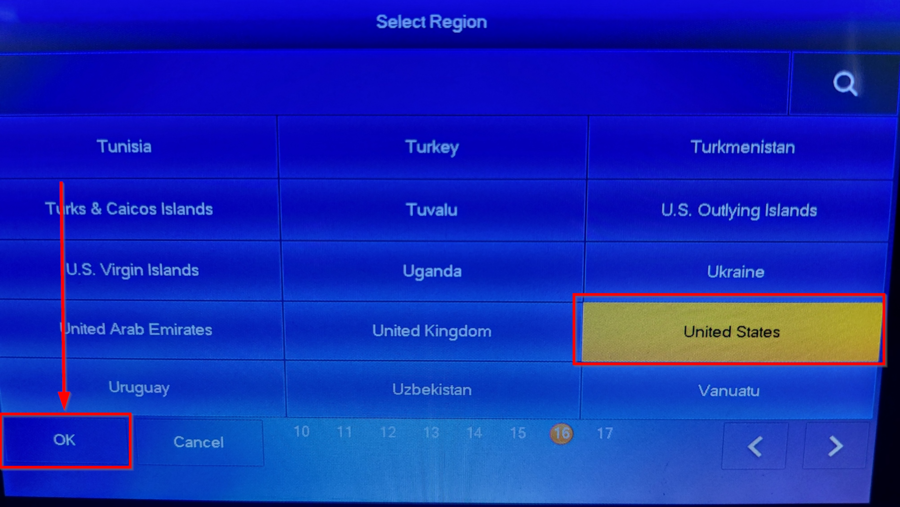
2. Select the country and tap on OK
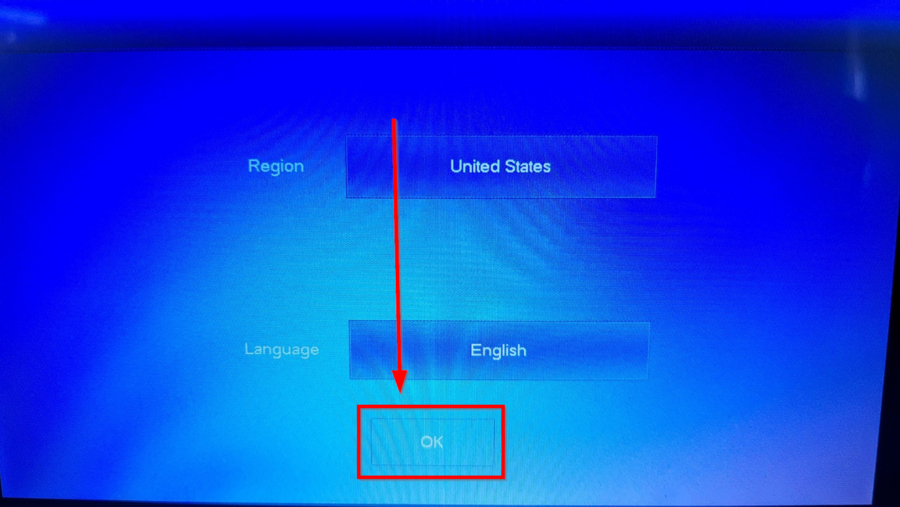
3. Then tap on OK
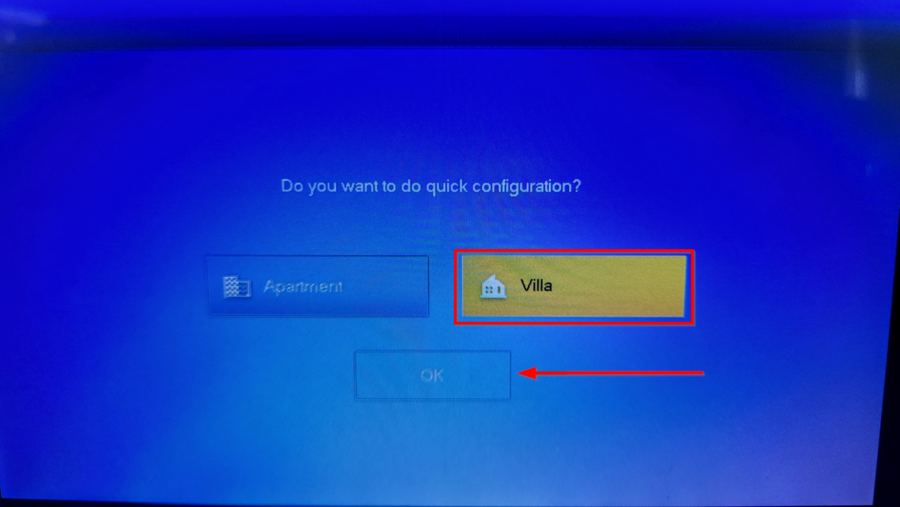
4. Tap on Villa before clicking on OK
5. Select First-time Config and then OK
6. The VTH will then receive a DHCP address from the network
7. Click on Next or select Static IP if you have a specific IP to give it
8. Set VTH Password Will initialize all the VTHs on the network with this password. Also enter an E-Mail to reset passwords. Tap on Next
Note: VTHs will require a 6-digit numerical password
9. Set VTO Password Will initialize all the VTOs on the network with this password. The E-Mail will re-enter itself. Tap on Next
Note: The VTO password requires a 8-character password. The password must be alpha-numerical
10. Click on Initialize on all the VDP devices on the network. The VTH will then initialize them with the passwords we previously entered.
11. Make sure all units say Initialized before clicking on Next
12. The VTH will now force a DHCP address to the VDP devices. It will also assign suggested main and subs to each device on the network.
13. This page will require you to edit every device we initialized. Local is the VTH we are on. So you don't need to edit. Select the First VTO and tap on Edit
The VTH will suggest the Main/Sub devices but you will still need to tap edit on each one to confirm the setup. If you skip this step you may encounter an Environment error
14. Make sure the first VTO is the Main unit. Change the video standard to NTSC for USA standards. Set the time and date to the VTO then tap on OK
15. Now select the second VTO and tap on Edit
The VTH will suggest the Main/Sub devices but you will still need to tap edit on each one to confirm the setup. If you skip this step you may encounter an Environment error
16. Enter a new IP if the DHCP address is not wanted. Then tap on OK
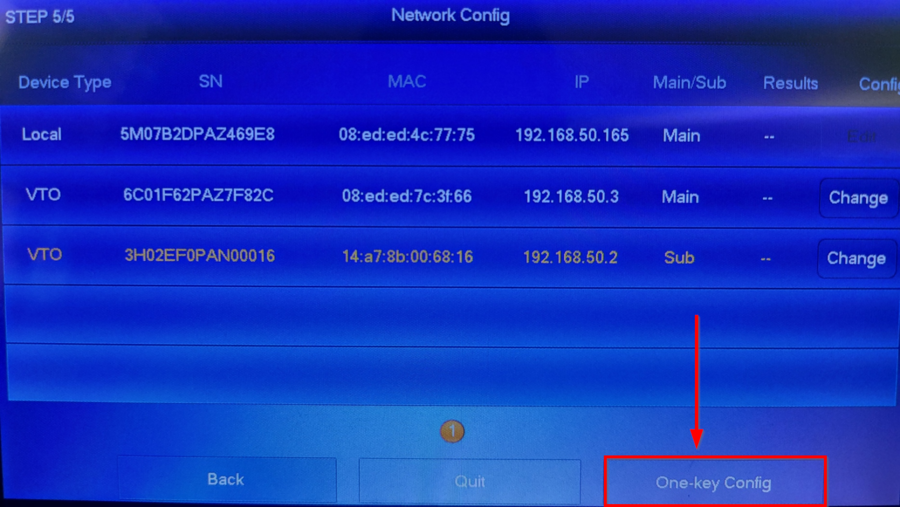
17. Once you see all the VDP device say Change you can tap on One-key Config
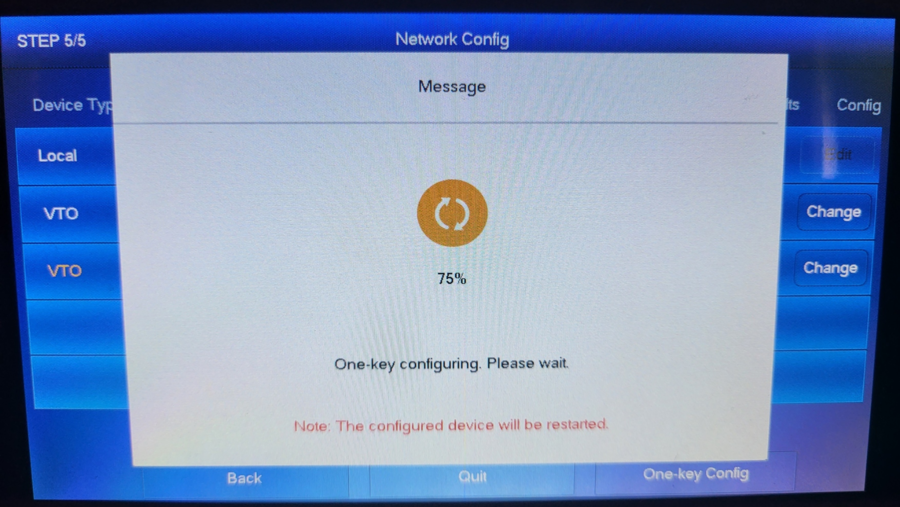
18. The VTH will now send the configurations to all the devices. The progress will stay stuck on a progress percentage until all the devices boot back up.
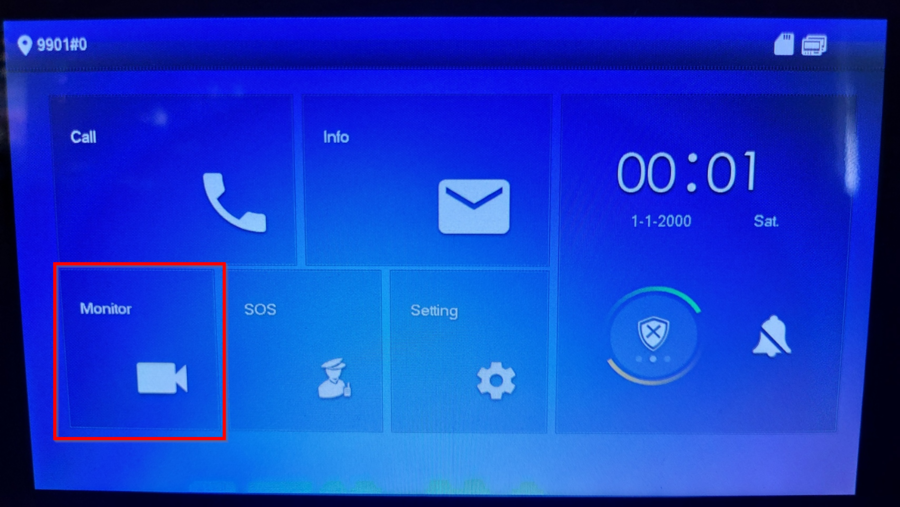
19. Once the devices boot back up you will be sent to the VTH home page, Click on Monitor to make sure you can see all the VTO's we setup
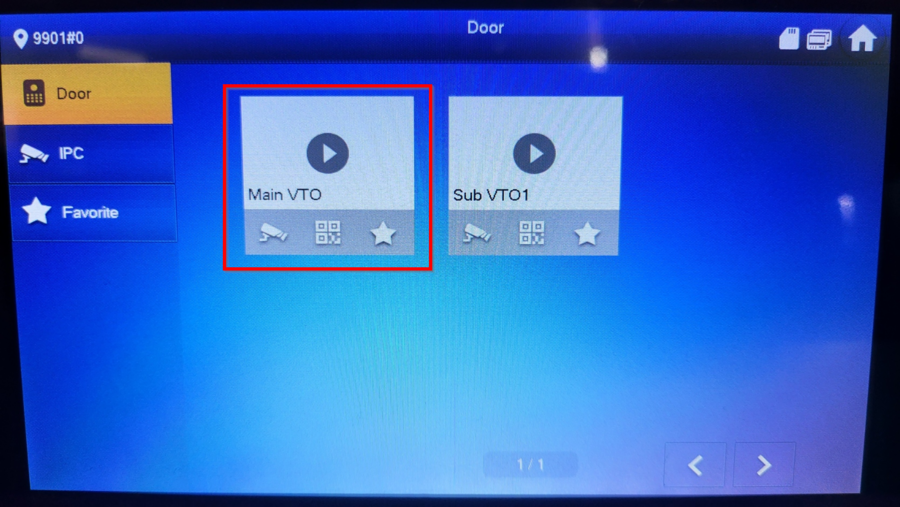
20. Tap on the entries
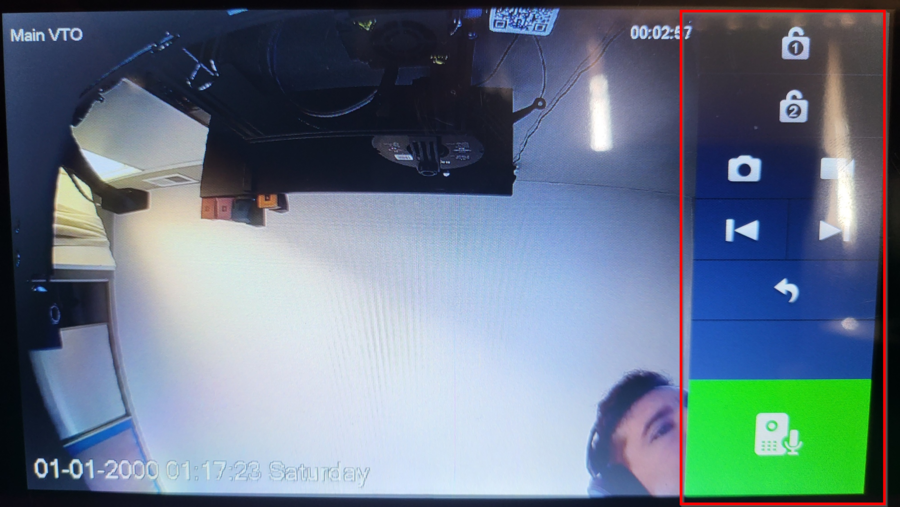
21. If you can see video and initiate a two-way talk you know everything went through properly.
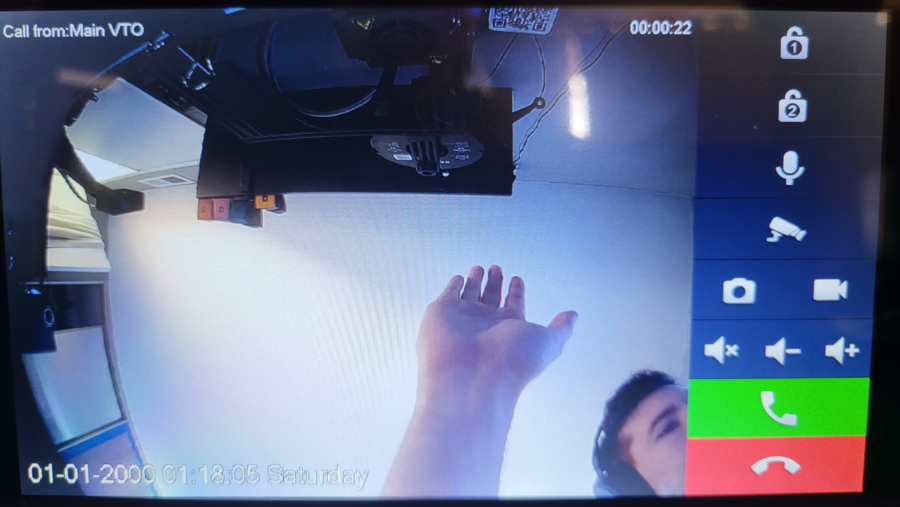
22. VTHs can now receive calls from the VTOs
