Difference between revisions of "DSS S2/Manager/EMap Setup"
(Created page with "== DSS E-Map Functionality == === Description === The DSS e-map function allows you to upload one or more maps to the system and add devices as icons on the map which can be v...") |
|||
| Line 10: | Line 10: | ||
=== Set up & Basic Functions === | === Set up & Basic Functions === | ||
| − | 1. After logging into the DSS server, navigate to the emap section by | + | 1. After logging into the DSS server, navigate to the emap section by using the '''+''' to open a new tab and select the "Map" function, this will take you to the configuration page for the E-map. |
<gallery> | <gallery> | ||
File:emap01.PNG| Use the '''+''' to open a new tab | File:emap01.PNG| Use the '''+''' to open a new tab | ||
File:emap02.PNG| Under this tab select 'Map' | File:emap02.PNG| Under this tab select 'Map' | ||
| − | File:emap03.PNG| | + | File:emap03.PNG| Add or edit maps |
</gallery> | </gallery> | ||
| + | <br /> | ||
| + | <br /> | ||
| + | 2. | ||
Revision as of 22:21, 26 June 2019
DSS E-Map Functionality
Description
The DSS e-map function allows you to upload one or more maps to the system and add devices as icons on the map which can be viewed quickly and easily by selecting the device from the icon on the client. This article will cover how to set up the e-map on the DSS-7016, add devices to the map and explain the basic functions related to the use of the e-map through the web interface. Information on how to work within the client can be found here.
Prerequisites
- A networked DSS server
- Windows PC with network access to the server
- An image file of the map in either PNG, JPG, or JPEG file format.
- Devices added to the DSS server
Set up & Basic Functions
1. After logging into the DSS server, navigate to the emap section by using the + to open a new tab and select the "Map" function, this will take you to the configuration page for the E-map.
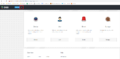
Use the + to open a new tab
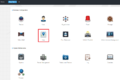
Under this tab select 'Map'
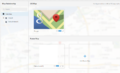
Add or edit maps


2.