Difference between revisions of "Template:SMD SystemUI NewGUI"
| Line 5: | Line 5: | ||
<embedvideo service="youtube">https://youtu.be/_ORkonAl8ak</embedvideo> | <embedvideo service="youtube">https://youtu.be/_ORkonAl8ak</embedvideo> | ||
==Step by Step Instructions== | ==Step by Step Instructions== | ||
| − | 1. | + | 1. From Live View |
| + | |||
| + | Right click select Main Menu | ||
[[File:SMD_-_SystemUI_New_-_1.jpg|600px]] | [[File:SMD_-_SystemUI_New_-_1.jpg|600px]] | ||
| + | |||
| + | 2. Click Storage | ||
[[File:SMD_-_SystemUI_New_-_2.jpg|600px]] | [[File:SMD_-_SystemUI_New_-_2.jpg|600px]] | ||
| + | |||
| + | 3. Confirm the recorder is set to motion detection recording | ||
| + | |||
| + | Click Schedule | ||
| + | |||
| + | Review the on screen schedule, make sure motion detection (MD) is enabled | ||
[[File:SMD_-_SystemUI_New_-_3.jpg|600px]] | [[File:SMD_-_SystemUI_New_-_3.jpg|600px]] | ||
| + | |||
| + | 4. Click Record | ||
| + | |||
| + | Confirm the record settings are enabled for the desired streams | ||
[[File:SMD_-_SystemUI_New_-_4.jpg|600px]] | [[File:SMD_-_SystemUI_New_-_4.jpg|600px]] | ||
| + | |||
| + | Right click to return to the Main Menu | ||
| + | |||
| + | 5. Click Alarm | ||
[[File:SMD_-_SystemUI_New_-_5.jpg|600px]] | [[File:SMD_-_SystemUI_New_-_5.jpg|600px]] | ||
| + | |||
| + | 6. Click Video Detection | ||
[[File:SMD_-_SystemUI_New_-_6.jpg|600px]] | [[File:SMD_-_SystemUI_New_-_6.jpg|600px]] | ||
| + | |||
| + | 7. Motion Detect | ||
| + | |||
| + | Use the dropdown to select the channel | ||
| + | |||
| + | Click to toggle and enable the Motion detection for this channel | ||
[[File:SMD_-_SystemUI_New_-_6-1.jpg|600px]] | [[File:SMD_-_SystemUI_New_-_6-1.jpg|600px]] | ||
| + | |||
| + | 8. Click Apply to save | ||
[[File:SMD_-_SystemUI_New_-_7.jpg|600px]] | [[File:SMD_-_SystemUI_New_-_7.jpg|600px]] | ||
| + | |||
| + | Right click to return to the Main Menu | ||
| + | |||
| + | 9. Click AI | ||
[[File:SMD_-_SystemUI_New_-_8.jpg|600px]] | [[File:SMD_-_SystemUI_New_-_8.jpg|600px]] | ||
| + | |||
| + | 10. Click Parameters > SMD | ||
[[File:SMD_-_SystemUI_New_-_9.jpg|600px]] | [[File:SMD_-_SystemUI_New_-_9.jpg|600px]] | ||
| + | |||
| + | 11. Use the dropdown box to select the channel | ||
| + | |||
| + | Click to toggle and enable the SMD for this channel | ||
[[File:SMD_-_SystemUI_New_-_10.jpg|600px]] | [[File:SMD_-_SystemUI_New_-_10.jpg|600px]] | ||
| + | |||
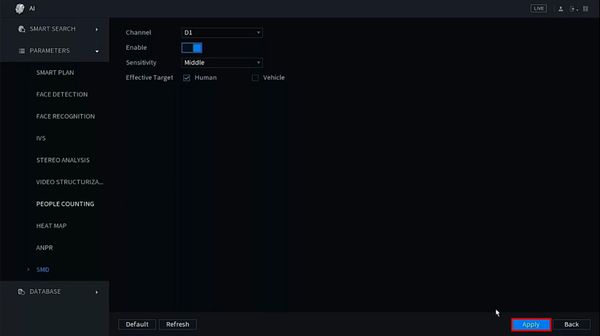
| + | 12. Use the additional options to configure the parameters of SMD: | ||
| + | |||
| + | * Sensitivity | ||
| + | * Effective Target - Human, Vehicle, or Both | ||
[[File:SMD_-_SystemUI_New_-_11.jpg|600px]] | [[File:SMD_-_SystemUI_New_-_11.jpg|600px]] | ||
| + | |||
| + | 13. Click Apply to save | ||
[[File:SMD_-_SystemUI_New_-_12.jpg|600px]] | [[File:SMD_-_SystemUI_New_-_12.jpg|600px]] | ||
Latest revision as of 18:08, 24 January 2020
Prerequisites
- Dahua device that supports SMD
Video Instructions
Step by Step Instructions
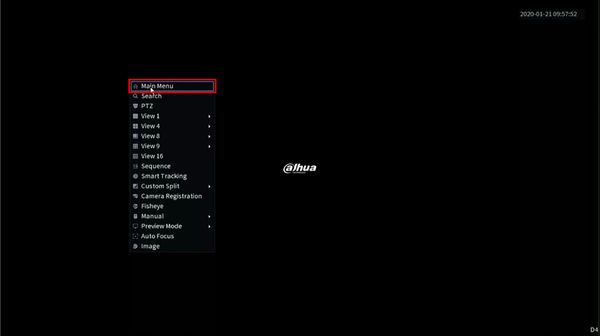
1. From Live View
Right click select Main Menu
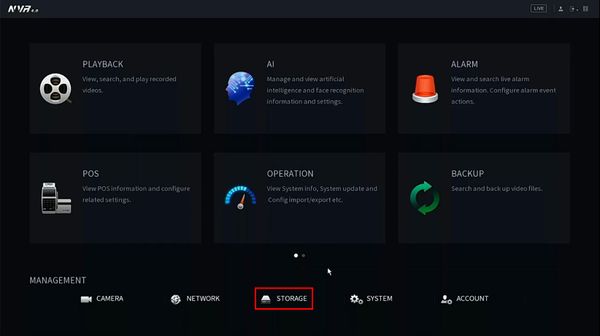
2. Click Storage
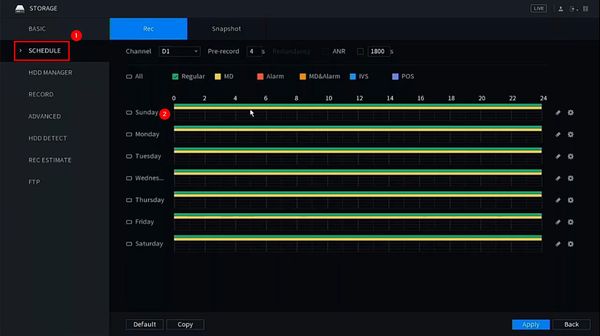
3. Confirm the recorder is set to motion detection recording
Click Schedule
Review the on screen schedule, make sure motion detection (MD) is enabled
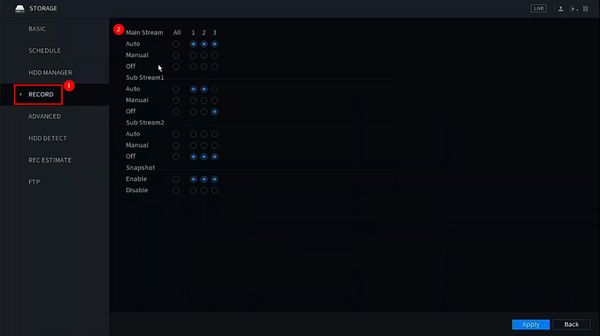
4. Click Record
Confirm the record settings are enabled for the desired streams
Right click to return to the Main Menu
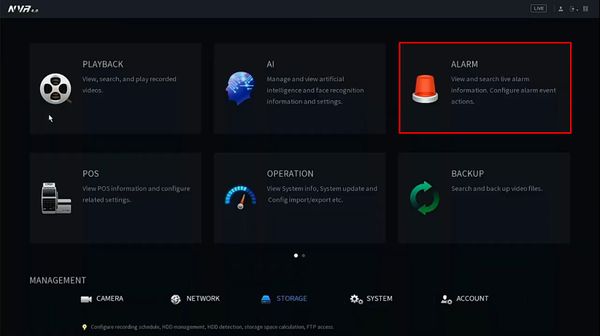
5. Click Alarm
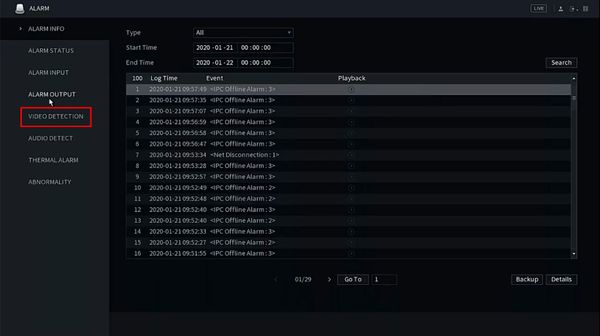
6. Click Video Detection
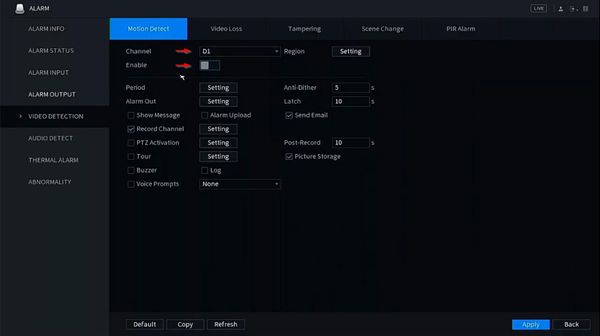
7. Motion Detect
Use the dropdown to select the channel
Click to toggle and enable the Motion detection for this channel
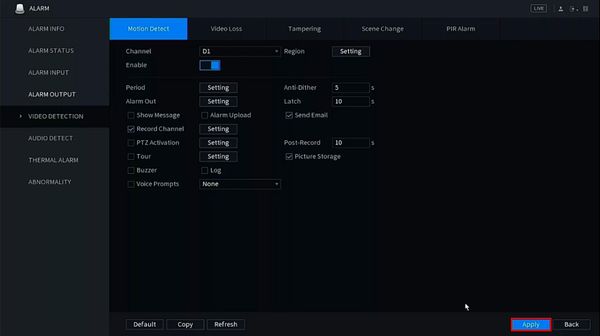
8. Click Apply to save
Right click to return to the Main Menu
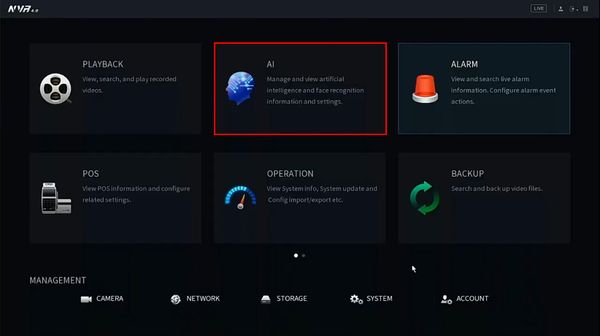
9. Click AI
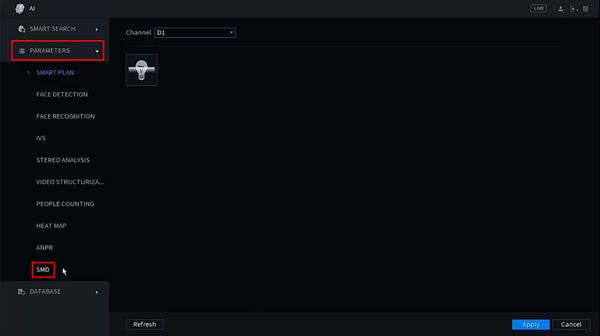
10. Click Parameters > SMD
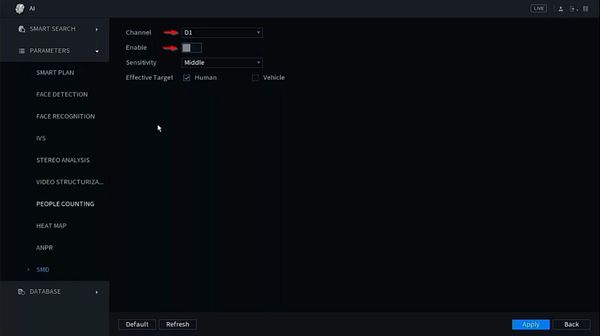
11. Use the dropdown box to select the channel
Click to toggle and enable the SMD for this channel
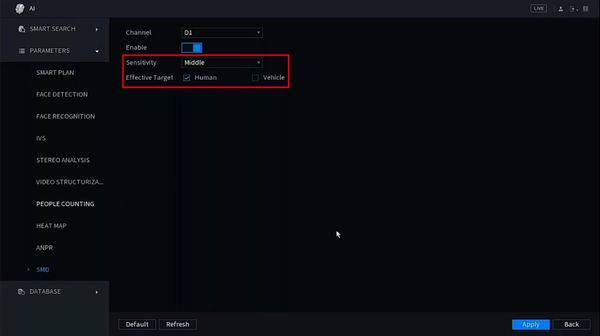
12. Use the additional options to configure the parameters of SMD:
- Sensitivity
- Effective Target - Human, Vehicle, or Both
13. Click Apply to save
