Difference between revisions of "3rdParty/How To Add A Digital Watchdog Camera to A Dahua Recorder"
| Line 13: | Line 13: | ||
<br>When the camera shows up in the list select "Click" under "IP Conf." | <br>When the camera shows up in the list select "Click" under "IP Conf." | ||
| − | [[File:DWCameraAdd1.png| | + | [[File:DWCameraAdd1.png|1100px]] |
2. Set the "IP Configuration Mode" to "Static IP", then change the IP Address to an IP address on the same IP Scheme as the Dahua recorder. | 2. Set the "IP Configuration Mode" to "Static IP", then change the IP Address to an IP address on the same IP Scheme as the Dahua recorder. | ||
| Line 20: | Line 20: | ||
<br>Select "Apply" to save your changes. | <br>Select "Apply" to save your changes. | ||
| − | [[File:DWCameraAdd2.png| | + | [[File:DWCameraAdd2.png|300px]] |
3. Log into the web interface of the Dahua recorder and go to Setup -> Image -> Registration. | 3. Log into the web interface of the Dahua recorder and go to Setup -> Image -> Registration. | ||
<br>Select "Manual Add". | <br>Select "Manual Add". | ||
| − | [[File:DWCameraAdd3.png| | + | [[File:DWCameraAdd3.png|1100px]] |
4. Change the Manufacturer to "Onvif". | 4. Change the Manufacturer to "Onvif". | ||
| Line 34: | Line 34: | ||
<br>You should see the camera listed on the bottom of the registration page with a Green Checkmark next to it. | <br>You should see the camera listed on the bottom of the registration page with a Green Checkmark next to it. | ||
| − | [[File:DWCameraAdd4.png| | + | [[File:DWCameraAdd4.png|500px]] |
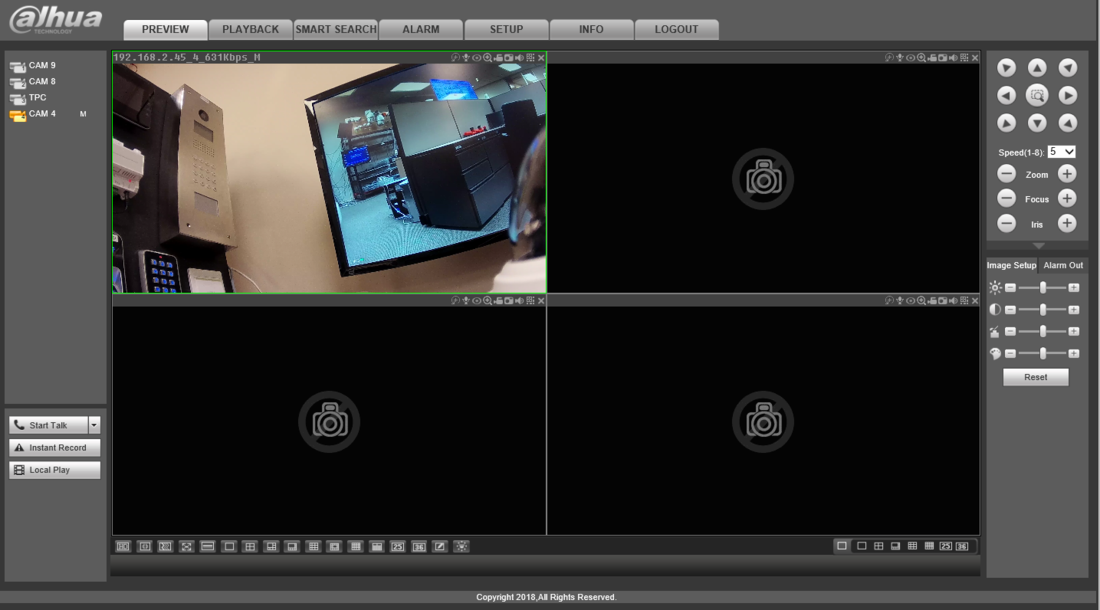
5. Open the Live Preview and select the newly added camera to see a live stream of the camera. | 5. Open the Live Preview and select the newly added camera to see a live stream of the camera. | ||
| − | [[File:DWCameraAdd5.PNG| | + | [[File:DWCameraAdd5.PNG|1100px]] |
Latest revision as of 00:39, 26 September 2018
Contents
How to Add a Digital Watchdog Camera to a Dahua Recorder
Description
This article will cover how to add a Digital Watchdog IP camera to a Dahua NVR, DVR, or XVR
Prerequisites
- Dahua NVR, DVR, or XVR on the latest firmware
- Digital Watchdog Camera on latest firmware. NOTE: Older firmware will not work.
- Digital Watchdog IP Finder: https://digital-watchdog.com/productdetail/DW-IP-Finder/
Step by Step Instructions
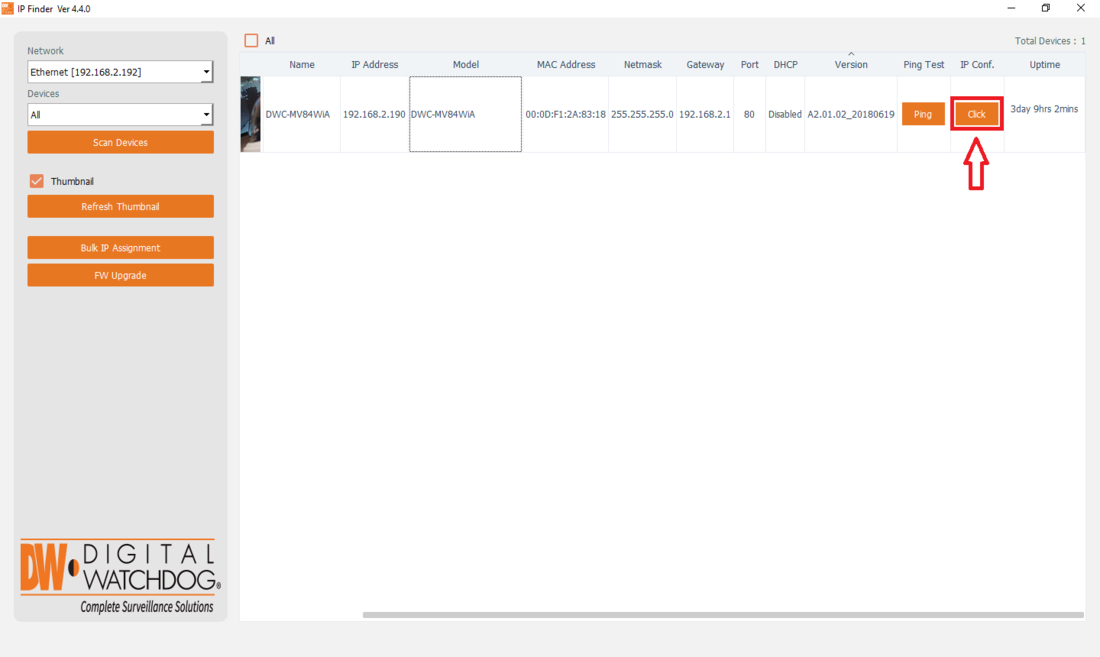
1. Open Digital Watchdog IP config and select "Scan for Devices".
When the camera shows up in the list select "Click" under "IP Conf."
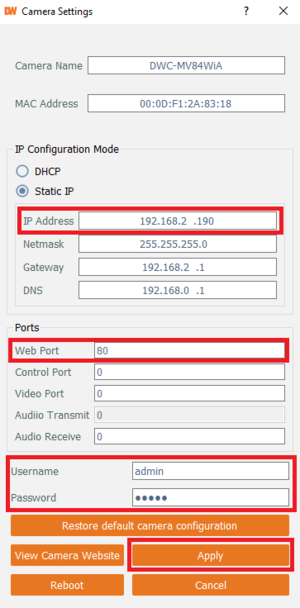
2. Set the "IP Configuration Mode" to "Static IP", then change the IP Address to an IP address on the same IP Scheme as the Dahua recorder.
Make a note of the "Web Port".
Change the "Username" and "Password" to credentials you will remember.
Select "Apply" to save your changes.
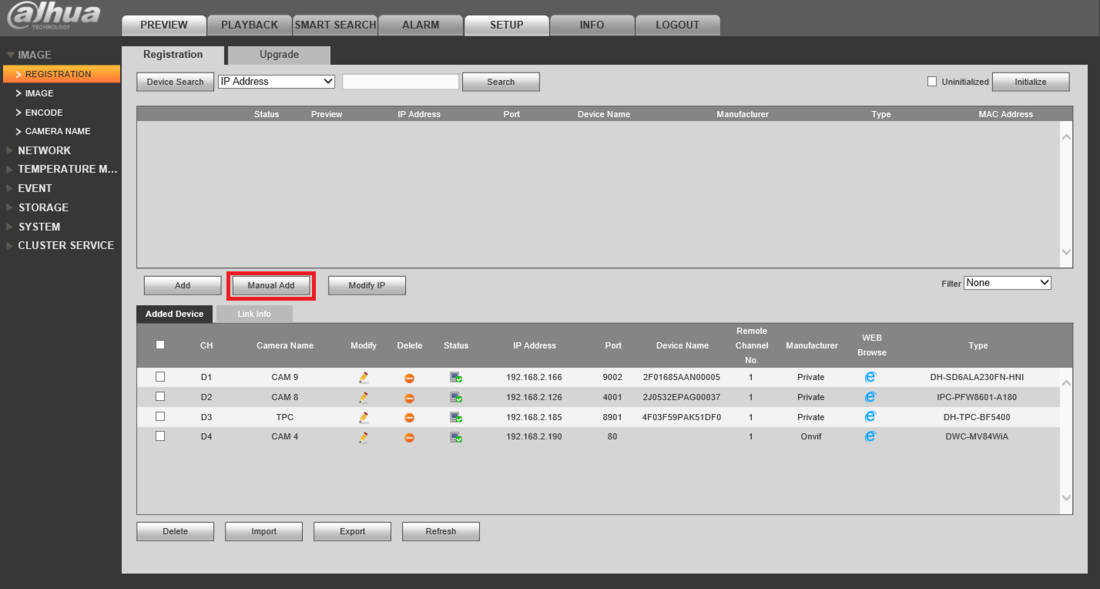
3. Log into the web interface of the Dahua recorder and go to Setup -> Image -> Registration.
Select "Manual Add".
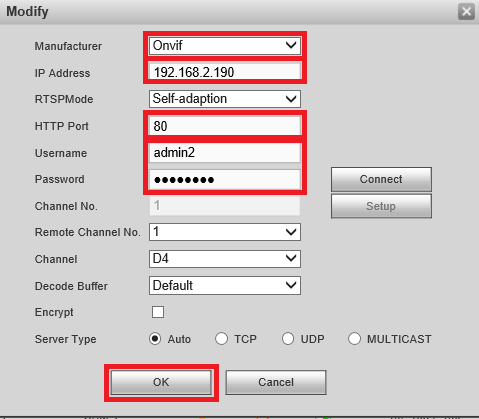
4. Change the Manufacturer to "Onvif".
Type in the IP address of the Digital Watchdog camera from Step 2.
Type in the "Web Port" from Step 2 in "HTTP Port".
Type in the Username and Password from Step 2.
Select "OK" at the bottom to save the changes.
You should see the camera listed on the bottom of the registration page with a Green Checkmark next to it.
5. Open the Live Preview and select the newly added camera to see a live stream of the camera.
