Difference between revisions of "Doorbell/DB11/Modify PIR Detection Zone"
| (2 intermediate revisions by 2 users not shown) | |||
| Line 1: | Line 1: | ||
| − | =Modify PIR Detection Zone= | + | =Modify DB11 PIR Motion Detection Zone= |
==Description== | ==Description== | ||
| − | How to | + | How to adjust the PIR and Motion Detection settings on a DB11 |
==Prerequisites== | ==Prerequisites== | ||
| − | *[[ | + | *[[DMSS|DMSS]] |
| − | *[ | + | *[[DMSS/Create_Dahua_Account|Dahua DMSS Account]] |
| − | *[[ | + | *[[Doorbell/DB11|DB11]] added to a DMSS Account |
| − | |||
| − | |||
==Step by Step Instructions== | ==Step by Step Instructions== | ||
| − | 1. | + | 1. Open the DMSS app and select '''Device''' at the bottom. |
| − | + | <br>Then tap on the 3 dots "'''...'''" to the right of the DB11 | |
| − | + | [[File:DB11ModifyPassword1.png|400px]] | |
| − | [[File: | ||
| − | + | 2. Tap on '''Device Details''' | |
| − | |||
| − | + | [[File:DB11ModifyPassword2.png|400px]] | |
| − | [[File: | ||
| − | + | 3. Tap on '''Arming Settings''' | |
| − | [[File: | + | |
| − | [[File: | + | [[File:DB11PIRMotionSetup1.png|400px]] |
| + | |||
| + | 4. Enable the slider next to '''Motion Detection'''. | ||
| + | <br>Then tap on '''PIR Region''' | ||
| + | |||
| + | [[File:DB11PIRMotionSetup2.png|400px]] | ||
| + | |||
| + | 5. Drag the slider on the left for the amount of distance you want the PIR to monitor. (100% = 5m [16.50 ft]) | ||
| + | <br>Tap the 3 zones either ON or OFF. | ||
| + | <br>Select '''Save''' at the top | ||
| + | |||
| + | [[File:LincX2ProPIRFloodlight11.png|800px]] | ||
| + | |||
| + | 6. Tap on '''Motion Detection Area''' | ||
| + | |||
| + | [[File:DB11PIRMotionSetup3.png|400px]] | ||
| + | |||
| + | 7. Adjust the areas that the camera will look for motion by keeping areas in red highlighted for motion detection or clear to not detect for motion. | ||
| + | <br>Tap on the broom icon on the left to clear everything highlighted on the screen. | ||
| + | <br>Tap on the center icon to swap between areas that are highlighted and not highlighted. | ||
| + | <br>Tap on the eraser icon on the right to switch between adding or removing highlighted areas. | ||
| + | <br>When you are done, tap on the floppy disk save icon at the top right. | ||
| + | <br>Then tap on the back arrow at the top left | ||
| + | |||
| + | [[File:LincX2ProMotionDetection8.png|800px]] | ||
Latest revision as of 21:55, 8 April 2024
Contents
Modify DB11 PIR Motion Detection Zone
Description
How to adjust the PIR and Motion Detection settings on a DB11
Prerequisites
- DMSS
- Dahua DMSS Account
- DB11 added to a DMSS Account
Step by Step Instructions
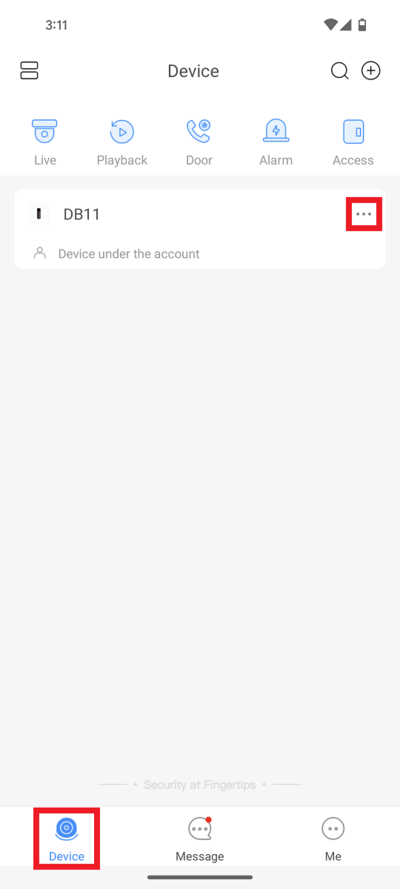
1. Open the DMSS app and select Device at the bottom.
Then tap on the 3 dots "..." to the right of the DB11
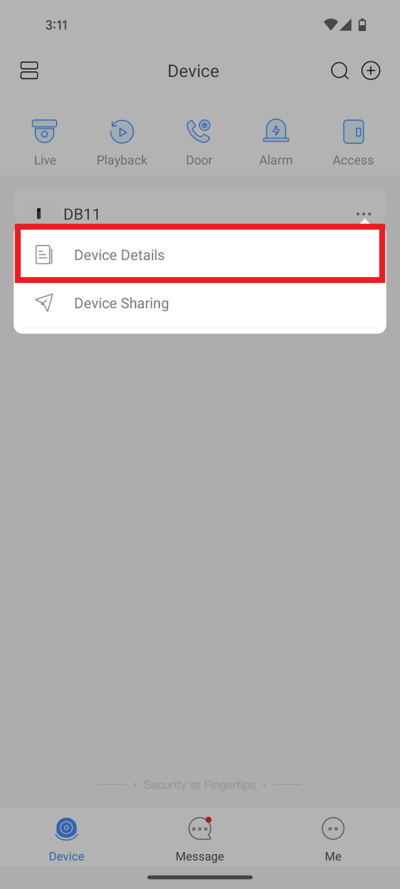
2. Tap on Device Details
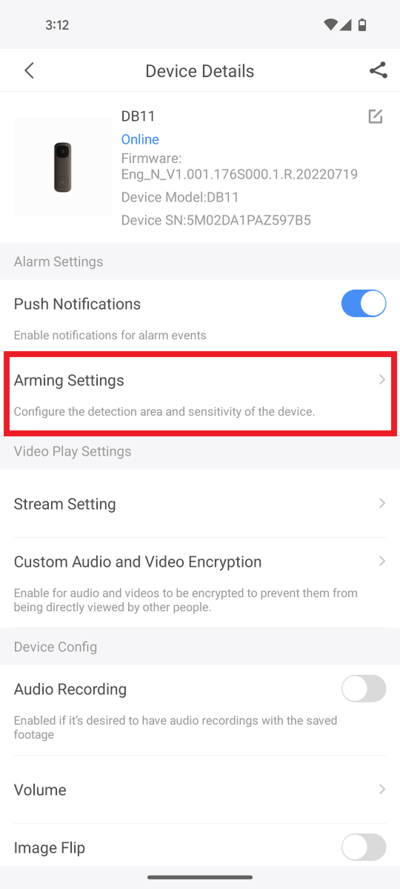
3. Tap on Arming Settings
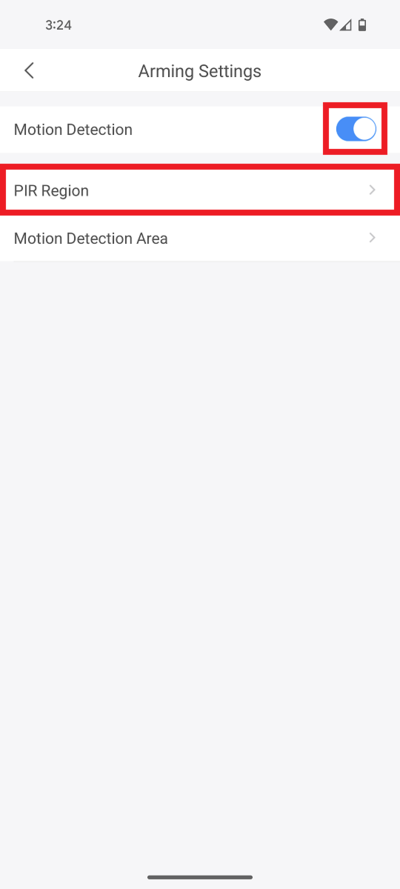
4. Enable the slider next to Motion Detection.
Then tap on PIR Region
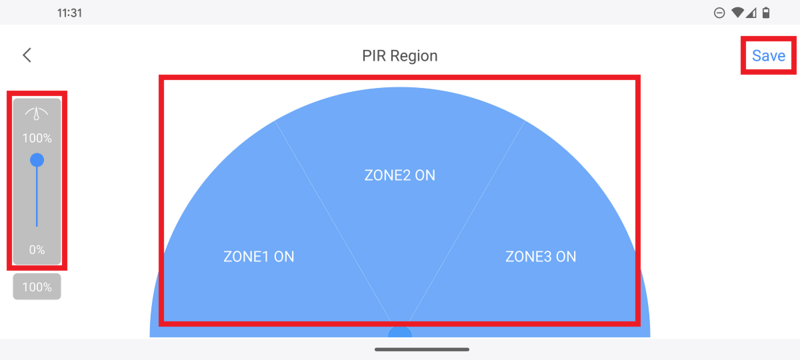
5. Drag the slider on the left for the amount of distance you want the PIR to monitor. (100% = 5m [16.50 ft])
Tap the 3 zones either ON or OFF.
Select Save at the top
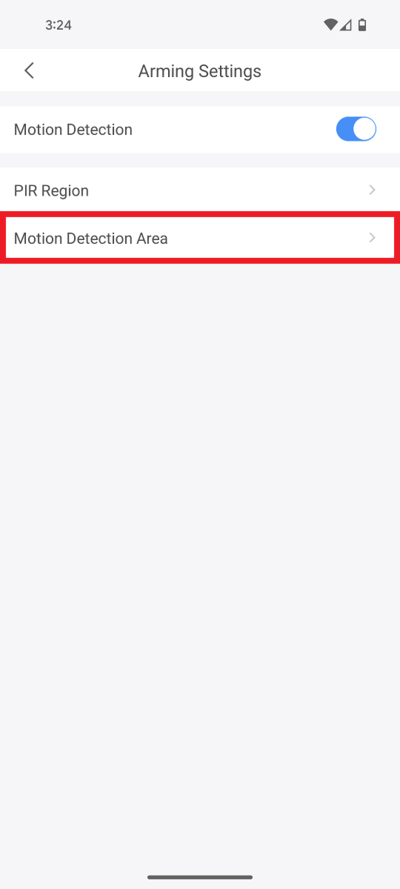
6. Tap on Motion Detection Area
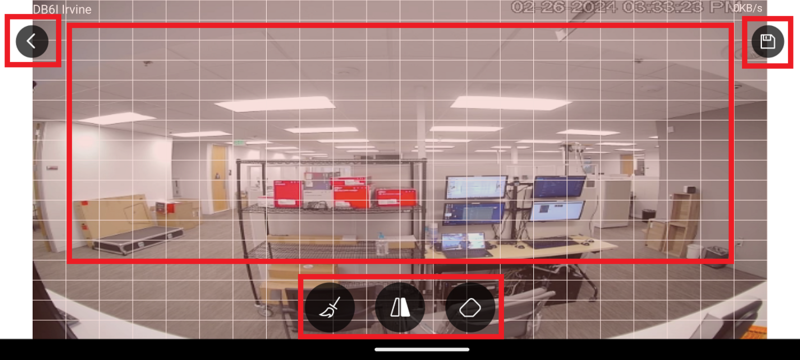
7. Adjust the areas that the camera will look for motion by keeping areas in red highlighted for motion detection or clear to not detect for motion.
Tap on the broom icon on the left to clear everything highlighted on the screen.
Tap on the center icon to swap between areas that are highlighted and not highlighted.
Tap on the eraser icon on the right to switch between adding or removing highlighted areas.
When you are done, tap on the floppy disk save icon at the top right.
Then tap on the back arrow at the top left
