Difference between revisions of "Template:Face Recognition SystemUI NewGUI"
(Created page with " ==Prerequisites== ==Video Instructions== <embedvideo service="youtube">https://youtu.be/lwRPD4q7_OM</embedvideo> ==Step by Step Instructions==") |
|||
| Line 1: | Line 1: | ||
==Prerequisites== | ==Prerequisites== | ||
| + | *HDMI output | ||
| + | |||
==Video Instructions== | ==Video Instructions== | ||
<embedvideo service="youtube">https://youtu.be/lwRPD4q7_OM</embedvideo> | <embedvideo service="youtube">https://youtu.be/lwRPD4q7_OM</embedvideo> | ||
| + | |||
==Step by Step Instructions== | ==Step by Step Instructions== | ||
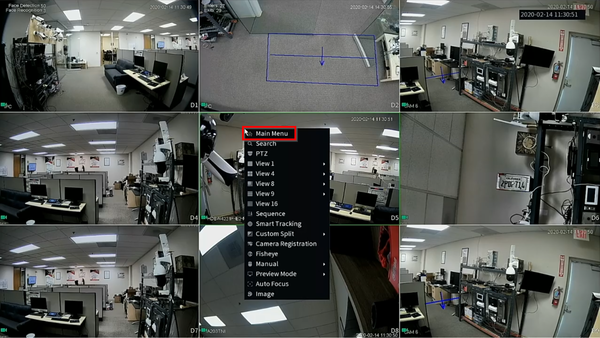
| + | 1. Select "Main Menu" | ||
| + | |||
| + | [[File:1._Main_Menu_-_Smart_Search_Face_Recognition_New_SystemUI.png|600px]] | ||
| + | |||
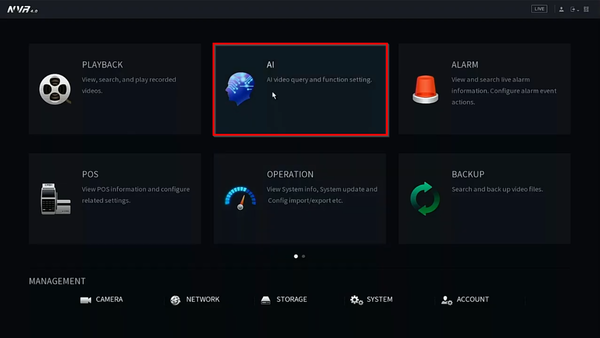
| + | 2. Select "AI" | ||
| + | |||
| + | [[File:2._AI_-_Smart_Search_Face_Recognition_New_SystemUI.png|600px]] | ||
| + | |||
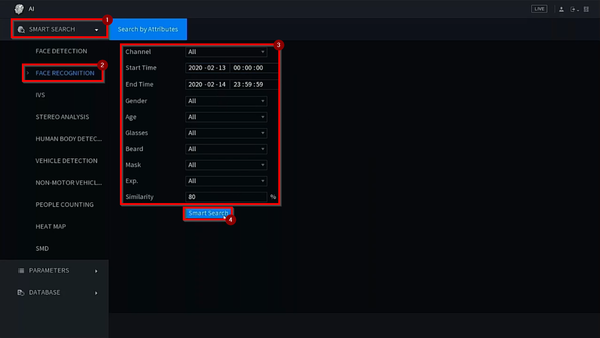
| + | 3. Expand "Smart Search" => Face Recognition => Select the channels, start time, end time, and attributes to view the face recognition => Click "Smart Search". | ||
| + | |||
| + | [[File:3._Face_Recognition_-_Smart_Search_Face_Recognition_New_SystemUI.png|600px]] | ||
| + | |||
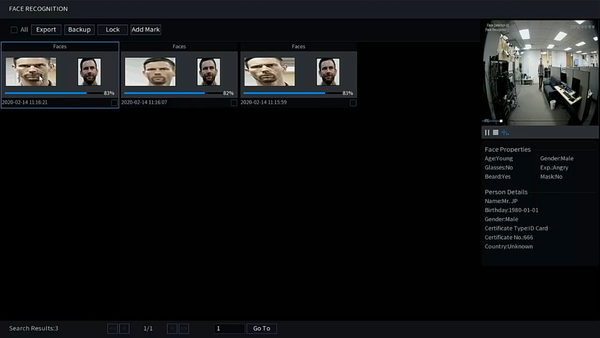
| + | 4. Double click on the search results to playback the video. | ||
| + | |||
| + | [[File:4._Playback_-_Smart_Search_Face_Recognition_New_SystemUI.png|600px]] | ||
Latest revision as of 20:51, 19 February 2020
Prerequisites
- HDMI output
Video Instructions
Step by Step Instructions
1. Select "Main Menu"
2. Select "AI"
3. Expand "Smart Search" => Face Recognition => Select the channels, start time, end time, and attributes to view the face recognition => Click "Smart Search".
4. Double click on the search results to playback the video.


