Notice: Firmware Links Under Maintenance We are currently undergoing maintenance on all firmware links. If any links are inaccessible, please email or contact Tech Support for the firmware. We appreciate your patience during the maintenance, thank you for your understanding.
Difference between revisions of "CMS/DSS/Server Main-Sub"
Norman.Ning (talk | contribs) (→Step by Step Instructions) |
Norman.Ning (talk | contribs) (→Step by Step Instructions) |
||
| Line 14: | Line 14: | ||
Log into DSS Web Config Page of the Sub Server and click on About | Log into DSS Web Config Page of the Sub Server and click on About | ||
| − | [[7016Mainsub01.jpg|750px]] | + | [[File:7016Mainsub01.jpg|750px]] |
Make sure that all your DSS All-in-ones are of the same version. | Make sure that all your DSS All-in-ones are of the same version. | ||
| Line 34: | Line 34: | ||
2-3. In the end, click on Apply and Restart. | 2-3. In the end, click on Apply and Restart. | ||
| − | [[7016Mainsub02.jpg|750px]] | + | [[File:7016Mainsub02.jpg|750px]] |
'''Step 3: Configure Sub-server on the Main Server.''' | '''Step 3: Configure Sub-server on the Main Server.''' | ||
| Line 40: | Line 40: | ||
3-1. Log into DSS Client with the Main Server IP and select [System Deployment] | 3-1. Log into DSS Client with the Main Server IP and select [System Deployment] | ||
| − | [[7016Mainsub03.jpg|750px]] | + | [[File:7016Mainsub03.jpg|750px]] |
3-2. Here you can see all the Sub-servers that registered themselves on the Main Server. | 3-2. Here you can see all the Sub-servers that registered themselves on the Main Server. | ||
| Line 46: | Line 46: | ||
You can enable or disable any of the Sub Servers. | You can enable or disable any of the Sub Servers. | ||
| − | [[7016Mainsub04.jpg|750px]] | + | [[File:7016Mainsub04.jpg|750px]] |
'''Step 4: Allocate resources''' | '''Step 4: Allocate resources''' | ||
| Line 52: | Line 52: | ||
4-1. Click on [Allocate Resources] and you can assign devices to Sub Servers. | 4-1. Click on [Allocate Resources] and you can assign devices to Sub Servers. | ||
| − | [[7016Mainsub05.jpg|750px]] | + | [[File:7016Mainsub05.jpg|750px]] |
4-2. You can drag the Devices to any of the Sub Servers you want. | 4-2. You can drag the Devices to any of the Sub Servers you want. | ||
| − | [[7016Mainsub06.jpg|750px]] | + | [[File:7016Mainsub06.jpg|750px]] |
4-3. Here is an example after resources are allocated | 4-3. Here is an example after resources are allocated | ||
| − | [[7016Mainsub07.jpg|750px]] | + | [[File:7016Mainsub07.jpg|750px]] |
4-4. When adding a Device, you can also assign the Device to any of the Servers in the cluster. | 4-4. When adding a Device, you can also assign the Device to any of the Servers in the cluster. | ||
| − | [[7016Mainsub08.jpg|750px]] | + | [[File:7016Mainsub08.jpg|750px]] |
Latest revision as of 06:27, 21 December 2022
Descriptions
DSS All-in-one supports Main-sub Mode which allows you to create a DSS Cluster. Compared to a single DSS All-in-one, Main-sub mode is better in terms of Device Access Capability, Bandwidth, and System Redundancy, etc.
This document will walk you through the process of configuring DSS Main-sub Mode.
Prerequisites
- At least 2 DSS4004s or DSS7016s
- Make sure that all your DSS All-in-ones are of the same version.
Step by Step Instructions
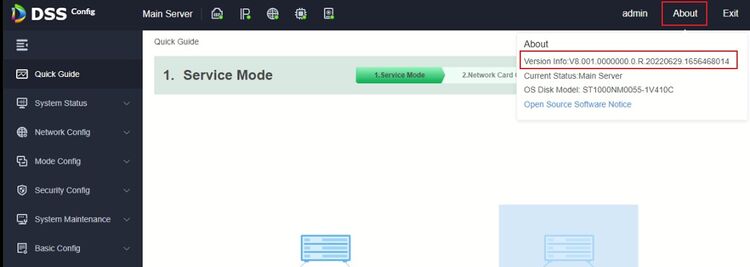
Step 0: Check DSS Version
Log into DSS Web Config Page of the Sub Server and click on About
Make sure that all your DSS All-in-ones are of the same version.
Step 1: Decide which one is the Main Server and which is (are) Sub Server (s)
In Main-sub Mode, you could only have one Main Server, and the other(s) will be Sub Servers. Sub-servers will register themselves onto the Main Server so that their resources can be deployed.
For example, I have two DSS All-in-ones, whose IP addresses are 10.5.2.60 and 10.5.2.65. I will nominate 10.5.2.60 as the Main Server and 10.5.2.65 as the Sub Server.
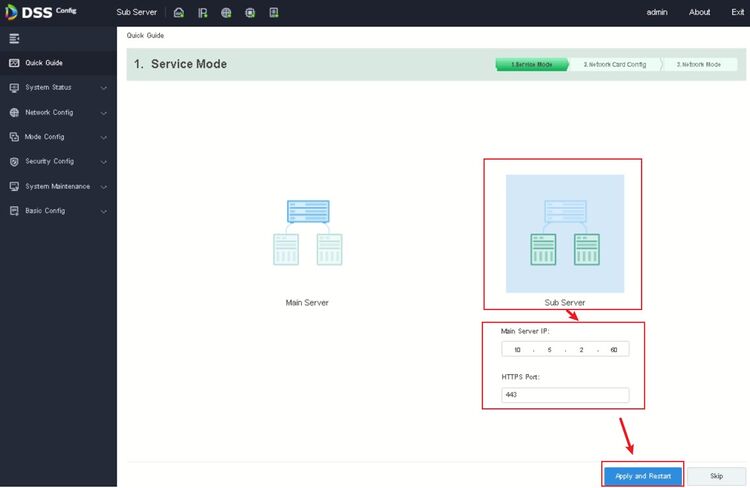
Step 2: Configure Sub Server(s)
Log into DSS Web Config Page of the Sub Server.
2-1. On the homepage, select “Sub Server”, which will make this DSS work as a Sub Server.
2-2. Then, insert the Main Server IP and the HTTPS Port (443 by default).
2-3. In the end, click on Apply and Restart.
Step 3: Configure Sub-server on the Main Server.
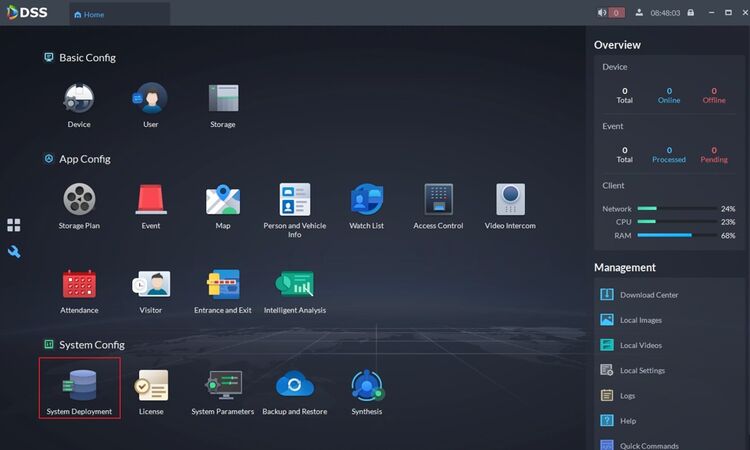
3-1. Log into DSS Client with the Main Server IP and select [System Deployment]
3-2. Here you can see all the Sub-servers that registered themselves on the Main Server.
You can enable or disable any of the Sub Servers.
Step 4: Allocate resources
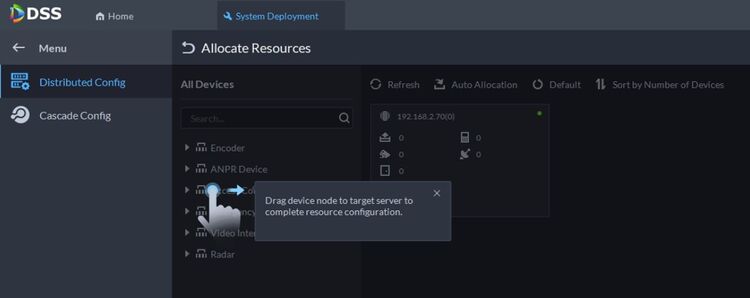
4-1. Click on [Allocate Resources] and you can assign devices to Sub Servers.
4-2. You can drag the Devices to any of the Sub Servers you want.
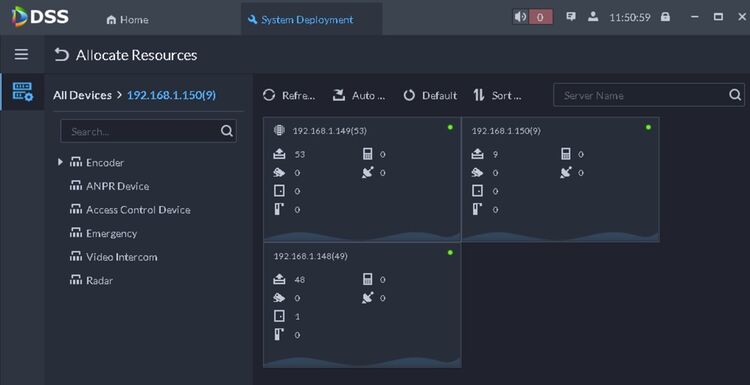
4-3. Here is an example after resources are allocated
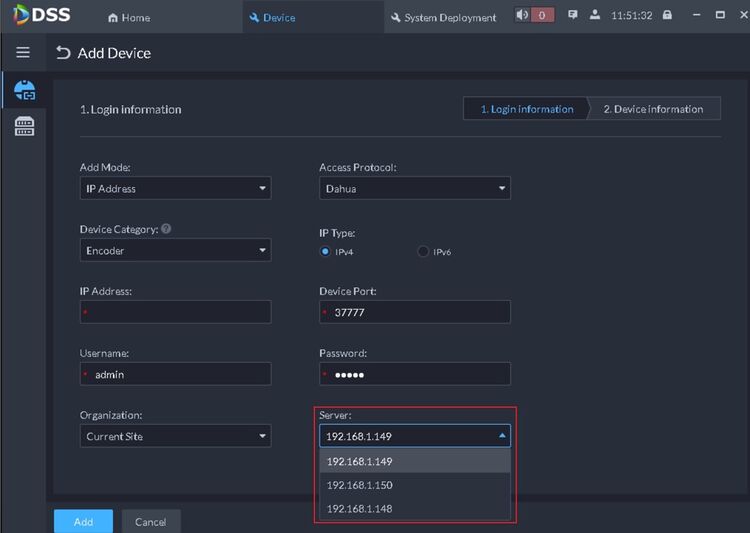
4-4. When adding a Device, you can also assign the Device to any of the Servers in the cluster.
