Difference between revisions of "Access Control/How To Setup DHI ASM100"
| Line 3: | Line 3: | ||
This step by step guide will run through the use of DHI-ASM100 with SmartPSS 1.16.1's access control section to assist in assigning 13.56 MHz MIFARE cards. | This step by step guide will run through the use of DHI-ASM100 with SmartPSS 1.16.1's access control section to assist in assigning 13.56 MHz MIFARE cards. | ||
===Prerequisites=== | ===Prerequisites=== | ||
| − | * Windows 10 PC | + | * Windows 7/8.1/10 PC |
* [[File:SmartPSSIcon1.16.png|65px|SmartPSS<br />1.16.1|link=https://dahuawiki.com/images/c/c9/483223_dh_smartpss_en_is_v1.16.1.r.20170220.zip]] [https://dahuawiki.com/images/Software/SmartPSS/473011_dh_smartpss_en_is_v1.16.1.r.20170119.zip SmartPSS 1.16.1] | * [[File:SmartPSSIcon1.16.png|65px|SmartPSS<br />1.16.1|link=https://dahuawiki.com/images/c/c9/483223_dh_smartpss_en_is_v1.16.1.r.20170220.zip]] [https://dahuawiki.com/images/Software/SmartPSS/473011_dh_smartpss_en_is_v1.16.1.r.20170119.zip SmartPSS 1.16.1] | ||
* DHI-ASM100 | * DHI-ASM100 | ||
| Line 10: | Line 10: | ||
<embedvideo service="youtube">https://youtu.be/kBUfZNA423c</embedvideo> | <embedvideo service="youtube">https://youtu.be/kBUfZNA423c</embedvideo> | ||
===Step by Step Instructions=== | ===Step by Step Instructions=== | ||
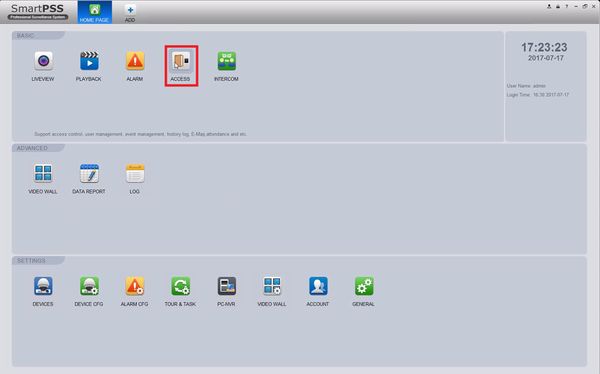
| − | 1. | + | 1. Connect the USB cable from the DHI-ASM100 to the Windows PC. Launch SmartPSS 1.16.1 then select ACCESS. |
| + | [[File:ASM100initial001.jpg|600x600px]] | ||
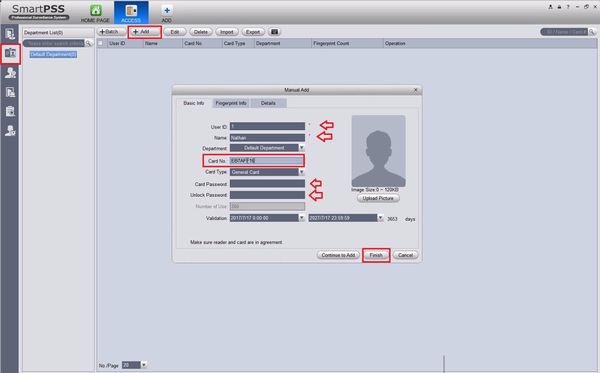
| + | 2. '''Single User''' Select the User tab on the top left, then select +Add. This is the area of SmartPSS 1.16.1 where you can add a new user to the ACCESS, in this page you can input: | ||
| + | * User ID | ||
| + | * Name | ||
| + | * Department (must be configured before) | ||
| + | * Card Type | ||
| + | * Card Password | ||
| + | * Unlock Password | ||
| + | * Validation Period | ||
| + | * 120KB picture | ||
| + | |||
| + | '''When you select Card No. the DHI-ASM100 will beep, when the light is greed it will read the card.''' | ||
| + | |||
| + | [[File:ASM100initial002.jpg|600x600px]] | ||
| + | |||
| + | |||
| + | 3. '''Batch User''' | ||
| + | |||
| + | [[File:ASM100initial001.jpg|600x600px]] | ||
| Line 26: | Line 45: | ||
D - Card Type: | D - Card Type: | ||
| − | + | General Card - 13.65 mhz mifare | |
| − | |||
Revision as of 20:02, 18 July 2017
Contents
How To Setup DHI-ASM100
Description
This step by step guide will run through the use of DHI-ASM100 with SmartPSS 1.16.1's access control section to assist in assigning 13.56 MHz MIFARE cards.
Prerequisites
- Windows 7/8.1/10 PC
-
 SmartPSS 1.16.1
 - DHI-ASM100
- DHI-ASC1204B/ASC1204C added to SmartPSS1.16.1
Video Instructions
Step by Step Instructions
1. Connect the USB cable from the DHI-ASM100 to the Windows PC. Launch SmartPSS 1.16.1 then select ACCESS.
2. Single User Select the User tab on the top left, then select +Add. This is the area of SmartPSS 1.16.1 where you can add a new user to the ACCESS, in this page you can input:
- User ID
- Name
- Department (must be configured before)
- Card Type
- Card Password
- Unlock Password
- Validation Period
- 120KB picture
When you select Card No. the DHI-ASM100 will beep, when the light is greed it will read the card.
3. Batch User
A - User ID: Upper and lower case letters and numbers allowed, but no spaces.
B - Name: Upper and lower case letters, numbers, spaces allowed.
C - Card No.: this will be inputted with the card reader
D - Card Type: General Card - 13.65 mhz mifare

