Notice: Firmware Links Under Maintenance We are currently undergoing maintenance on all firmware links. If any links are inaccessible, please email or contact Tech Support for the firmware. We appreciate your patience during the maintenance, thank you for your understanding.
Template:Tripwire WebUI Old
Video Instructions
Step By Step Instructions
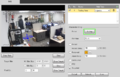
1. Navigate in a web browser to the IP address of the camera or recorder and log into the device

2.Select Setting -> Event -> IVS.

3. Next to Rule Type click "+" in the new rule that shows below, define the Rule Name and in the drop down select "Tripwire" as the rule type

4. Once the rule is created and named, use "Draw Rule" to place your Tripwire line and under the "Direction drop down define in which direction, if only one, crossing is prohibited. In this example crossing from B -> A is prohibited.

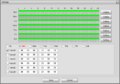
5. Click "Setting" next to Period and a new window will appear. Here you can set the active time periods for the tripwire. By default the tripwire will be active 24/7. Each day can be edited individually or you can select multiple at once by checking the boxes and using the forms below to enter times. Up to 6 periods can be set for each day.
Setting Button
Setting Window


6. Next be sure to check any other options you may want such as Record & Record Delay, Snapshot, Relay out (1, 2, or both)alarm Delay and email.
Note: For instructions on email setup see Email Setup.
To record or save snapshots an SD card or recorder is required.

7. When finished click Save.
