Difference between revisions of "NVR/Basic Setup/Video Matrix and Spot Out"
(→'Video Matrix and Spot Out) |
(→Video Matrix and Spot Out) |
||
| (4 intermediate revisions by 2 users not shown) | |||
| Line 1: | Line 1: | ||
| − | == | + | ==Video Matrix and Spot Out== |
| − | This is a How To Guide for the following Models:<br />HCVR72A16A-S3, HCVR72A08-S3, HCVR52A16A-S3, HCVR52A16AN-S3 | + | NOTE: Video Matrix is used only for, "BNC Video Out" or "Spot Out" for HDMI2 configuration use, "Tour" |
| + | |||
| + | This is a How To Guide for the following Models: | ||
| + | ===<br />HCVR72A16A-S3, HCVR72A08-S3, HCVR52A16A-S3, HCVR52A16AN-S3=== | ||
| Line 7: | Line 10: | ||
| − | + | 1. Go to the Main Menu click on System in the Setting Section. | |
[[File:vmsp01.JPG|500px]] | [[File:vmsp01.JPG|500px]] | ||
| − | + | 2. On the Left side, click on Display. | |
| − | + | * In the first tab click on the box for the Video Matrix. | |
[[File:vmsp02.JPG|500px]] | [[File:vmsp02.JPG|500px]] | ||
| − | + | 3. A drop down menu will appear, select either VGA or HDMI Output. | |
[[File:vmsp03.JPG|500px]] | [[File:vmsp03.JPG|500px]] | ||
| − | + | 4. Once Selected, click on Apply, then on Save | |
| − | |||
[[File:vmsp03.JPG|500px]] | [[File:vmsp03.JPG|500px]] | ||
| − | + | 5. Now when it comes back up you will need to go back to the Main Menu and click on System in the Settings section. | |
[[File:vmsp01.JPG|500px]] | [[File:vmsp01.JPG|500px]] | ||
| − | + | 6. On the left column click on the video Matrix, then select the cameras that you would like to appear in the "Spot Out" monitor. | |
| − | |||
[[File:vmsp05.JPG|500px]] | [[File:vmsp05.JPG|500px]] | ||
| − | + | 7. Click Apply and Save. Now you will have a monitor that will have access to the Menu functions as well has a monitor for viewing only. | |
| + | [[Category:HD-CVI]] | ||
| + | [[Category:HCVR]] | ||
| + | [[Category:Tribrid]] | ||
| + | [[Category:Troubleshoot]] | ||
| + | [[Category:Video]] | ||
| + | |||
| + | |||
| + | ===HCVR58A32S-S2=== | ||
| + | |||
| + | *Description: | ||
| + | Spot out on HCVR58A32S is adding a second display to the recorder with the intention of certain cameras seen on that display. All functions and menus are on the primary display. | ||
| + | |||
| + | *How to designate the second display: | ||
| + | This device contains 2 HDMI and 1 VGA ports. Using the HDMI ports as your designators, attach your cables to the HCVR system. HDMI-1 then will be designated as Main-Display-1 and HDMI-2 is your Secondary-Spot Out-Display-2. If using a VGA port then whichever HDMI port is not in use will be the VGA port’s designate. Example: Using HDMI port 2 and VGA ports together the VGA port is designated as Main-Display-1 and HDMI-2 is your Secondary-Spot Out-Display-2. | ||
| + | NOTE: This feature is not programmed but automatically detected. | ||
| + | |||
| + | * To designate the cameras shown on the Secondary-Spot Out-Display-2: | ||
| + | 1. Go to the Main Menu click on System (in the Setting Section.) | ||
| + | |||
| + | [[File:hcvr58a32s2spot1.jpg| 600x600px]] | ||
| + | |||
| + | 2. On the Left side, locate and click on Video Matrix | ||
| + | |||
| + | [[File:hcvr58a32s2spot2.jpg| 600x600px]] | ||
| + | |||
| + | 3. An HDMI Tab is now opened. | ||
| + | a. Check the ‘Enable’ box. | ||
| + | |||
| + | b. Select the ‘Window Split’ option for the amount of Cameras you want displayed at once (View 4 = 4 Cameras, View 16 = View 16 Channels, etc.) | ||
| + | |||
| + | c. You will see ‘Channel Group’ with devices listed. | ||
| − | + | NOTE: These are the devices that will display on your Secondary Display. | |
| + | * To create a custom list, select ‘Add’ | ||
| + | * To edit the current list, select ‘Modify’ | ||
| + | * To delete the list, select ‘Delete’ | ||
| + | * If generating multiple lists make sure they are in order you want them to appear | ||
Latest revision as of 16:59, 6 July 2017
Video Matrix and Spot Out
NOTE: Video Matrix is used only for, "BNC Video Out" or "Spot Out" for HDMI2 configuration use, "Tour"
This is a How To Guide for the following Models:
HCVR72A16A-S3, HCVR72A08-S3, HCVR52A16A-S3, HCVR52A16AN-S3
To make this feature work you will need to do the following:
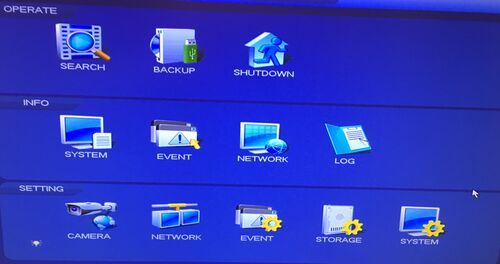
1. Go to the Main Menu click on System in the Setting Section.
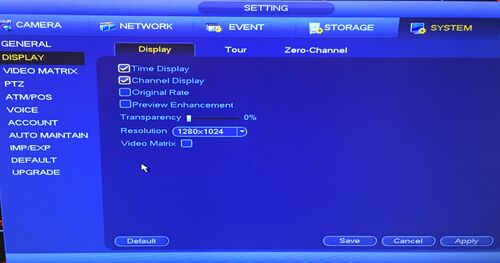
2. On the Left side, click on Display.
- In the first tab click on the box for the Video Matrix.
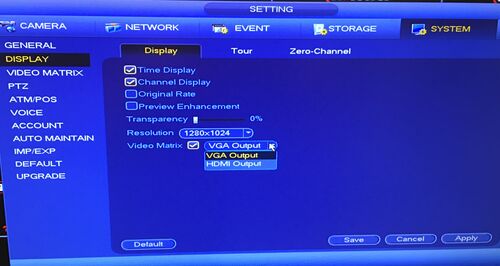
3. A drop down menu will appear, select either VGA or HDMI Output.
4. Once Selected, click on Apply, then on Save
5. Now when it comes back up you will need to go back to the Main Menu and click on System in the Settings section.
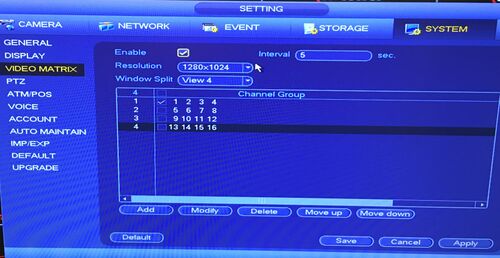
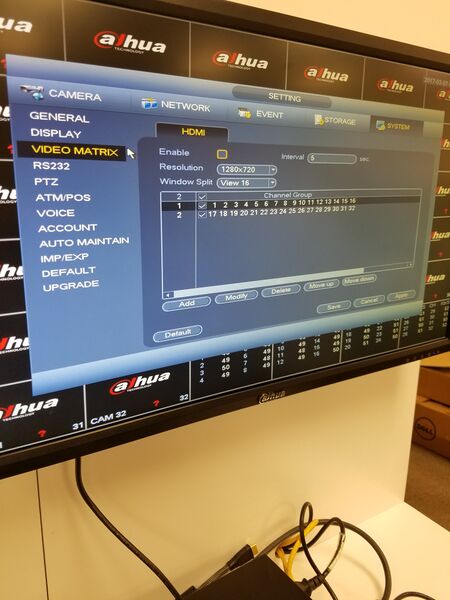
6. On the left column click on the video Matrix, then select the cameras that you would like to appear in the "Spot Out" monitor.
7. Click Apply and Save. Now you will have a monitor that will have access to the Menu functions as well has a monitor for viewing only.
HCVR58A32S-S2
- Description:
Spot out on HCVR58A32S is adding a second display to the recorder with the intention of certain cameras seen on that display. All functions and menus are on the primary display.
- How to designate the second display:
This device contains 2 HDMI and 1 VGA ports. Using the HDMI ports as your designators, attach your cables to the HCVR system. HDMI-1 then will be designated as Main-Display-1 and HDMI-2 is your Secondary-Spot Out-Display-2. If using a VGA port then whichever HDMI port is not in use will be the VGA port’s designate. Example: Using HDMI port 2 and VGA ports together the VGA port is designated as Main-Display-1 and HDMI-2 is your Secondary-Spot Out-Display-2. NOTE: This feature is not programmed but automatically detected.
- To designate the cameras shown on the Secondary-Spot Out-Display-2:
1. Go to the Main Menu click on System (in the Setting Section.)
2. On the Left side, locate and click on Video Matrix
3. An HDMI Tab is now opened.
a. Check the ‘Enable’ box.
b. Select the ‘Window Split’ option for the amount of Cameras you want displayed at once (View 4 = 4 Cameras, View 16 = View 16 Channels, etc.)
c. You will see ‘Channel Group’ with devices listed.
NOTE: These are the devices that will display on your Secondary Display.
- To create a custom list, select ‘Add’
- To edit the current list, select ‘Modify’
- To delete the list, select ‘Delete’
- If generating multiple lists make sure they are in order you want them to appear
