Difference between revisions of "CMS/DSS/Setup Date and Time"
(→How to Setup Date and Time) |
|||
| (2 intermediate revisions by one other user not shown) | |||
| Line 9: | Line 9: | ||
===Video Instructions=== | ===Video Instructions=== | ||
| − | <embedvideo service="youtube">https://youtu.be/ | + | <embedvideo service="youtube">https://youtu.be/wqfM14sdo8s</embedvideo> |
===Step by Step Instructions=== | ===Step by Step Instructions=== | ||
| − | |||
| − | [[File: | + | 1. First locate the '''ip address''' of your DSS. |
| + | |||
| + | [[File:DSStime001.jpg|600x600px]] | ||
| + | |||
| + | 2. Use address: http://'''ip address'''/config in internet explorer (ie http://192.168.2.111/config). | ||
| + | |||
| + | [[File:DSStime002.jpg|600x600px]] | ||
| + | |||
| + | 3. Once at the config webpage for DSS enter the config login. (default username: '''admin''', password: '''123456'''). | ||
| + | |||
| + | [[File:DSStime003.jpg|600x600px]] | ||
| + | |||
| + | 4. Under Quick Guide select the '''Skip''' button in the lower right corner, until you reach '''Time Setup'''. | ||
| + | |||
| + | [[File:DSStime004.jpg|600x600px]] | ||
| + | |||
| + | 5. Check DST is daylight savings time applies. Select your timezone. Manually enter the date and time, or use '''Sync PC''' to use the date and time of the PC you are currently on. If you want to use a NTP server then select '''NTP Setup''' Enter the servers address and the period that you want to update the time. This should finish configuring the time on the server, please wait while the server reboots. | ||
| + | |||
| + | [[File:DSStime005.jpg|600x600px]] | ||
| + | |||
| + | [[File:DSStime006.jpg|600x600px]] | ||
| + | |||
| + | 6. '''Sync IPC Time''' Is located in the Admin page. Use address: http://'''ip address'''/ in internet explorer (ie http://192.168.2.111/). Once at the webpage log in using the system account. (default username: '''system''', password: '''123456''') | ||
| + | |||
| + | [[File:DSStime007.jpg|600x600px]] | ||
| + | |||
| + | 7. Select the System Tab ➞ Select Parameters Tab ➞ Sync Time. Make sure the check box is checked as well, you can also set an sync interval if needed. | ||
| + | |||
| + | [[File:DSStime008.jpg|600x600px]] | ||
[[Category:Record_Setup]] | [[Category:Record_Setup]] | ||
[[Category:DSS]] | [[Category:DSS]] | ||
Latest revision as of 00:25, 25 July 2017
Contents
How to Setup Date and Time
Description
DSS server’s DMS server send sync time command to front-end device via network SDK, after frontdevice sync time, will return DMS server to info channel and sync device time to certain time. Check object to sync time(server, device, set sync start time and period, click sync time button.
Prequisites
- IE
- Internet access and IP address to the DSS Server
Video Instructions
Step by Step Instructions
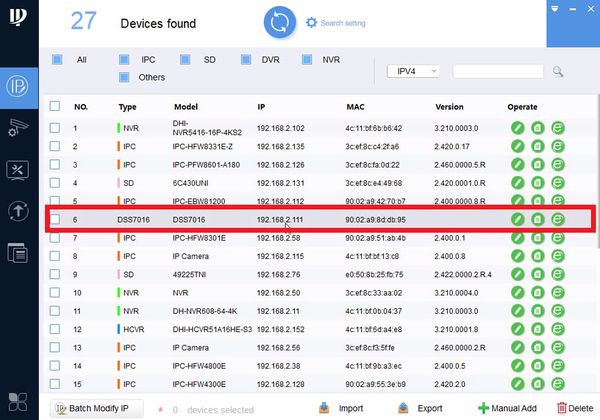
1. First locate the ip address of your DSS.
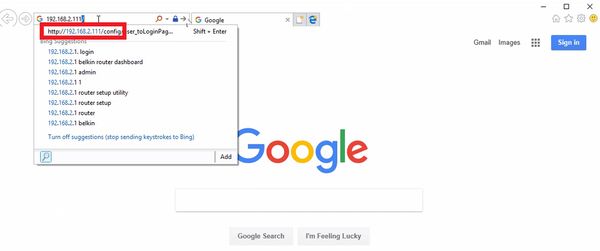
2. Use address: http://ip address/config in internet explorer (ie http://192.168.2.111/config).
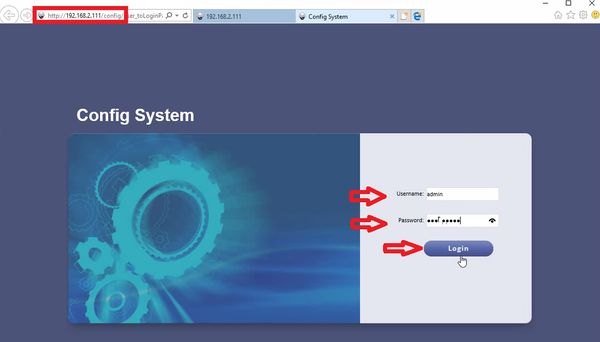
3. Once at the config webpage for DSS enter the config login. (default username: admin, password: 123456).
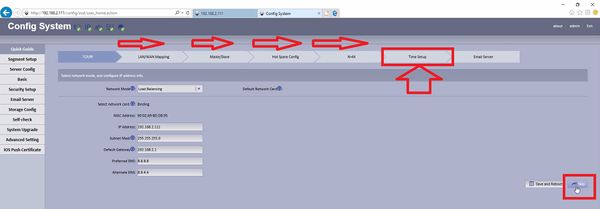
4. Under Quick Guide select the Skip button in the lower right corner, until you reach Time Setup.
5. Check DST is daylight savings time applies. Select your timezone. Manually enter the date and time, or use Sync PC to use the date and time of the PC you are currently on. If you want to use a NTP server then select NTP Setup Enter the servers address and the period that you want to update the time. This should finish configuring the time on the server, please wait while the server reboots.
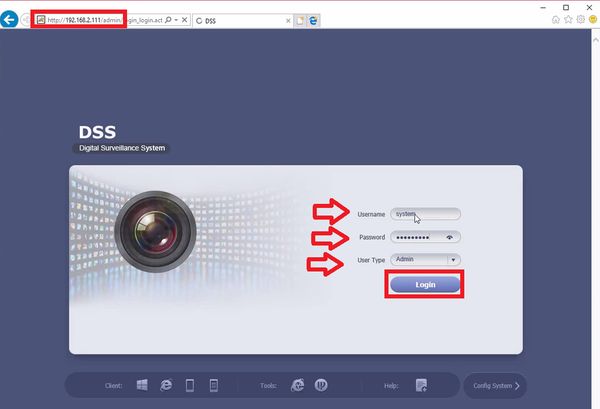
6. Sync IPC Time Is located in the Admin page. Use address: http://ip address/ in internet explorer (ie http://192.168.2.111/). Once at the webpage log in using the system account. (default username: system, password: 123456)
7. Select the System Tab ➞ Select Parameters Tab ➞ Sync Time. Make sure the check box is checked as well, you can also set an sync interval if needed.
