Difference between revisions of "Remote Access/Easy4IP Playback"
| (2 intermediate revisions by the same user not shown) | |||
| Line 1: | Line 1: | ||
| − | ==Playback Video via Easy4IP== | + | ==How to Playback Video via Easy4IP.com on Internet Explorer== |
===Description=== | ===Description=== | ||
| − | + | Follow the instructions below to access Playback Video via Easy4IP on Internet Explorer. | |
===Prerequisites=== | ===Prerequisites=== | ||
| − | + | * Device connected to the internet with P2P enabled | |
| + | * Computer with Internet Explorer and internet access | ||
| + | * [[Remote_Access/Easy4IP_Access_Setup_P2P_Plus_Signup | Easy4IP account setup and device added]] | ||
| + | * Recording on device | ||
===Video Instructions=== | ===Video Instructions=== | ||
| − | <embedvideo service="youtube"> | + | <embedvideo service="youtube">https://youtu.be/g1u3oqk5QGw</embedvideo> |
===Step by Step Instructions=== | ===Step by Step Instructions=== | ||
| − | 1. | + | 1. Open Internet Explorer on your computer and go to www.easy4ip.com and log into your account. |
| − | + | [[File:e4ipplayback001.jpg|500x500px]] | |
| − | + | 2. Once logged in please select playback at the top of the screen. You should also see your registered device on the left hand side. | |
| − | 4. ( | + | [[File:e4ipplayback002.jpg|500x500px]] |
| + | |||
| + | 3. Now select the calendar icon on the left hand side and specify a 24 hour period (usually just one date). Please know that these will show up as the date listed on the recorder. If the recorder is set forward in time, you will not be able to see this data via Easy4IP. | ||
| + | |||
| + | [[File:e4ipplayback003.jpg|500x500px]] | ||
| + | |||
| + | [[File:e4ipplayback004.jpg|500x500px]] | ||
| + | |||
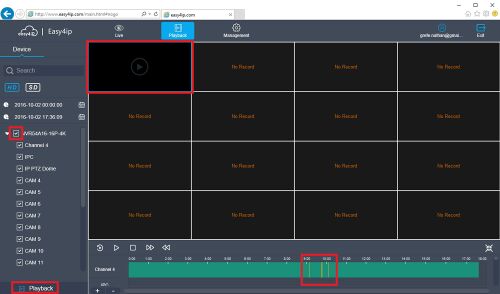
| + | 4. Now check the box of your device or the specific channel you want played and then select Playback at the bottom of the screen in order to initiate the playback transport at the bottom of the screen. A green or yellow bard should now populate the bottom of the screen displaying the different types of recordings that were setup (i.e. constant = green, motion = yellow, IVS/alarm = red) | ||
| + | |||
| + | [[File:e4ipplayback005.jpg|500x500px]] | ||
| + | |||
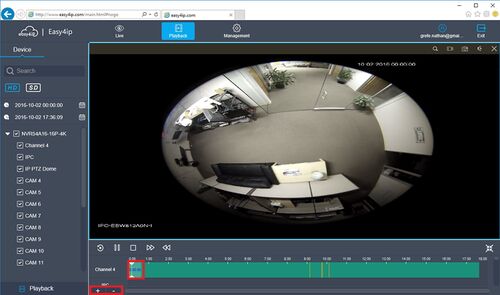
| + | 5. You can view one stream by double clicking the desired stream. Use the slider at the bottom of the screen to select the time of playback. Selecting a specific time is easy after zooming in using the + and - buttons at the bottom of the screen. | ||
| + | |||
| + | [[File:e4ipplayback006.jpg|500x500px]] | ||
| + | |||
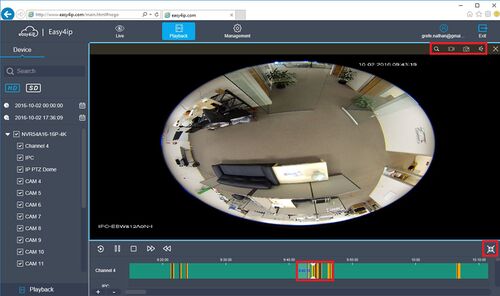
| + | 6. The icons in the top right side of the window will: Digitally Zoom, Take a Recording, Take a Snapshot, Toggle Sound on/off, and exit the playback of that stream. The icon in the lower right corner will maximize the video feed on your main monitor. | ||
| + | |||
| + | [[File:e4ipplayback007.jpg|500x500px]] | ||
| + | |||
| + | [[Category:Easy4IP]][[Category:Playback]] | ||
Latest revision as of 16:26, 25 October 2016
Contents
How to Playback Video via Easy4IP.com on Internet Explorer
Description
Follow the instructions below to access Playback Video via Easy4IP on Internet Explorer.
Prerequisites
- Device connected to the internet with P2P enabled
- Computer with Internet Explorer and internet access
- Easy4IP account setup and device added
- Recording on device
Video Instructions
Step by Step Instructions
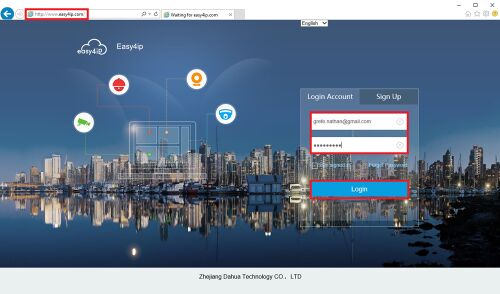
1. Open Internet Explorer on your computer and go to www.easy4ip.com and log into your account.
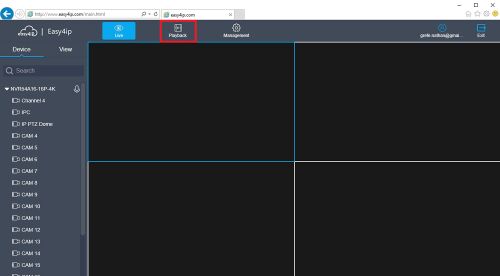
2. Once logged in please select playback at the top of the screen. You should also see your registered device on the left hand side.
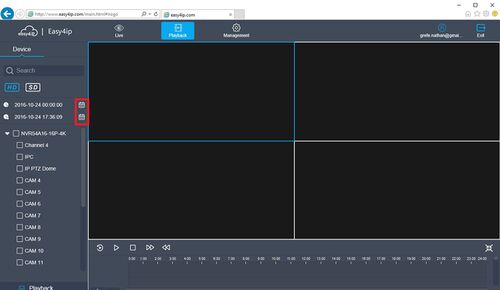
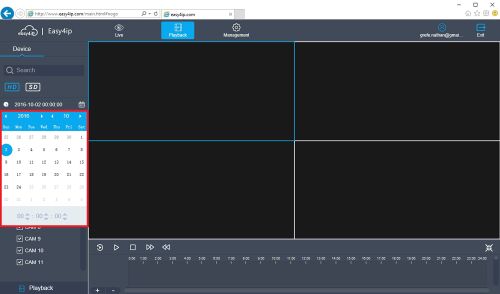
3. Now select the calendar icon on the left hand side and specify a 24 hour period (usually just one date). Please know that these will show up as the date listed on the recorder. If the recorder is set forward in time, you will not be able to see this data via Easy4IP.
4. Now check the box of your device or the specific channel you want played and then select Playback at the bottom of the screen in order to initiate the playback transport at the bottom of the screen. A green or yellow bard should now populate the bottom of the screen displaying the different types of recordings that were setup (i.e. constant = green, motion = yellow, IVS/alarm = red)
5. You can view one stream by double clicking the desired stream. Use the slider at the bottom of the screen to select the time of playback. Selecting a specific time is easy after zooming in using the + and - buttons at the bottom of the screen.
6. The icons in the top right side of the window will: Digitally Zoom, Take a Recording, Take a Snapshot, Toggle Sound on/off, and exit the playback of that stream. The icon in the lower right corner will maximize the video feed on your main monitor.
