Difference between revisions of "SmartPSS/PC NVR Setup SPSS2"
(Created page with "==How to Configure SmartPSS to Record IP Camera Feed / PC-NVR Setup== ===Description=== This enables you to allocate a storage space on your computer for IP Camera recordings...") |
|||
| (5 intermediate revisions by 2 users not shown) | |||
| Line 1: | Line 1: | ||
| − | ==How to Configure SmartPSS to Record IP Camera Feed / PC-NVR Setup== | + | =='''NOTICE'''== |
| + | [https://dahuawiki.com/Discontinuation_of_SmartPSS Notice of Discontinuation of SmartPSS] | ||
| + | |||
| + | ==How to Configure SmartPSS 2.0 to Record IP Camera Feed / PC-NVR Setup== | ||
===Description=== | ===Description=== | ||
| Line 5: | Line 8: | ||
===Prerequisites=== | ===Prerequisites=== | ||
| − | *[http:// | + | *Internet |
| + | *[http://dahuawiki.com/images/3/37/454572_dh_smartpss_en_is_v2.00.0.r.20161116.zip SmartPSS_v2.00_20161116] | ||
*PC-NVR | *PC-NVR | ||
*Computer with storage | *Computer with storage | ||
| − | |||
*Camera online and connected | *Camera online and connected | ||
===Video Instructions=== | ===Video Instructions=== | ||
| − | <embedvideo service="youtube"></embedvideo> | + | <embedvideo service="youtube">https://www.youtube.com/watch?v=_bMfsPXZc3I&feature=youtu.be</embedvideo> |
===Step by Step Instructions=== | ===Step by Step Instructions=== | ||
| Line 20: | Line 23: | ||
1. Launch SmartPSS and click, "PC-NVR" | 1. Launch SmartPSS and click, "PC-NVR" | ||
| − | [[ | + | [[File:spss2pcnvr002.jpg|800px]] |
| + | |||
| + | 2. Select "Here" | ||
| + | |||
| + | [[File:spss2pcnvr003.jpg|800px]] | ||
| + | |||
| + | 3. Select Search | ||
| + | |||
| + | [[File:spss2pcnvr001.jpg|800px]] | ||
| + | |||
| + | 4. Find PC-NVR-V3.0, check the box on the left and click Add. | ||
| + | |||
| + | [[File:spss2pcnvr004.jpg|800px]] | ||
| + | |||
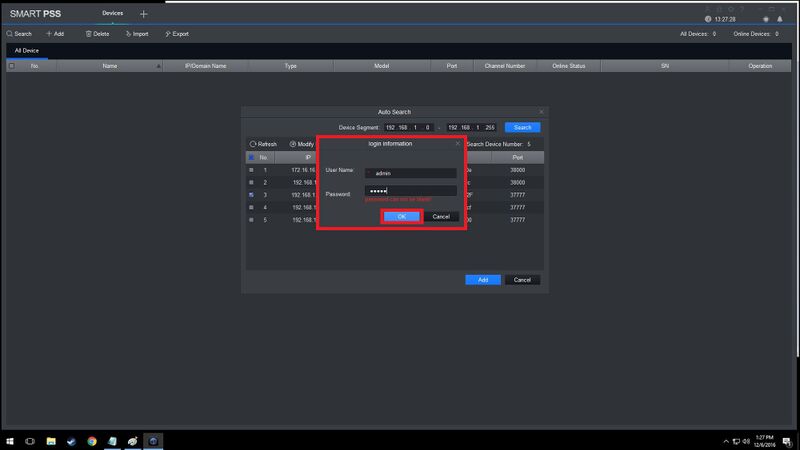
| + | 5. Enter in the username and password for PCNVR 3.0. | ||
| + | |||
| + | [[File:spss2pcnvr005.jpg|800px]] | ||
| + | |||
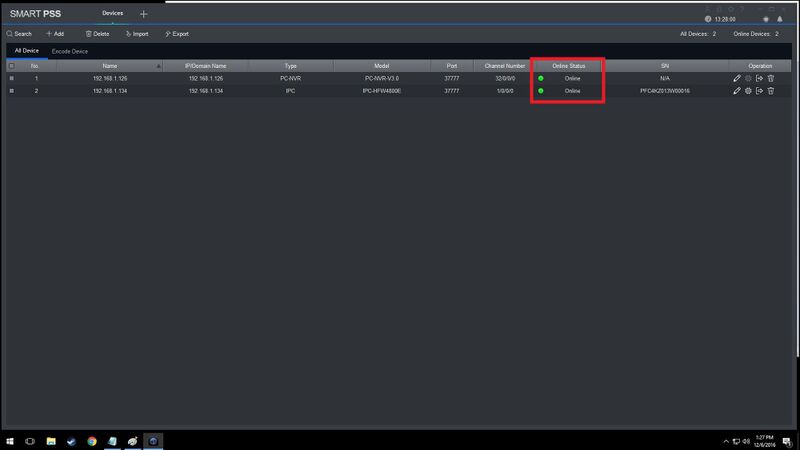
| + | 6. Check if each device is online and added properly. | ||
| + | |||
| + | [[File:spss2pcnvr006.jpg|800px]] | ||
| + | |||
| + | 7. Now Select + at the top of the screen and then select PC NVR again. | ||
| + | |||
| + | [[File:spss2pcnvr002.jpg|800px]] | ||
| + | |||
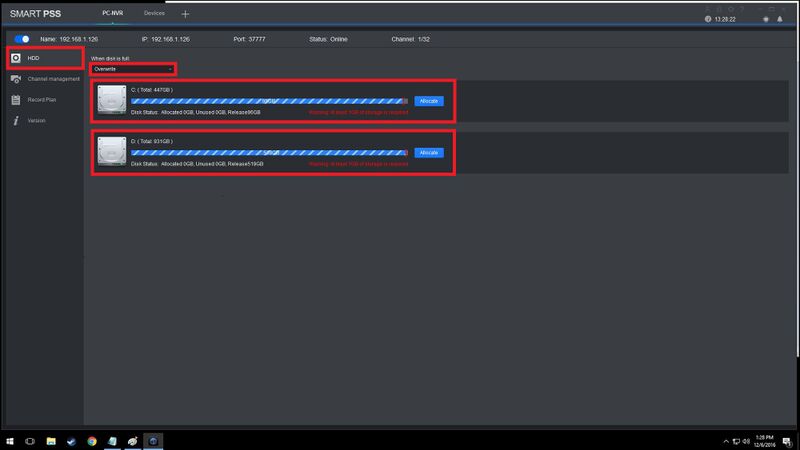
| + | 8. Select the HDD tab in the right hand column, then select Allocate on the HDD you want to use. Notice the option to Overwrite the HDD or make these read only. | ||
| + | |||
| + | [[File:spss2pcnvr007.jpg|800px]] | ||
| + | |||
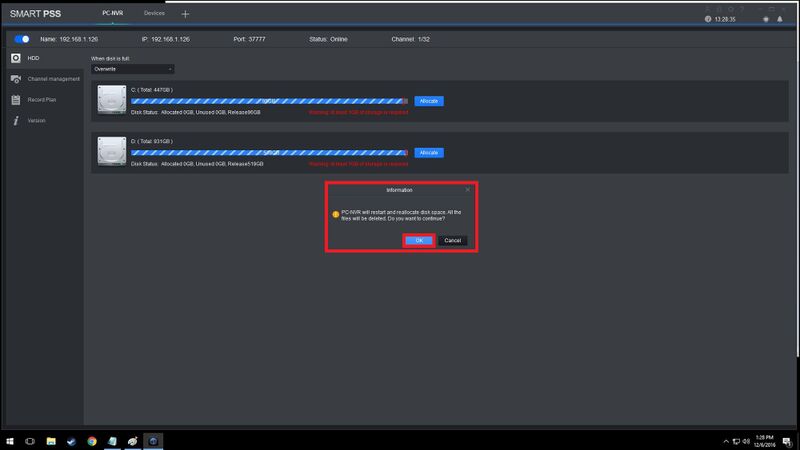
| + | 9. Select OK to proceed with erasing and allocating the empty portion of the drive. | ||
| + | |||
| + | [[File:spss2pcnvr008.jpg|800px]] | ||
| + | |||
| + | 10. Select the Channel Management tab in the right hand column. | ||
| + | |||
| + | [[File:spss2pcnvr009.jpg|800px]] | ||
| + | |||
| + | 11. Now check any network device to be recorded and then select the right arrow button and then save to add them. | ||
| + | |||
| + | [[File:spss2pcnvr010.jpg|800px]] | ||
| + | |||
| + | 12. Select Record Plan tab in the right hand column once these devices have been added. | ||
| + | |||
| + | [[File:spss2pcnvr011.jpg|800px]] | ||
| + | |||
| + | 13. Select the gear icon on the right to set the parameters of the record schedule, and then select ok and then save. | ||
| + | |||
| + | [[File:spss2pcnvr012.jpg|800px]] | ||
| + | |||
| + | 14. Select ok, thne select + at the top of the screen to add a new tab. | ||
| + | |||
| + | [[File:spss2pcnvr013.jpg|800px]] | ||
| + | |||
| + | 15. Select Playback. | ||
| + | |||
| + | [[File:spss2pcnvr014.jpg|800px]] | ||
| + | |||
| + | 16. Now under the PC-NVR 3.0 select the device to search for recorded video. Select Search and press play. The recorded video will open in the first available window. The Type of recording and time of recording will take place towards the bottom of the screen. The Green area in this picture represents what regular recording will look like. | ||
| + | [[File:spss2pcnvr015.jpg|800px]] | ||
| + | 17. This is what the playback of the PC-NVR 3.0 should look like. | ||
| + | [[File:spss2pcnvr016.jpg|800px]] | ||
| + | [[Category:How to]] | ||
[[Category:SmartPSS]] | [[Category:SmartPSS]] | ||
| + | [[Category:Record]] | ||
| + | [[Category:Record Setup]] | ||
Latest revision as of 19:30, 2 October 2024
Contents
NOTICE
Notice of Discontinuation of SmartPSS
How to Configure SmartPSS 2.0 to Record IP Camera Feed / PC-NVR Setup
Description
This enables you to allocate a storage space on your computer for IP Camera recordings.
Prerequisites
- Internet
- SmartPSS_v2.00_20161116
- PC-NVR
- Computer with storage
- Camera online and connected
Video Instructions
Step by Step Instructions
Note: Please be sure you have completed the, "Install SmartPSS Guide" before proceeding with these instructions.
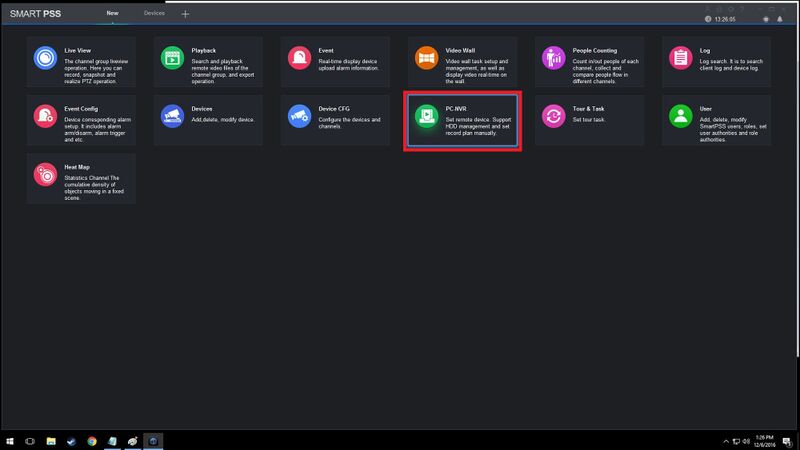
1. Launch SmartPSS and click, "PC-NVR"
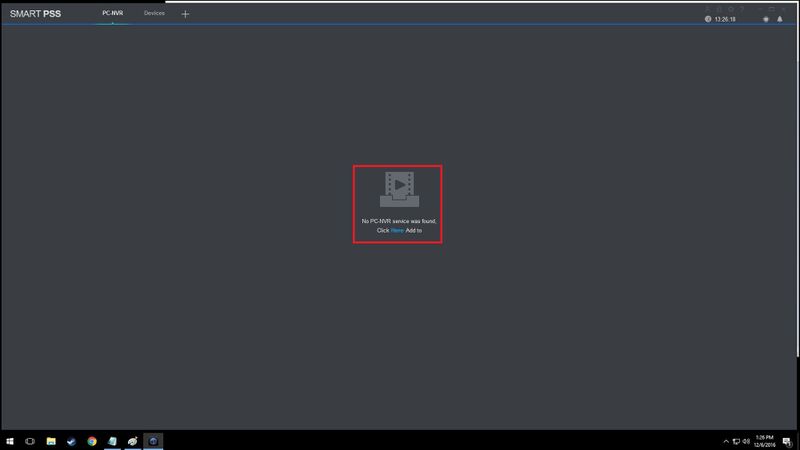
2. Select "Here"
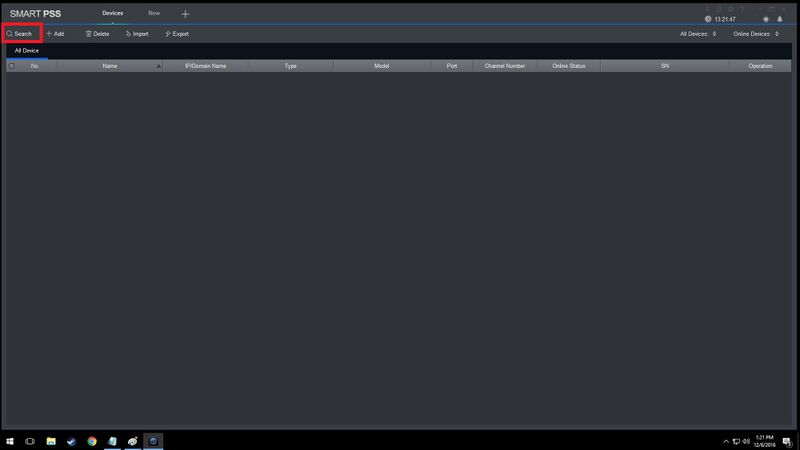
3. Select Search
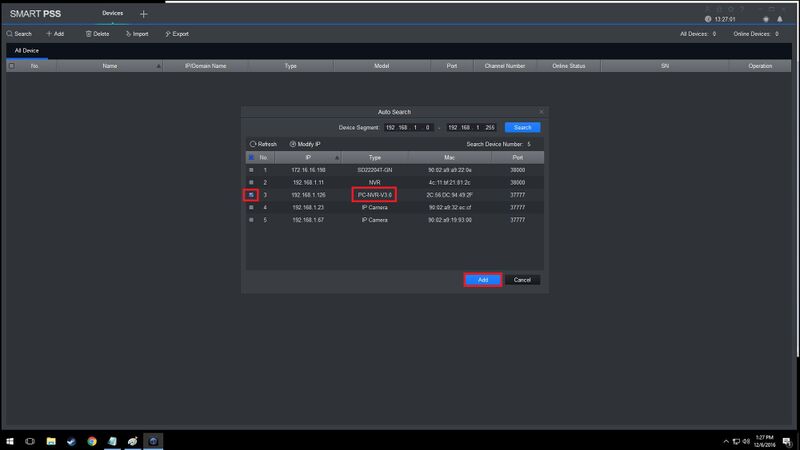
4. Find PC-NVR-V3.0, check the box on the left and click Add.
5. Enter in the username and password for PCNVR 3.0.
6. Check if each device is online and added properly.
7. Now Select + at the top of the screen and then select PC NVR again.
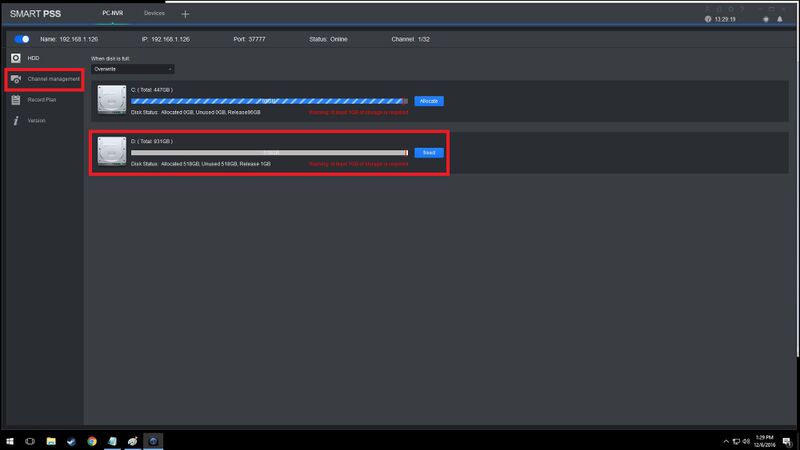
8. Select the HDD tab in the right hand column, then select Allocate on the HDD you want to use. Notice the option to Overwrite the HDD or make these read only.
9. Select OK to proceed with erasing and allocating the empty portion of the drive.
10. Select the Channel Management tab in the right hand column.
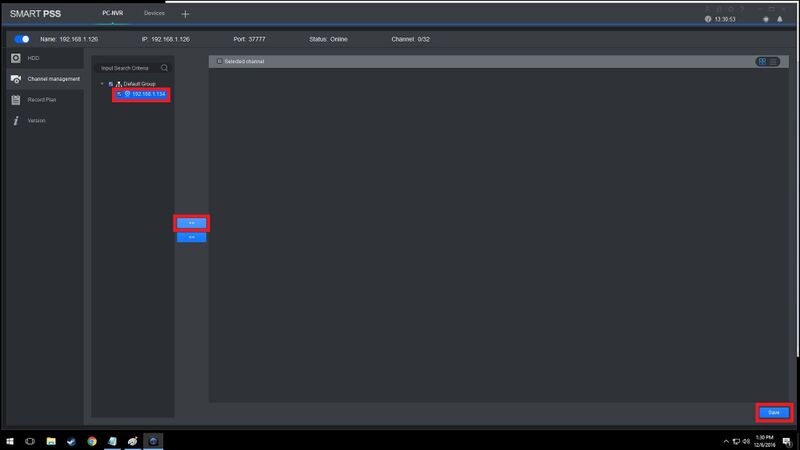
11. Now check any network device to be recorded and then select the right arrow button and then save to add them.
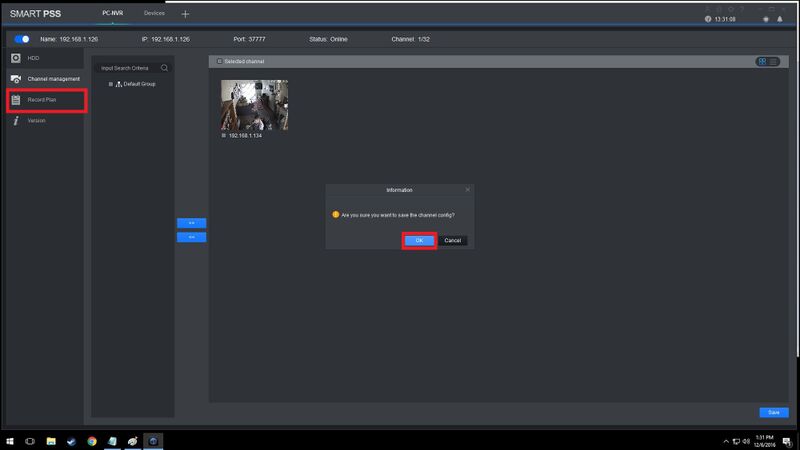
12. Select Record Plan tab in the right hand column once these devices have been added.
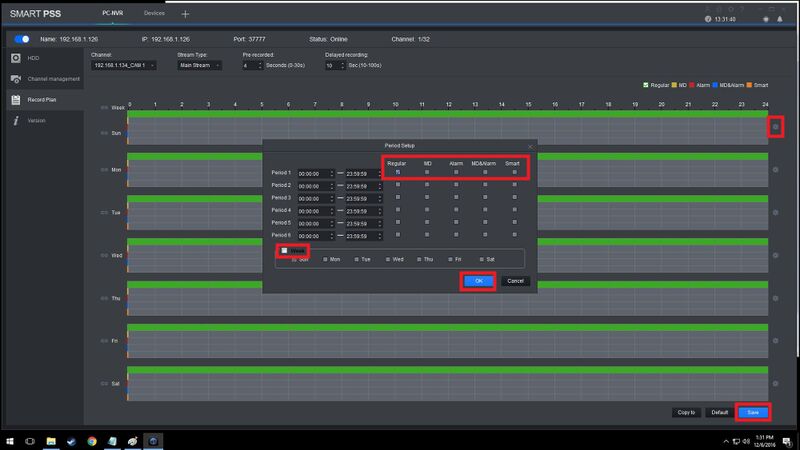
13. Select the gear icon on the right to set the parameters of the record schedule, and then select ok and then save.
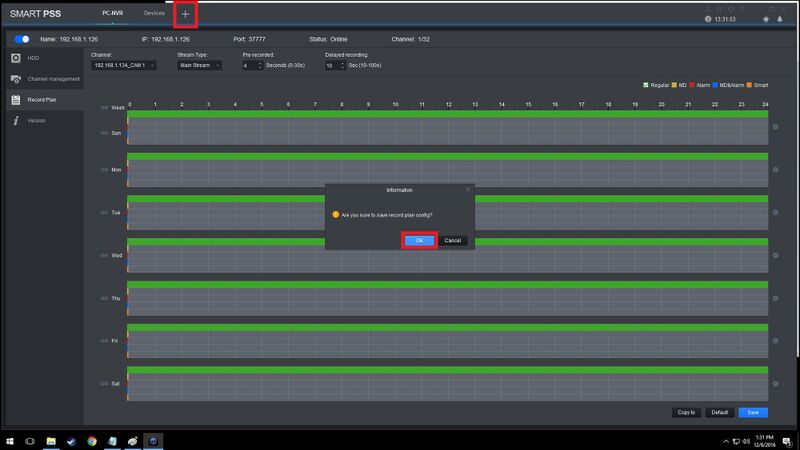
14. Select ok, thne select + at the top of the screen to add a new tab.
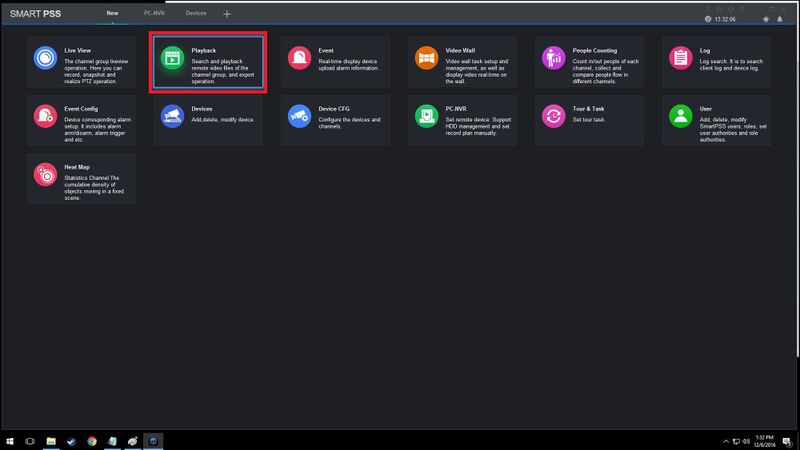
15. Select Playback.
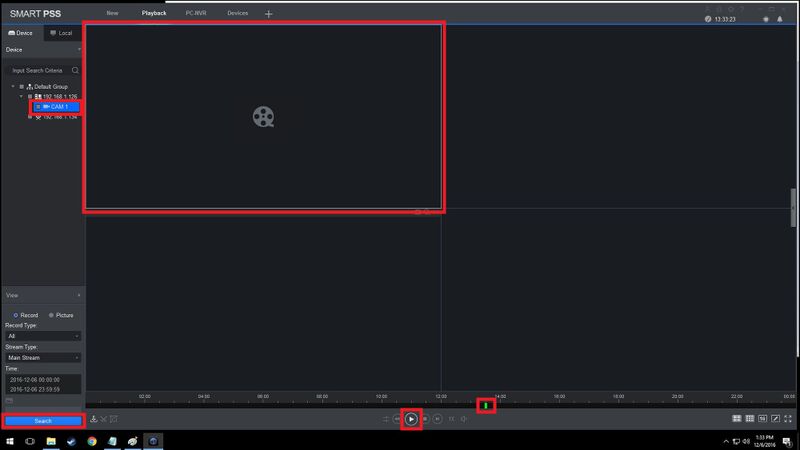
16. Now under the PC-NVR 3.0 select the device to search for recorded video. Select Search and press play. The recorded video will open in the first available window. The Type of recording and time of recording will take place towards the bottom of the screen. The Green area in this picture represents what regular recording will look like.
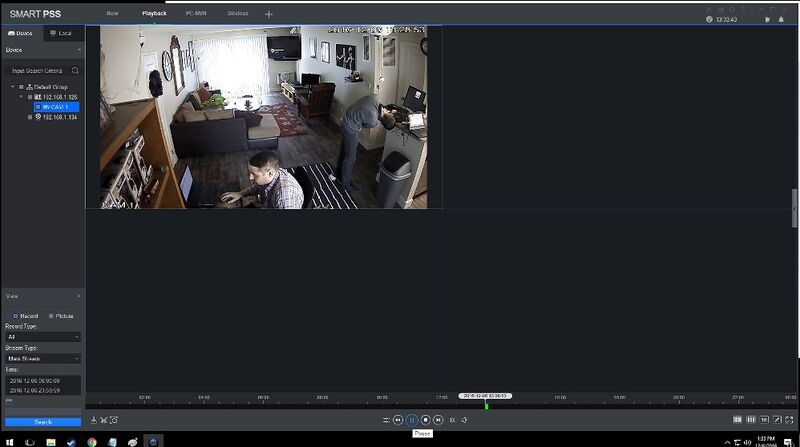
17. This is what the playback of the PC-NVR 3.0 should look like.
