Difference between revisions of "3rd Party Software/DeskCamera/Add DeskCamera to NVR"
(Created page with "==How to Add DeskCamera to a NVR==") |
(Changed categories.) |
||
| (5 intermediate revisions by 2 users not shown) | |||
| Line 1: | Line 1: | ||
==How to Add DeskCamera to a NVR== | ==How to Add DeskCamera to a NVR== | ||
| + | ===Description=== | ||
| + | DeskCamera is an affordable and easy solution for streaming multiple desktops screens and web cameras from a single computer to your Onvif compliant network video recorder. | ||
| + | ===Prerequisites=== | ||
| + | * [https://www.deskcamera.com/| DeskCamera Software] Installed on a Windows computer. | ||
| + | * Dahua Onvif Compliant Recorder | ||
| + | |||
| + | ===Video Instructions=== | ||
| + | <embedvideo service="youtube">https://www.youtube.com/watch?v=YcogtI7KmnE</embedvideo> | ||
| + | |||
| + | <embedvideo service="youtube">https://www.youtube.com/watch?v=FTA7tS7y0eI</embedvideo> | ||
| + | ===Step by Step Instructions=== | ||
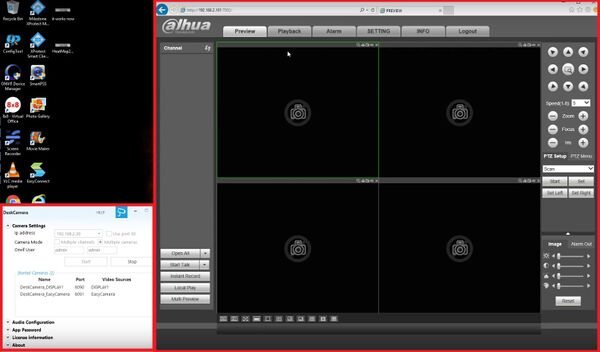
| + | 1. Start up DeskCamera and get your NVR/HCVR/DVR accessible. | ||
| + | |||
| + | [[File:deskcam1.jpg|600x600px]] | ||
| + | |||
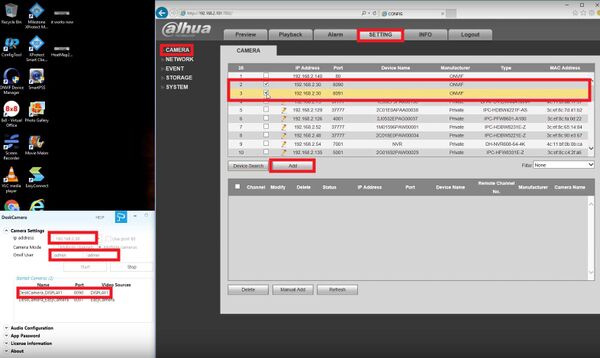
| + | 2. Notice the DeskCamera settings, the IP address of the computer, Onvif username and password, and the port your desired display is on. The stock settings on DeskCamera allow you to add the Desktop you want easily (mainly the username admin and password admin, Dahua's defaults). Now select Setting->Camera->Remote Devices and search for the settings noted before. Once you have found the device, check the box and select Add. | ||
| + | |||
| + | [[File:deskcam2.jpg|600x600px]] | ||
| + | |||
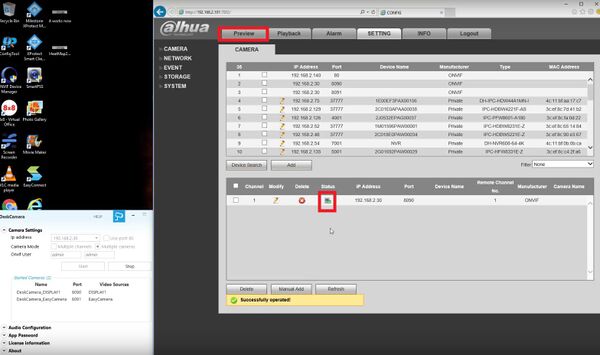
| + | 3. Notice the status of the added device, make sure it is green, then select preview. | ||
| + | |||
| + | [[File:deskcam3.jpg|600x600px]] | ||
| + | |||
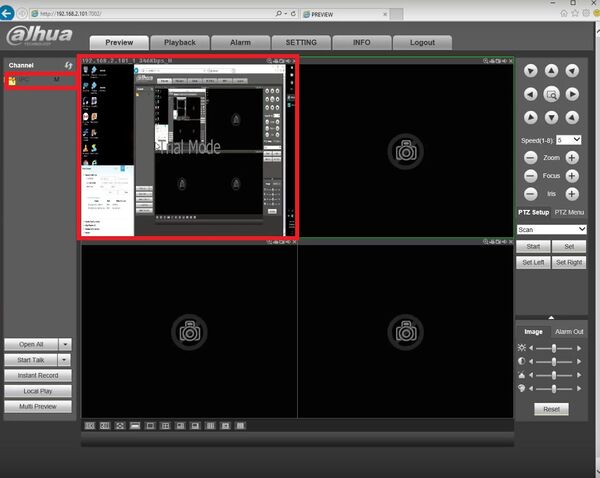
| + | 4. Select the desired feed to view your desktop. If you are having difficulty adding the device use the steps below to manually add the desktop. | ||
| + | |||
| + | [[File:deskcam4.jpg|600x600px]] | ||
| + | |||
| + | 5. In this scenario I would like my Desktop to be private on the network so I will setup a new username and password by selecting stop and entering in my credentials. After this select start to start up the camera. | ||
| + | |||
| + | [[File:deskcam5.jpg|600x600px]] | ||
| + | |||
| + | 6. On the NVR/HCVR/DVR Go to Setting->Camera->Remote Devices and select Manual Add and then enter in the highlighted information which can be found in DeskCamera. | ||
| + | |||
| + | [[File:deskcam6.jpg|600x600px]] | ||
| + | [[Category:3rd Party VMS]] | ||
| + | [[Category:3rd Party Software]] | ||
Latest revision as of 00:49, 28 February 2017
Contents
How to Add DeskCamera to a NVR
Description
DeskCamera is an affordable and easy solution for streaming multiple desktops screens and web cameras from a single computer to your Onvif compliant network video recorder.
Prerequisites
- DeskCamera Software Installed on a Windows computer.
- Dahua Onvif Compliant Recorder
Video Instructions
Step by Step Instructions
1. Start up DeskCamera and get your NVR/HCVR/DVR accessible.
2. Notice the DeskCamera settings, the IP address of the computer, Onvif username and password, and the port your desired display is on. The stock settings on DeskCamera allow you to add the Desktop you want easily (mainly the username admin and password admin, Dahua's defaults). Now select Setting->Camera->Remote Devices and search for the settings noted before. Once you have found the device, check the box and select Add.
3. Notice the status of the added device, make sure it is green, then select preview.
4. Select the desired feed to view your desktop. If you are having difficulty adding the device use the steps below to manually add the desktop.
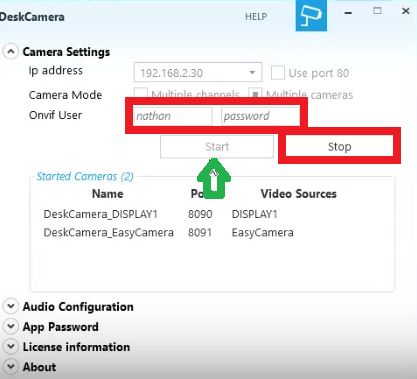
5. In this scenario I would like my Desktop to be private on the network so I will setup a new username and password by selecting stop and entering in my credentials. After this select start to start up the camera.
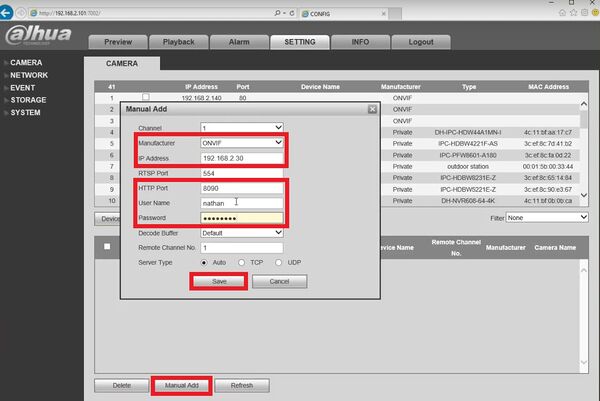
6. On the NVR/HCVR/DVR Go to Setting->Camera->Remote Devices and select Manual Add and then enter in the highlighted information which can be found in DeskCamera.
