Difference between revisions of ":Intrusion Detect"
| (5 intermediate revisions by 2 users not shown) | |||
| Line 24: | Line 24: | ||
* Current Firmware | * Current Firmware | ||
| + | ===IVS Best Practices=== | ||
| + | To assess issues with IVS compatibility between the camera and NVR, please update both devices to the most current firmware and factory reset the NVR, and use the hard reset button to reset the camera. | ||
===Video Instructions=== | ===Video Instructions=== | ||
| Line 86: | Line 88: | ||
[[File:IntrusionSetupSystem5.png|600px]] | [[File:IntrusionSetupSystem5.png|600px]] | ||
| − | ===SmartPSS Setup=== | + | ===SmartPSS 1.16 Setup=== |
====Prerequisites==== | ====Prerequisites==== | ||
* SmartPSS | * SmartPSS | ||
| − | * IVS capable device with | + | * IVS capable device with Intrusion Detection |
* Upgraded devices to latest firmware | * Upgraded devices to latest firmware | ||
| + | |||
====Video Instructions==== | ====Video Instructions==== | ||
<embedvideo service="youtube">https://youtu.be/r8NWO0a73y8</embedvideo> | <embedvideo service="youtube">https://youtu.be/r8NWO0a73y8</embedvideo> | ||
| Line 105: | Line 108: | ||
[[File:IntrusionSetupSmartPSS3.png|600px]] | [[File:IntrusionSetupSmartPSS3.png|600px]] | ||
| + | |||
| + | |||
| + | ===SmartPSS 2 Setup=== | ||
| + | |||
| + | ====Prerequisites==== | ||
| + | * SmartPSS | ||
| + | * IVS capable device with IntrusionDetection | ||
| + | * Upgraded devices to latest firmware | ||
| + | |||
| + | ====Video Instructions==== | ||
| + | <embedvideo service="youtube">X</embedvideo> | ||
| + | ====Step by Step Instructions==== | ||
| + | |||
| + | 1. Go to Live View. | ||
| + | |||
| + | [[File:SPSS2Intrusion1.png|600px]] | ||
| + | |||
| + | 2. Right click on a device and select IVS Channel cfg. | ||
| + | |||
| + | [[File:SPSS2Intrusion2.png|600px]] | ||
| + | |||
| + | 3. Select IVS and click Next. | ||
| + | |||
| + | [[File:SPSS2Intrusion3.png|600px]] | ||
| + | |||
| + | 4. Under Detect Region, Draw your rule and apply. | ||
| + | |||
| + | [[File:SPSS2Intrusion4.png|600px]] | ||
| + | |||
| + | 5. Under Rule config -> Target Filter -> Draw the rule -> Apply -> save. | ||
| + | |||
| + | [[File:SPSS2Intrusion5.png|600px]] | ||
| + | |||
| + | 6. Under Rule config -> Rule Details -> Add rule -> Select Intrusion -> Draw. | ||
| + | |||
| + | [[File:SPSS2Intrusion6.png|600px]] | ||
| + | |||
| + | 7. Draw -> Apply -> Save. | ||
| + | |||
| + | [[File:SPSS2Intrusion7.png|600px]] | ||
[[Category:IVS]] | [[Category:IVS]] | ||
| − | [[Category: | + | [[Category:IVS/Intrusion_Detection]] |
[[Category:Event]] | [[Category:Event]] | ||
Latest revision as of 15:33, 2 August 2019
Contents
Intrusion Detection
Description
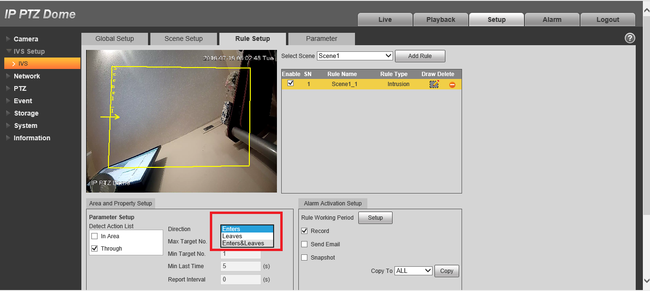
Intrusion Detection is to detect if there is any object entering or leaving the area, it will trigger rule when crossing the area perimeter, support enter, leave and enter&leave three direction selection, it can activate record, snapshot and alarm according to the judgment result.
Application Scene: It is similar to warning line. It needs to leave some space for target movement outside the perimeter if it is to detect enter and leave event; It can only be applied to the scene where the target is sparse and there is rarely any covering between the targets, such as the perimeter without any guard. It will trigger alarm when the target is entering or leaving the area.
Prerequisites
- Internet Explorer
- IP Address of Device
- IVS capable device
- Current Firmware
IVS Best Practices
To assess issues with IVS compatibility between the camera and NVR, please update both devices to the most current firmware and factory reset the NVR, and use the hard reset button to reset the camera.
Video Instructions
Step by Step Instructions
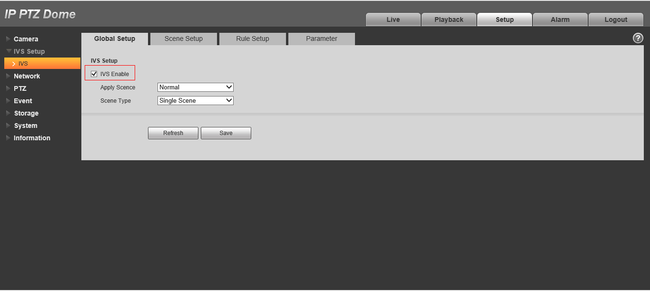
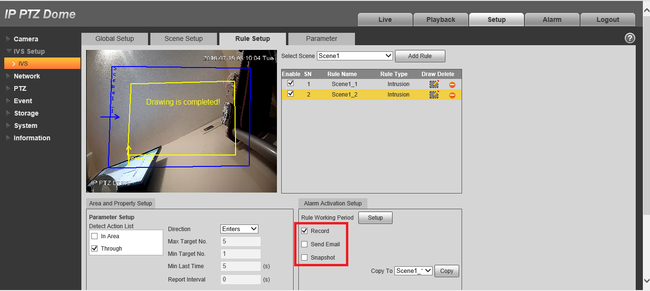
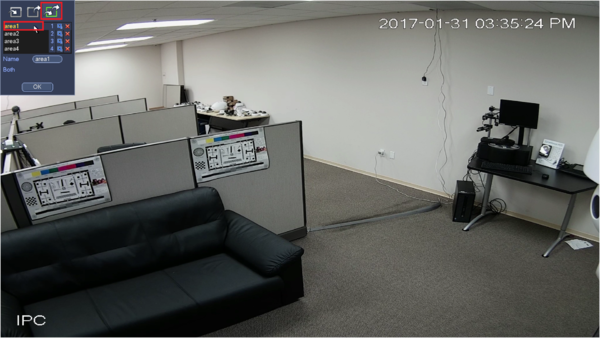
1. Click “Enable” button, the default rule name is area 1, area 2, area 3 and area 4 when adding rule.
2. Select detection action list: when selecting “Through” in the detection action list, the direction can be set as: enter, leave and bidirectional.
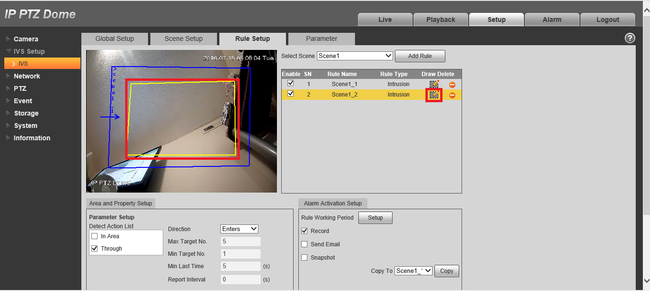
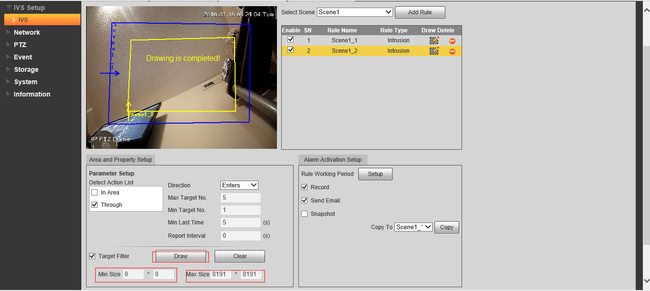
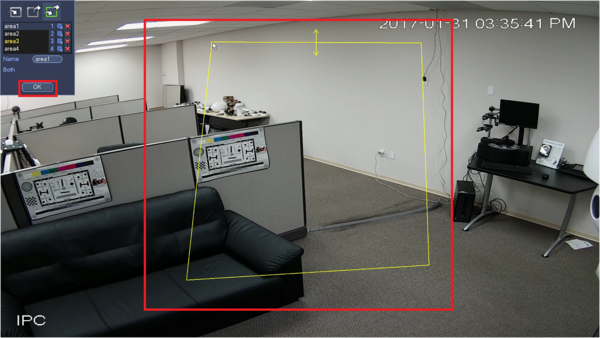
3. Click “Draw Rule” and draw a warning area in the image according to the actual needs, it will trigger alarm when the target is crossing the warning area perimeter according to the set movement direction.
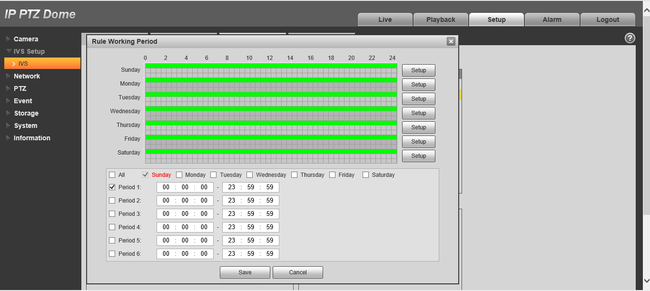
4. Working period setting, default is all day.
5. Support alarm activation setup: record, relay-out, send email and snapshot.
6. Target filter can set max size and min size; it means the max and min target it can detect.
System Interface Setup
Prerequisites
- NVR with IVS capable
- Camera with IVS capable
Video Instructions
Step by Step Instructions
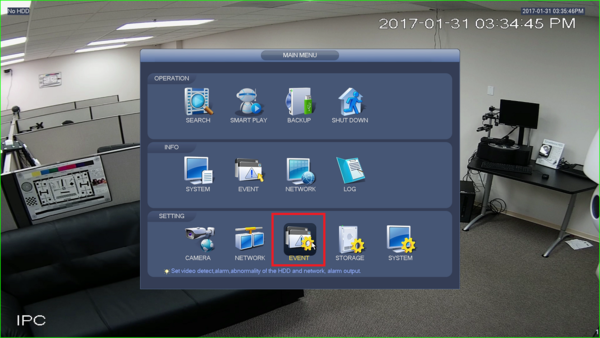
1. Go to Event.
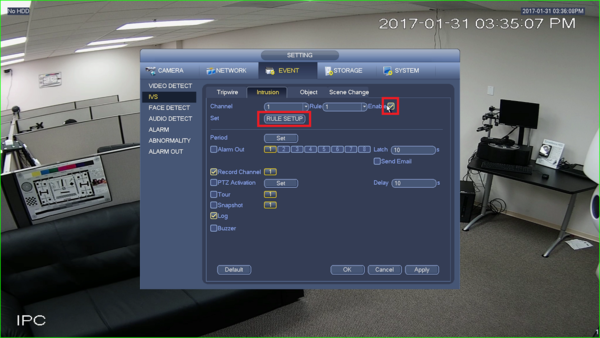
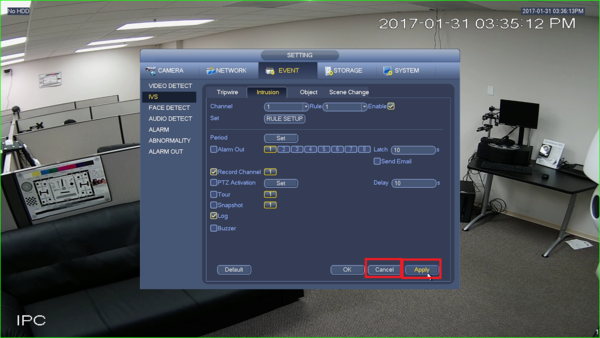
2. Enable Intrusion under IVS and click on rule setup.
3. Choose the direction of intrusion and select the area.
4. Draw your rule and click ok.
5. Click apply and ok.
SmartPSS 1.16 Setup
Prerequisites
- SmartPSS
- IVS capable device with Intrusion Detection
- Upgraded devices to latest firmware
Video Instructions
Step by Step Instructions
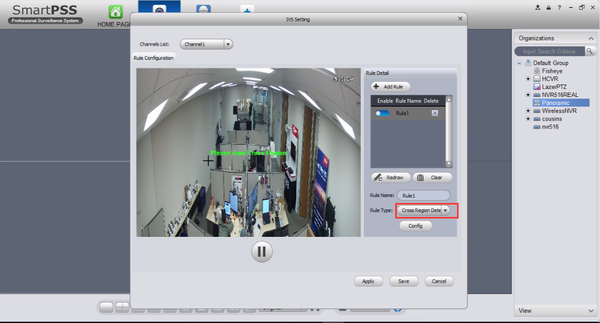
1. Right click and select IVS channel config.
2. Select cross region detection and draw rules.
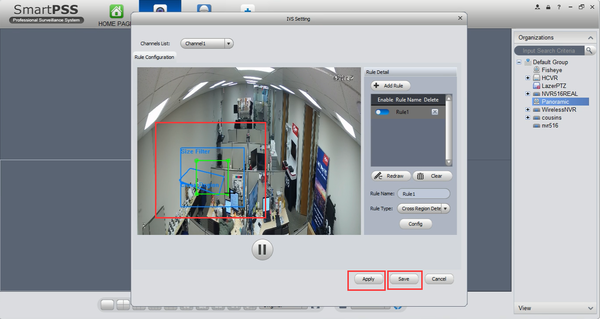
3. Select largest and minimum object to detect and hit apply and ok.
SmartPSS 2 Setup
Prerequisites
- SmartPSS
- IVS capable device with IntrusionDetection
- Upgraded devices to latest firmware
Video Instructions
Step by Step Instructions
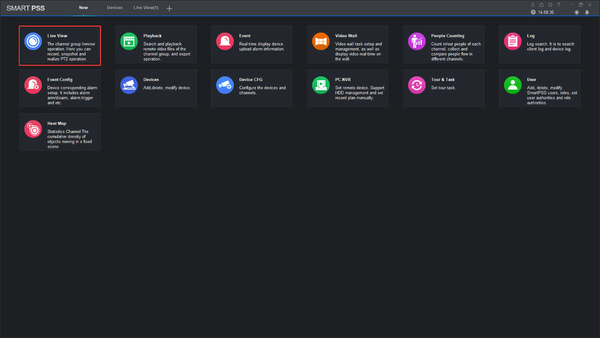
1. Go to Live View.
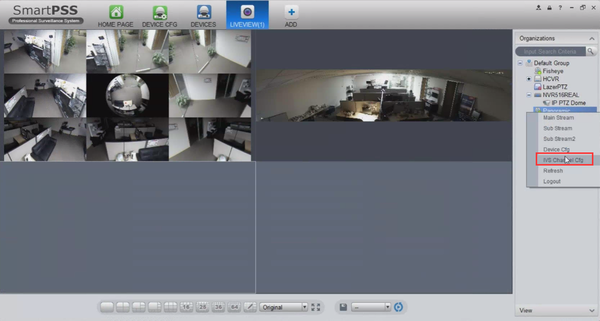
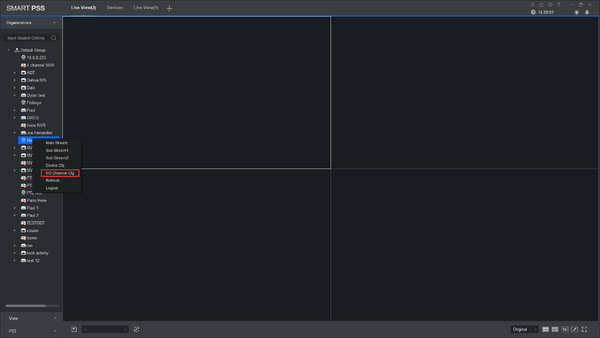
2. Right click on a device and select IVS Channel cfg.
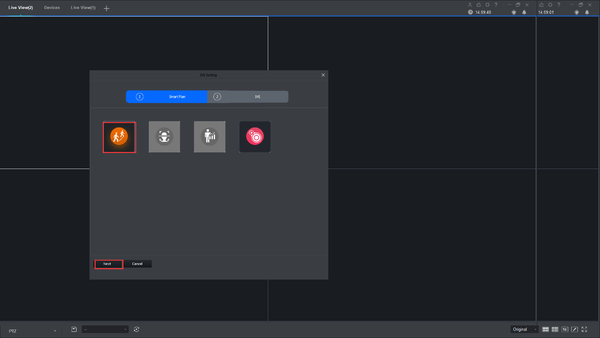
3. Select IVS and click Next.
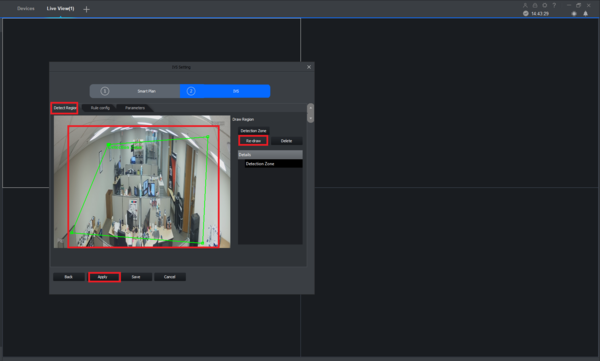
4. Under Detect Region, Draw your rule and apply.
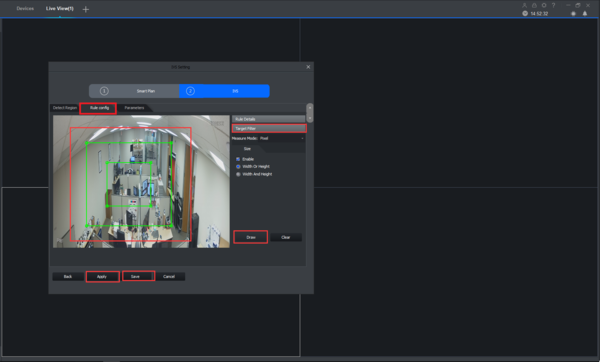
5. Under Rule config -> Target Filter -> Draw the rule -> Apply -> save.
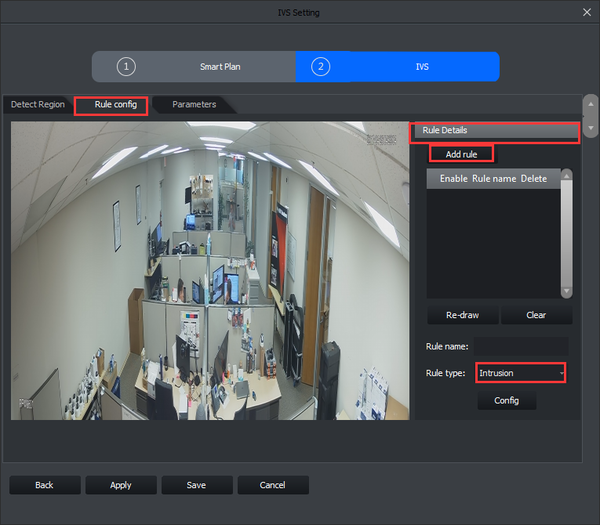
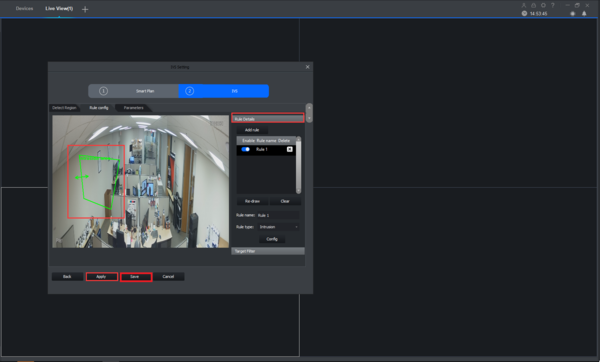
6. Under Rule config -> Rule Details -> Add rule -> Select Intrusion -> Draw.
7. Draw -> Apply -> Save.


