Difference between revisions of "DDNS/NoIP DDNS Setup"
(Created page with "<pdf>File:DDNSNO-IP.pdf</pdf>") |
|||
| (34 intermediate revisions by 3 users not shown) | |||
| Line 1: | Line 1: | ||
| − | < | + | =DDNS Setup No-IP= |
| + | ==NOTICE== | ||
| + | [http://www1.dahuasecurity.com/notice_single/discontinuation-of-dahuaddnsquickddns-2.html Notice of Discontinuation of DahuaDDNS & QuickDDNS] | ||
| + | ===Description=== | ||
| + | This article is a step by step setup guide for NoIP DDNS. NoIP DDNS is Dynamic Domain Name System which is a method of automatically updating a name server. This is primarily used if your public IP address on the internet changes from time to time (dynamic IP). Setting this feature up will give you another configured hostname. | ||
| + | ===Prerequisites=== | ||
| + | *The device must be connected to the Internet. | ||
| + | |||
| + | * It is recommended that the default username and password are changed from admin/admin since you are making this device publicly accessible. You should change your password at first login for every device anyways. | ||
| + | |||
| + | *Create an account at www.quickddns.com | ||
| + | |||
| + | *Check if the device supports monitoring and DDNS management via the [https://dahuawiki.com/Template:Mobile mobile phone app]. | ||
| + | |||
| + | *Record the device's MAC address from the sticker fixed to the device, or by finding it on the network. | ||
| + | |||
| + | *NoIP DDNS service is disabled by default, and to enable it, you need to login. | ||
| + | |||
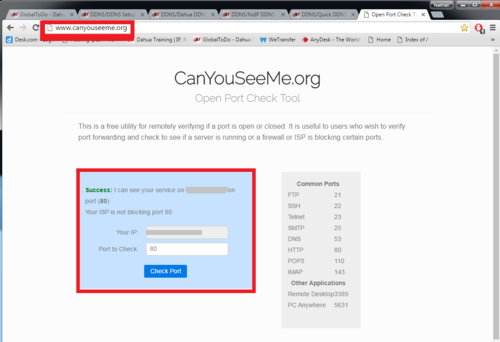
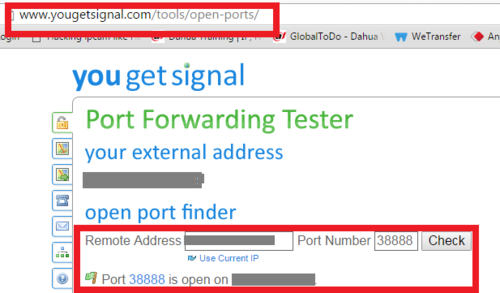
| + | *Port forwarding is configured in the router(s) and working on default ports: 80, 554,37777, or custom ports. To modify default port, please refer to DDNS User’s Manual. Canyouseeme.org or www.yougetsignal.com/tools/open-ports/ will check if your setup was successful or not. | ||
| + | |||
| + | [[File:ddns001.png|500x500px]] | ||
| + | |||
| + | [[File:ddns002.png|500x500px]] | ||
| + | |||
| + | (port 37777 is default, 38888 is an example) | ||
| + | |||
| + | ===Video Instructions=== | ||
| + | <embedvideo service="youtube">https://www.youtube.com/watch?v=z1VMWG8K01g</embedvideo> | ||
| + | |||
| + | ===Step by Step Instructions=== | ||
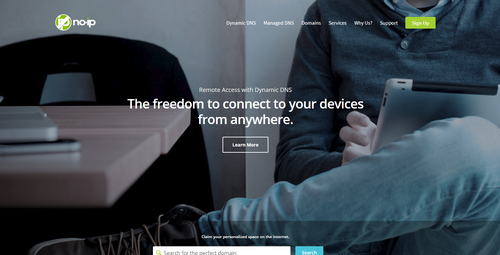
| + | 1. Go to https://www.noip.com/ | ||
| + | |||
| + | [[File:no_ip_1.png|500px]] | ||
| + | |||
| + | |||
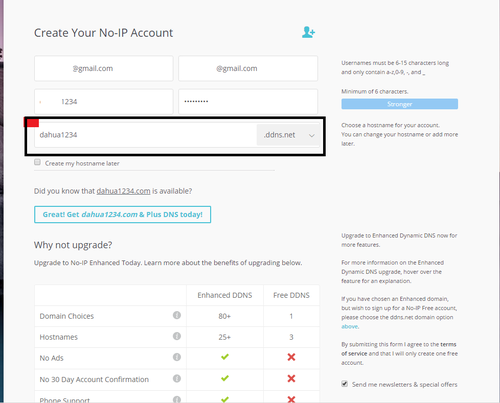
| + | 2. Create an account -> Go to your email registered with noip.com. An email activation will be sent to your registered email to activate noip.com account. | ||
| + | |||
| + | [[File:no_ip_2.png|500px]] | ||
| + | |||
| + | [[File:no_ip_3.png|500px]] | ||
| + | |||
| + | |||
| + | 3. Once account is activated select "Create Host Name Now" | ||
| + | |||
| + | [[File:no_ip_4.png|500px]] | ||
| + | |||
| + | |||
| + | 4. Input a host name of your choice > Select Add "Host Name" | ||
| + | |||
| + | [[File:no_ip_5.png|500px]] | ||
| + | |||
| + | |||
| + | 5. Login into Recorder via Web Service or Physical recorder. From the Main Menu select the network tab > Select DDNS on the left hand side. Check off "Enable" > Click on Drop down to select "No-IP" | ||
| + | |||
| + | [[File:no_ip_8.png|500px]] | ||
| + | |||
| + | |||
| + | 6. Input host IP > Domain Name > User Name > Password > Do not forget to click "APPLY" to save settings. | ||
| + | |||
| + | [[File:no_ip_8.png|500px]] | ||
| + | |||
| + | |||
| + | |||
| + | |||
| + | [[Category:DDNS]] | ||
| + | [[Category:HCVR]] | ||
| + | [[Category:NVR]] | ||
| + | [[Category:How To]] | ||
| + | [[Category:Remote Access]] | ||
| + | [[Category:Setup]] | ||
| + | [[Category:Tutorial]] | ||
| + | [[Category:UI]] | ||
| + | [[Category:Web UI]] | ||
| + | [[Category:FAQ]] | ||
Latest revision as of 22:07, 1 August 2019
Contents
DDNS Setup No-IP
NOTICE
Notice of Discontinuation of DahuaDDNS & QuickDDNS
Description
This article is a step by step setup guide for NoIP DDNS. NoIP DDNS is Dynamic Domain Name System which is a method of automatically updating a name server. This is primarily used if your public IP address on the internet changes from time to time (dynamic IP). Setting this feature up will give you another configured hostname.
Prerequisites
- The device must be connected to the Internet.
- It is recommended that the default username and password are changed from admin/admin since you are making this device publicly accessible. You should change your password at first login for every device anyways.
- Create an account at www.quickddns.com
- Check if the device supports monitoring and DDNS management via the mobile phone app.
- Record the device's MAC address from the sticker fixed to the device, or by finding it on the network.
- NoIP DDNS service is disabled by default, and to enable it, you need to login.
- Port forwarding is configured in the router(s) and working on default ports: 80, 554,37777, or custom ports. To modify default port, please refer to DDNS User’s Manual. Canyouseeme.org or www.yougetsignal.com/tools/open-ports/ will check if your setup was successful or not.
(port 37777 is default, 38888 is an example)
Video Instructions
Step by Step Instructions
1. Go to https://www.noip.com/
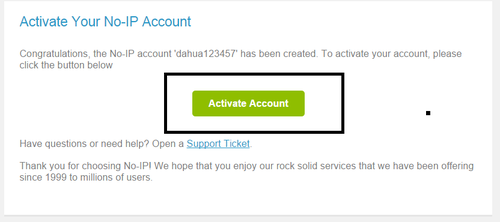
2. Create an account -> Go to your email registered with noip.com. An email activation will be sent to your registered email to activate noip.com account.
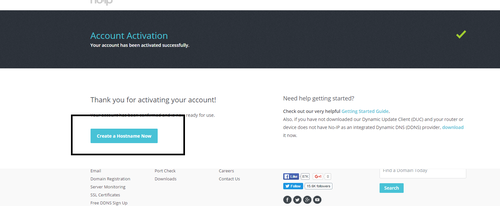
3. Once account is activated select "Create Host Name Now"
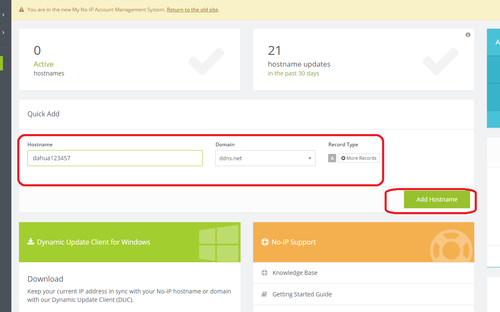
4. Input a host name of your choice > Select Add "Host Name"
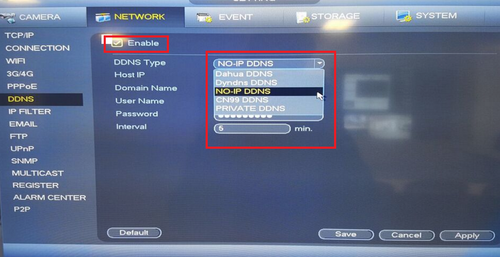
5. Login into Recorder via Web Service or Physical recorder. From the Main Menu select the network tab > Select DDNS on the left hand side. Check off "Enable" > Click on Drop down to select "No-IP"
6. Input host IP > Domain Name > User Name > Password > Do not forget to click "APPLY" to save settings.
