Difference between revisions of "NVR/Basic Setup/Initial Setup"
(Created page with "<pdf>File:Standalone_DVR_Quick_Start_Guide_V1.0.0.pdf</pdf>") |
|||
| (17 intermediate revisions by 4 users not shown) | |||
| Line 1: | Line 1: | ||
| − | + | =Boot up and Shutdown= | |
| + | ==Boot up== | ||
| + | Before the boot up, please make sure: | ||
| + | |||
| + | * For device security, please connect the NVR to the power adapter first and then connect the device to the power socket. | ||
| + | * The rated input voltage matches the device power on-off button. Please make sure the power wire connection is OK. Then click the power on-off button. | ||
| + | * Always use the stable current, if necessary UPS is a best alternative measure. | ||
| + | |||
| + | Please follow the steps listed below to boot up the device. | ||
| + | 1. Connect the device to the monitor and then connect a mouse. | ||
| + | 2. Connect power cable. | ||
| + | 3. Click the power button at the front or rear panel and then boot up the device. After device booted up, the system is in multiple-channel display mode by default. | ||
| + | |||
| + | |||
| + | =Start Up Wizard (Device Initialization)= | ||
| + | |||
| + | 1. When you first turn on the recorder you will be greeted with the region settings. Click on the drop down menu and select "United States" and click Next. | ||
| + | |||
| + | [[File:Newguiinitialize-1.0.png|600px]] | ||
| + | |||
| + | 2. Select the proper time zone setting for your region. | ||
| + | |||
| + | [[File:newguiinitialize-2.png|600px]] | ||
| + | |||
| + | 3. You will now be prompted to input a password for the admin account. | ||
| + | |||
| + | [[File:newguiinitialize-3.png|600px]] | ||
| + | |||
| + | 4. For easier login you can create a pattern, you will need to enter it twice to confirm. | ||
| + | |||
| + | [[File:newguiinitialize-4.png|600px]] | ||
| + | |||
| + | 5. Enter your email in order to reset the admin password in case the password was forgotten, you may also setup security questions. | ||
| + | '''Note:''' This is the only method to reset the password for XVRs and NVRs. If you skip this step and forget your device's password, you will need to replace the unit | ||
| + | |||
| + | [[File:newguiinitialize-5.png|600px]] | ||
| + | |||
| + | 6. The Auto-check for firmware is not yet implemented in the U.S. so you can just click on next. | ||
| + | |||
| + | [[File:newguiinitialize-6.png|600px]] | ||
| + | |||
| + | 7. Make sure the video standard format is set to NTSC and click on "Next". | ||
| + | |||
| + | [[File:newguiinitialize-7.png|600px]] | ||
| + | |||
| + | 8. Here you can go in depth with the time settings. You may want to set up the DST (Daylight savings) so that it takes affect when the time comes. | ||
| + | |||
| + | [[File:newguiinitialize-8.png|600px]] | ||
| + | |||
| + | 9. The recorder will be set as a static default IP address you see on the screen. Input an open local IP address and gateway from you network. If you don't know this information you can select DHCP (highlighted in the red box) in order to automatically receive an IP address from the router. | ||
| + | |||
| + | [[File:newguiinitialize-9.png|600px]] | ||
| + | |||
| + | 10. If you have the recorder properly connected to the router the P2P status will indicate "Online" and you can now remote in to the unit with our mobile app/PC app. | ||
| + | |||
| + | [[File:newguiinitialize-10.png|600px]] | ||
| + | |||
| + | 11. You can select the Encode settings for each camera by selecting the drop down menu on "Channel". | ||
| + | |||
| + | [[File:newguiinitialize-11.png|600px]] | ||
| + | |||
| + | 12. Select the resolution and image quality for snapshots. | ||
| + | |||
| + | [[File:newguiinitialize-12.png|600px]] | ||
| + | |||
| + | 13. Select what you want to to when the hard drive fills up. | ||
| + | |||
| + | [[File:newguiinitialize-13.png|600px]] | ||
| + | |||
| + | 14. Here is you recording schedule, the green will indicate 24/7 recording and Yellow will be Motion recording. | ||
| + | |||
| + | [[File:newguiinitialize-14.png|600px]] | ||
| + | |||
| + | 15. Here is you Snapshot schedule, same color legend as recording, | ||
| + | |||
| + | [[File:newguiinitialize-15.png|600px]] | ||
| + | |||
| + | 16. Once all that is setup you will be greeted with the final Prompt! You are now finished Initializing you new recorder | ||
| + | |||
| + | [[File:newguiinitialize-16.png|600px]] | ||
| + | |||
| + | =Shutdown= | ||
| + | |||
| + | * When you see corresponding dialogue box “System is shutting down…” Do not click power on-off button directly. | ||
| + | * Do not unplug the power cable or click power on-off button to shutdown device directly when device is running (especially when it is recording.) | ||
| + | |||
| + | |||
| + | There are three ways for you to log out. | ||
| + | |||
| + | # Main menu ('''RECOMMENDED''') | ||
| + | |||
| + | From Main Menu->Shutdown, select shutdown from dropdown list. | ||
| + | |||
| + | Click OK button, you can see device shuts down. | ||
| + | |||
| + | [[file:NVRIShutdown.png|500px]] | ||
| + | |||
| + | # From power on-off button on the front panel or remote control | ||
| + | |||
| + | Press the power on-off button on the NVR front panel or remote control for more than 3 seconds to shutdown the device. | ||
| + | |||
| + | |||
| + | |||
| + | |||
| + | |||
| + | |||
| + | |||
| + | |||
| + | |||
| + | |||
| + | |||
| + | |||
| + | |||
| + | |||
| + | |||
| + | |||
| + | |||
| + | |||
| + | |||
| + | Below are the instructions for previous firmware for Dahua recorders: | ||
| + | |||
| + | |||
| + | After device successfully booted up, it goes to startup wizard. Click Cancel/Next button, you can see system goes to login interface. | ||
| + | [[file:NVRStartupWizard.png]] | ||
| + | |||
| + | Click Smart add, Cancel button or Next button, system goes to login interface. | ||
| + | |||
| + | System consists of four accounts: | ||
| + | |||
| + | * '''Username''': admin. '''Password''': admin. (administrator, local and network) | ||
| + | * '''Username''': 888888. '''Password''': 888888. (administrator, local only) | ||
| + | * '''Username''': 666666. '''Password''': 666666(Lower authority user who can only monitor, playback, backup and etc.) | ||
| + | * '''Username''': default. '''Password''': default (hidden user). Hidden user “default” is for system interior use only and can not be deleted. When there is no login user, hidden user “default” automatically login. You can set some rights such as monitor for this user so that you can view some channel view without login. | ||
| + | |||
| + | Note: For security reason, please modify password after you first login. | ||
| + | Within 30 minutes, three times login failure will result in system alarm and five times login failure will result in account lock! | ||
| + | |||
| + | [[file:NVRStartupWizard2.png|500px]] | ||
| + | |||
| + | Click Next button, you can go to network interface. | ||
| + | |||
| + | [[file:NVRStartupWizard3.png|500px]] | ||
| + | |||
| + | Click Next button, you can go to remote device interface. | ||
| + | |||
| + | [[file:NVRStartupWizard4.png|500px]] | ||
| + | |||
| + | Click Next button, you can go to Schedule interface. | ||
| + | |||
| + | [[file:NVRStartupWizard5.png|500px]] | ||
| + | |||
| + | Click Finish button, system pops up a dialogue box. Click the OK button, the startup wizard is complete. | ||
| + | |||
| + | [[file:NVRStartupWizard6.png]] | ||
| + | |||
| + | |||
| + | |||
| + | |||
| + | |||
| + | |||
| + | |||
| + | |||
| + | [[Category:NVR Interface]] | ||
| + | [[Category:UI]] | ||
| + | |||
| + | [[Category:UI/SystemUI]] | ||
| + | [[Category:SystemUI]] | ||
| + | [[Category:How_To]] | ||
| + | |||
| + | [[Category:Setup]] | ||
Latest revision as of 22:41, 30 July 2021
Boot up and Shutdown
Boot up
Before the boot up, please make sure:
- For device security, please connect the NVR to the power adapter first and then connect the device to the power socket.
- The rated input voltage matches the device power on-off button. Please make sure the power wire connection is OK. Then click the power on-off button.
- Always use the stable current, if necessary UPS is a best alternative measure.
Please follow the steps listed below to boot up the device. 1. Connect the device to the monitor and then connect a mouse. 2. Connect power cable. 3. Click the power button at the front or rear panel and then boot up the device. After device booted up, the system is in multiple-channel display mode by default.
Start Up Wizard (Device Initialization)
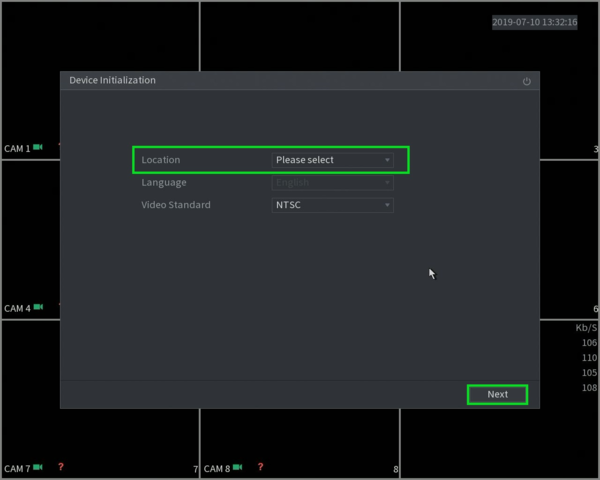
1. When you first turn on the recorder you will be greeted with the region settings. Click on the drop down menu and select "United States" and click Next.
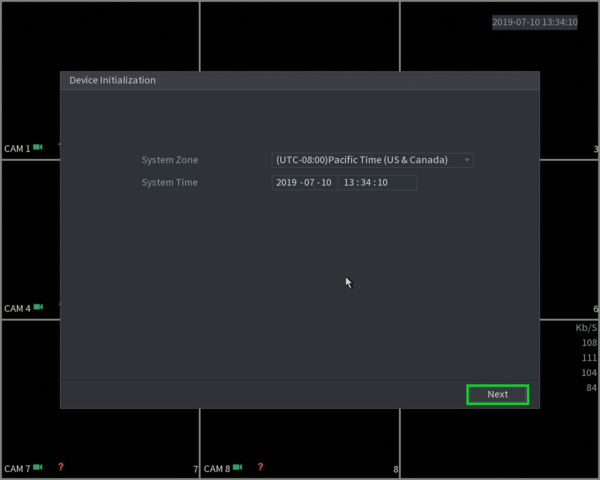
2. Select the proper time zone setting for your region.
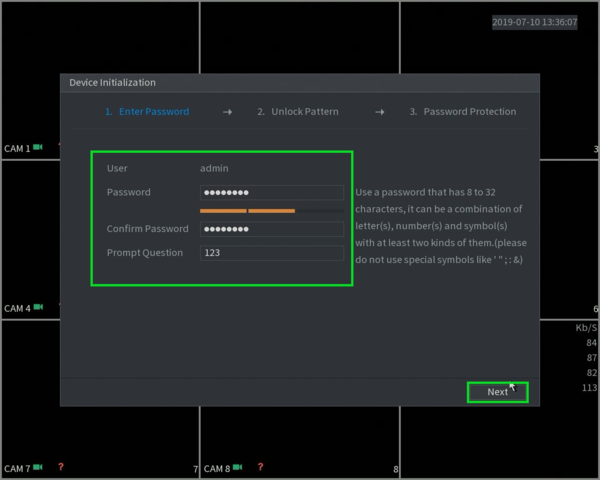
3. You will now be prompted to input a password for the admin account.
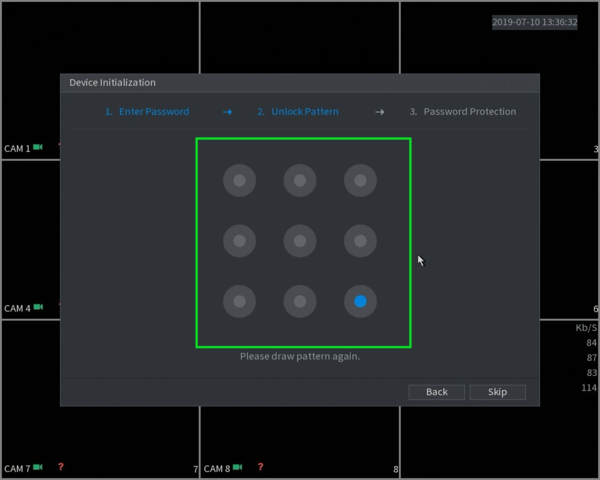
4. For easier login you can create a pattern, you will need to enter it twice to confirm.
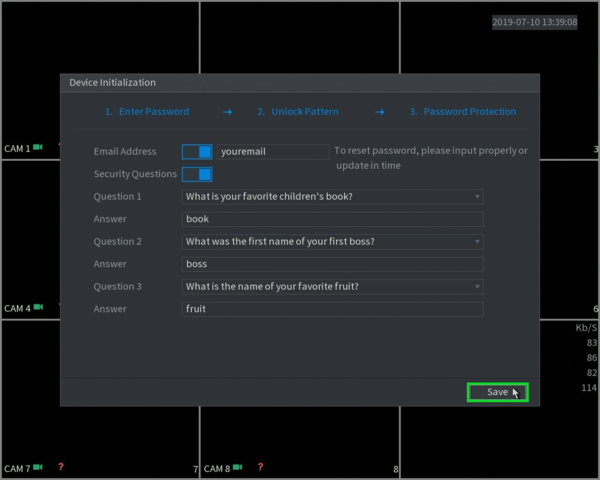
5. Enter your email in order to reset the admin password in case the password was forgotten, you may also setup security questions.
Note: This is the only method to reset the password for XVRs and NVRs. If you skip this step and forget your device's password, you will need to replace the unit
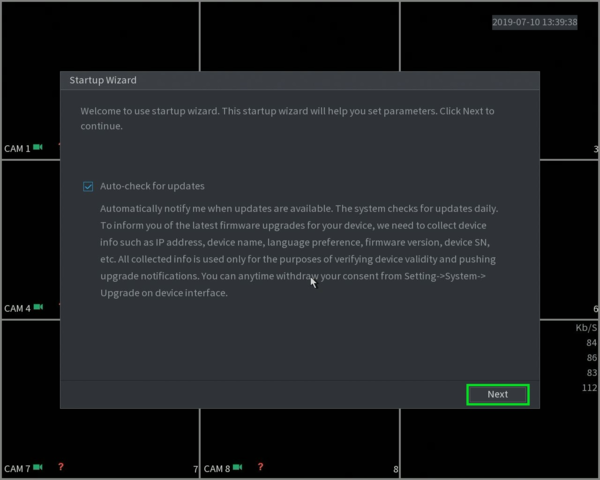
6. The Auto-check for firmware is not yet implemented in the U.S. so you can just click on next.
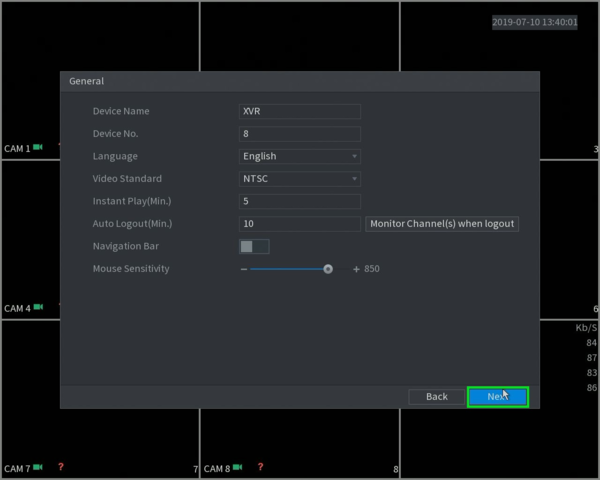
7. Make sure the video standard format is set to NTSC and click on "Next".
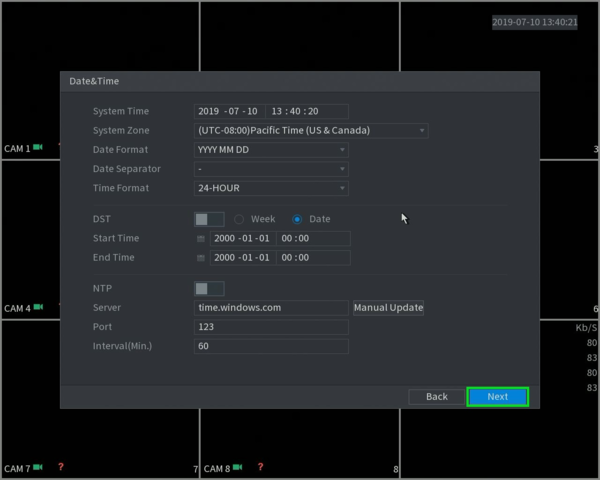
8. Here you can go in depth with the time settings. You may want to set up the DST (Daylight savings) so that it takes affect when the time comes.
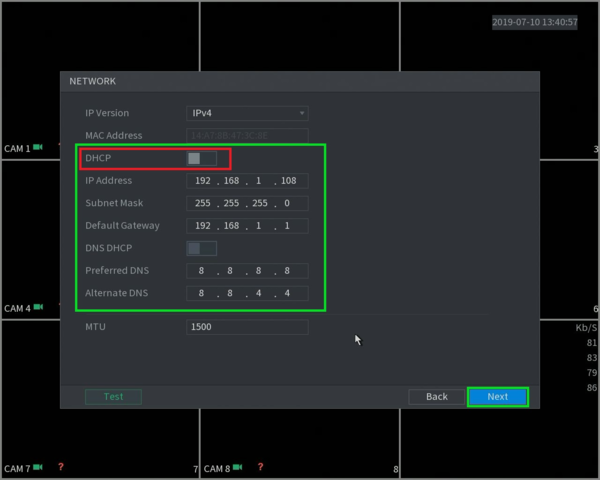
9. The recorder will be set as a static default IP address you see on the screen. Input an open local IP address and gateway from you network. If you don't know this information you can select DHCP (highlighted in the red box) in order to automatically receive an IP address from the router.
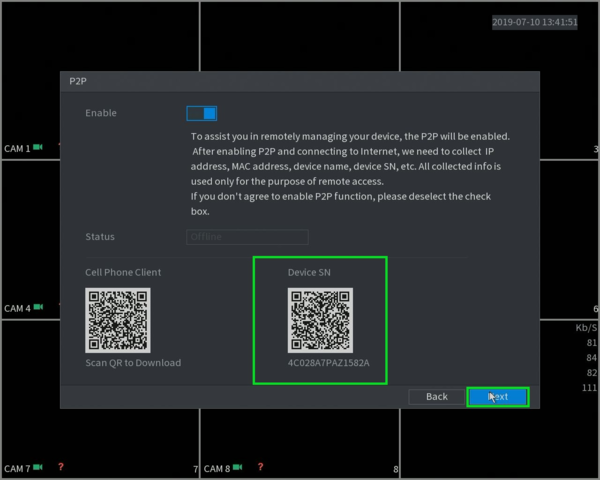
10. If you have the recorder properly connected to the router the P2P status will indicate "Online" and you can now remote in to the unit with our mobile app/PC app.
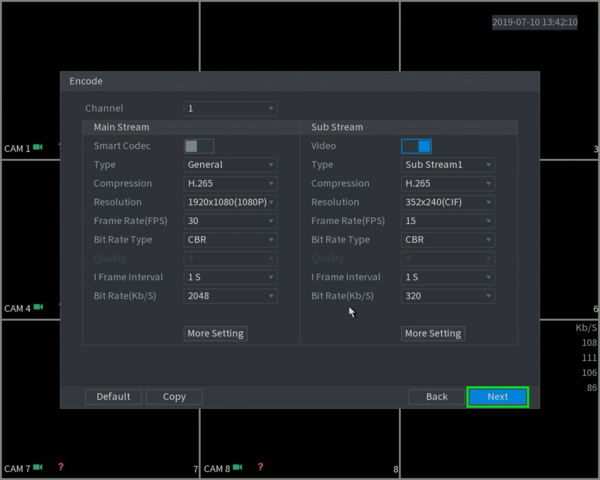
11. You can select the Encode settings for each camera by selecting the drop down menu on "Channel".
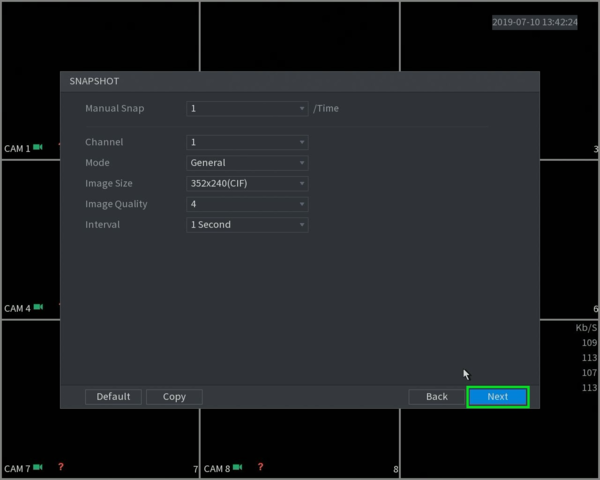
12. Select the resolution and image quality for snapshots.
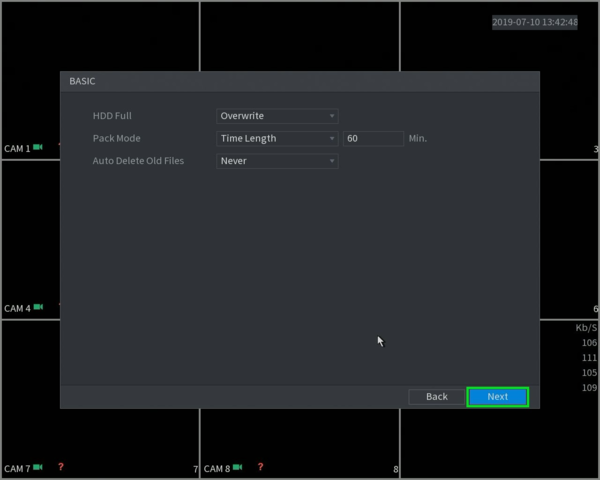
13. Select what you want to to when the hard drive fills up.
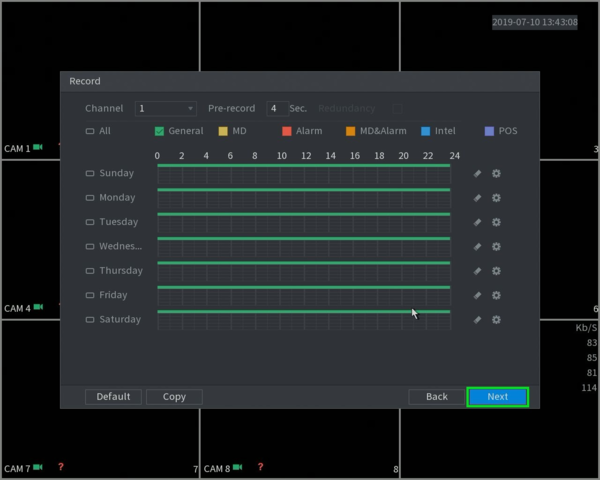
14. Here is you recording schedule, the green will indicate 24/7 recording and Yellow will be Motion recording.
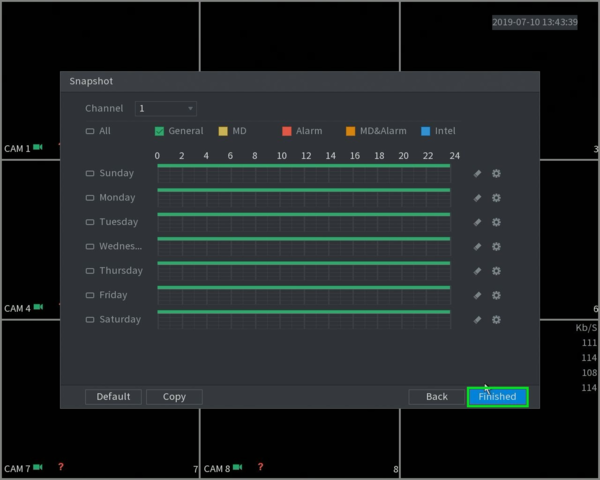
15. Here is you Snapshot schedule, same color legend as recording,
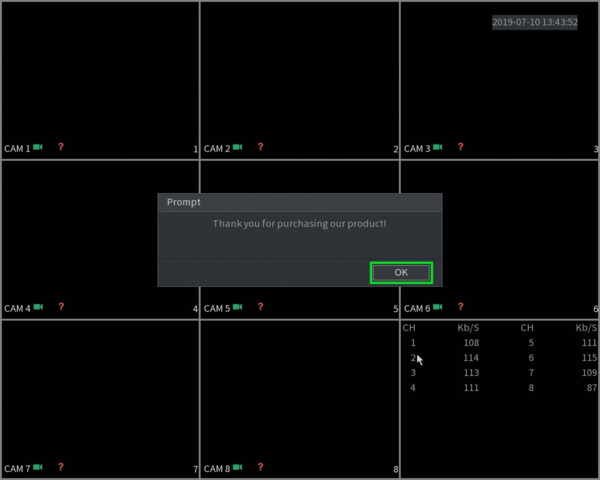
16. Once all that is setup you will be greeted with the final Prompt! You are now finished Initializing you new recorder
Shutdown
- When you see corresponding dialogue box “System is shutting down…” Do not click power on-off button directly.
- Do not unplug the power cable or click power on-off button to shutdown device directly when device is running (especially when it is recording.)
There are three ways for you to log out.
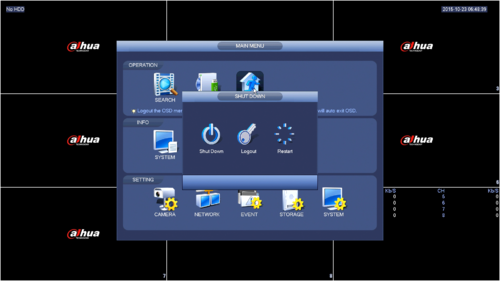
- Main menu (RECOMMENDED)
From Main Menu->Shutdown, select shutdown from dropdown list.
Click OK button, you can see device shuts down.
- From power on-off button on the front panel or remote control
Press the power on-off button on the NVR front panel or remote control for more than 3 seconds to shutdown the device.
Below are the instructions for previous firmware for Dahua recorders:
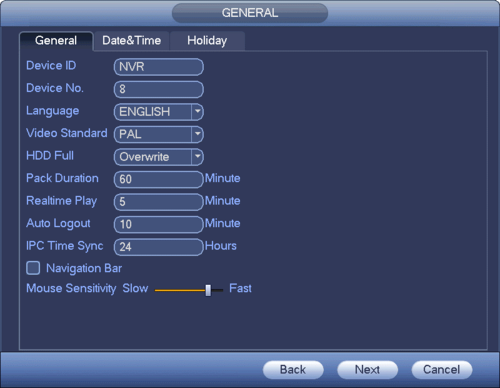
After device successfully booted up, it goes to startup wizard. Click Cancel/Next button, you can see system goes to login interface.
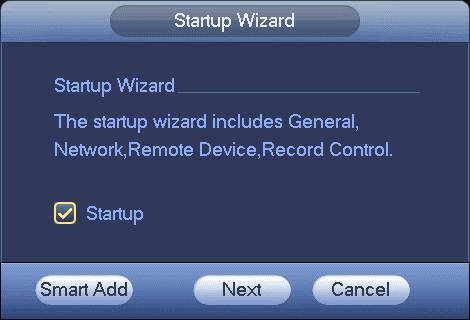
Click Smart add, Cancel button or Next button, system goes to login interface.
System consists of four accounts:
- Username: admin. Password: admin. (administrator, local and network)
- Username: 888888. Password: 888888. (administrator, local only)
- Username: 666666. Password: 666666(Lower authority user who can only monitor, playback, backup and etc.)
- Username: default. Password: default (hidden user). Hidden user “default” is for system interior use only and can not be deleted. When there is no login user, hidden user “default” automatically login. You can set some rights such as monitor for this user so that you can view some channel view without login.
Note: For security reason, please modify password after you first login. Within 30 minutes, three times login failure will result in system alarm and five times login failure will result in account lock!
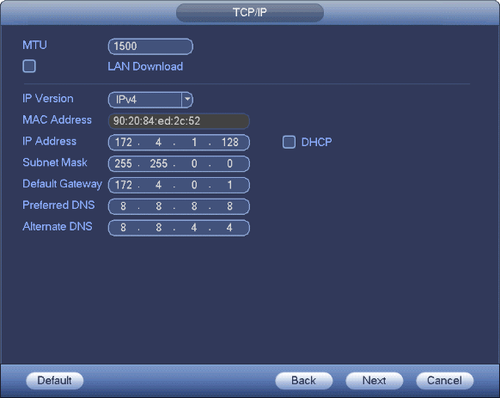
Click Next button, you can go to network interface.
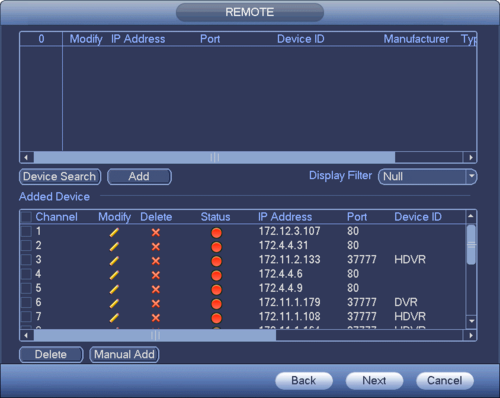
Click Next button, you can go to remote device interface.
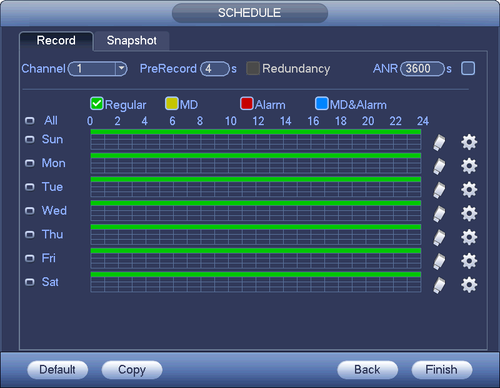
Click Next button, you can go to Schedule interface.
Click Finish button, system pops up a dialogue box. Click the OK button, the startup wizard is complete.
