Difference between revisions of "3rd Party VMS/Milestone/Add Dahua Device"
| (One intermediate revision by the same user not shown) | |||
| Line 3: | Line 3: | ||
This article will run through adding a Dahua device to XProtect. | This article will run through adding a Dahua device to XProtect. | ||
==Prerequisites== | ==Prerequisites== | ||
| − | + | * X Protect 2017 R3 | |
| + | * Dahua ONVIF compliant camera | ||
==Video Instructions== | ==Video Instructions== | ||
<embedvideo service="youtube">https://youtu.be/nATr6xDBpy0</embedvideo> | <embedvideo service="youtube">https://youtu.be/nATr6xDBpy0</embedvideo> | ||
==Step by Step Instructions== | ==Step by Step Instructions== | ||
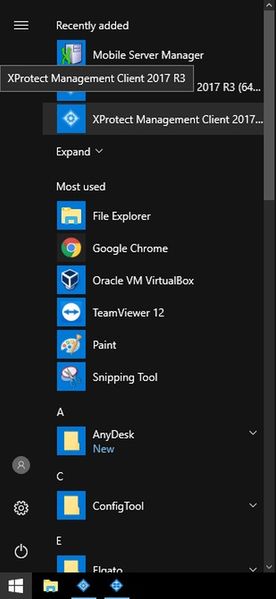
| − | 1. | + | 1. Begin with launching X Protect Management Client 2017 R3. |
[[File:AddDahuaDevicetoXProtect001.jpg|600x600px]] | [[File:AddDahuaDevicetoXProtect001.jpg|600x600px]] | ||
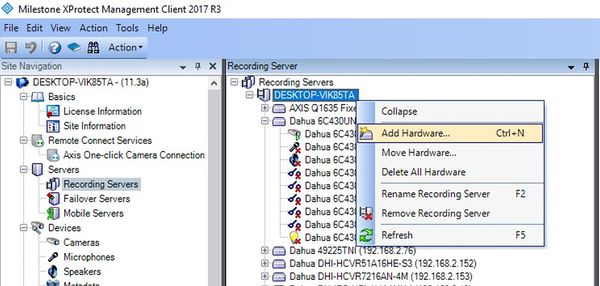
| − | 2. ( | + | 2. Select Servers -> Recording Servers. Then right-click the recording server you want to add the camera to and select Add Hardware (Cntrl+N). |
[[File:AddDahuaDevicetoXProtect002.jpg|600x600px]] | [[File:AddDahuaDevicetoXProtect002.jpg|600x600px]] | ||
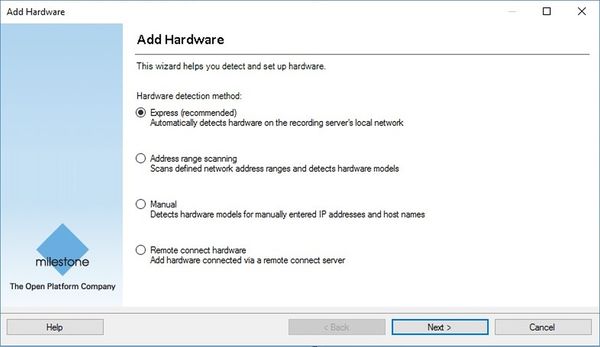
| − | 3. | + | 3. Select Express, then select Next >. |
[[File:AddDahuaDevicetoXProtect003.jpg|600x600px]] | [[File:AddDahuaDevicetoXProtect003.jpg|600x600px]] | ||
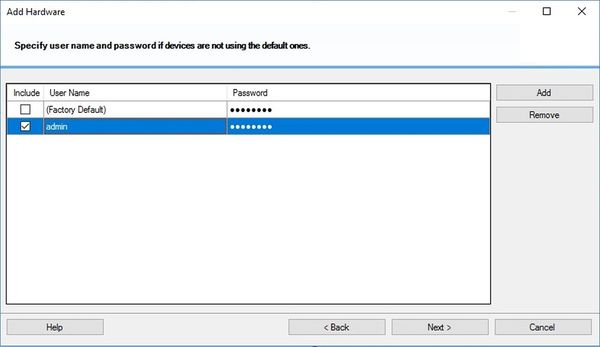
| − | 4. | + | 4. Make sure to input the username and password for the devices ONVIF interface, then select Next >. |
[[File:AddDahuaDevicetoXProtect004.jpg|600x600px]] | [[File:AddDahuaDevicetoXProtect004.jpg|600x600px]] | ||
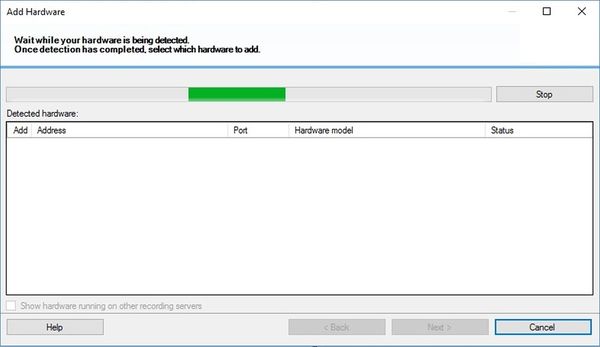
| − | 5. | + | 5. Wait while searching for the camera you want to add. |
[[File:AddDahuaDevicetoXProtect005.jpg|600x600px]] | [[File:AddDahuaDevicetoXProtect005.jpg|600x600px]] | ||
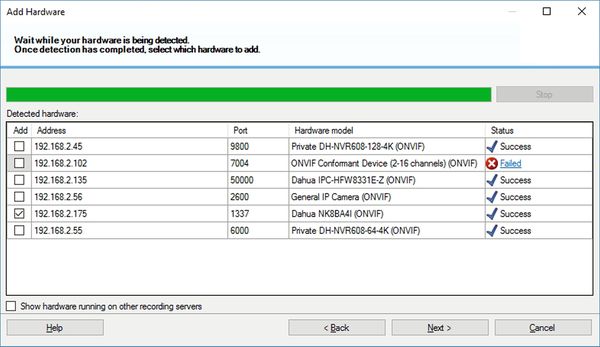
| − | 6. | + | 6. Once you see the camera(s) you want to add, you can either wait until the search finishes or select Stop. Check the device(s) you want to add and select Next >. |
[[File:AddDahuaDevicetoXProtect006.jpg|600x600px]] | [[File:AddDahuaDevicetoXProtect006.jpg|600x600px]] | ||
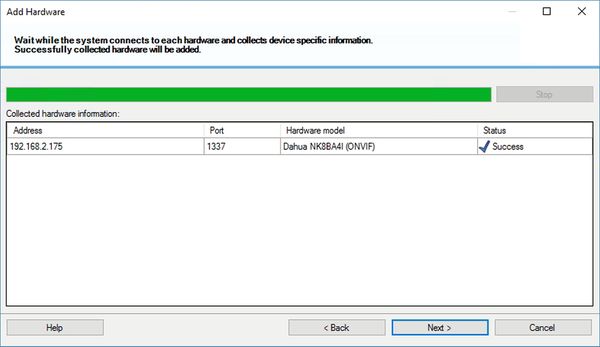
| − | 7. | + | 7. Wait for the device to discover hardware capability, then select Next. |
[[File:AddDahuaDevicetoXProtect007.jpg|600x600px]] | [[File:AddDahuaDevicetoXProtect007.jpg|600x600px]] | ||
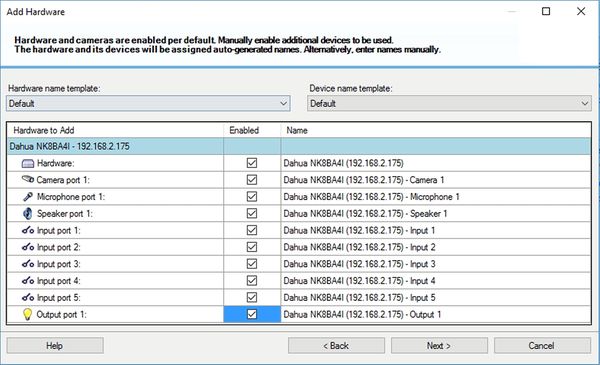
| − | 8. | + | 8. Enable any or all Hardware features that might apply to your application. |
[[File:AddDahuaDevicetoXProtect008.jpg|600x600px]] | [[File:AddDahuaDevicetoXProtect008.jpg|600x600px]] | ||
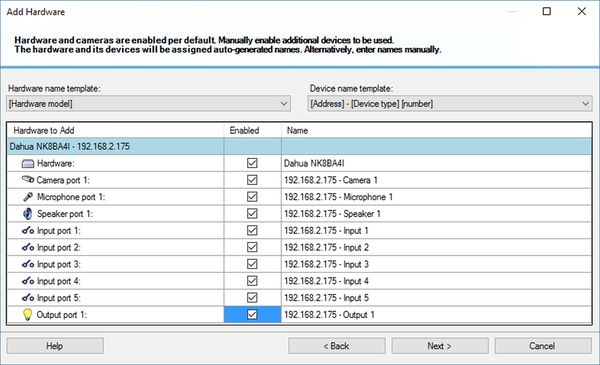
| − | 9. | + | 9. You can also adjust your template layout. Select Next >. |
[[File:AddDahuaDevicetoXProtect009.jpg|600x600px]] | [[File:AddDahuaDevicetoXProtect009.jpg|600x600px]] | ||
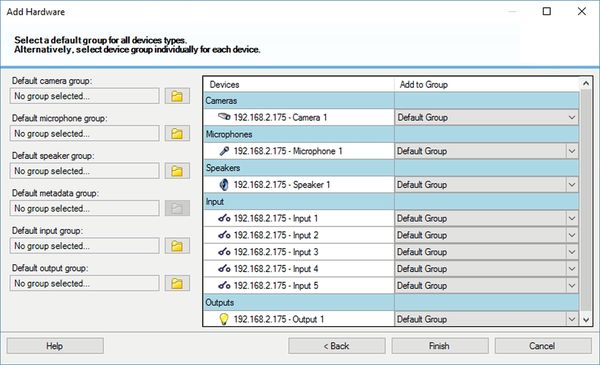
| − | 10. | + | 10. In this menu, you can create groupings and then assigned the camera's |
| − | |||
| − | |||
| − | |||
| − | |||
[[File:AddDahuaDevicetoXProtect011.jpg|600x600px]] | [[File:AddDahuaDevicetoXProtect011.jpg|600x600px]] | ||
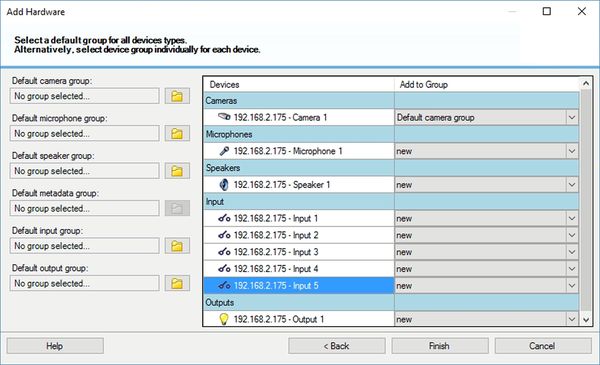
| − | + | 11. Here is an exampled of the groupings. Select Finished. | |
[[File:AddDahuaDevicetoXProtect012.jpg|600x600px]] | [[File:AddDahuaDevicetoXProtect012.jpg|600x600px]] | ||
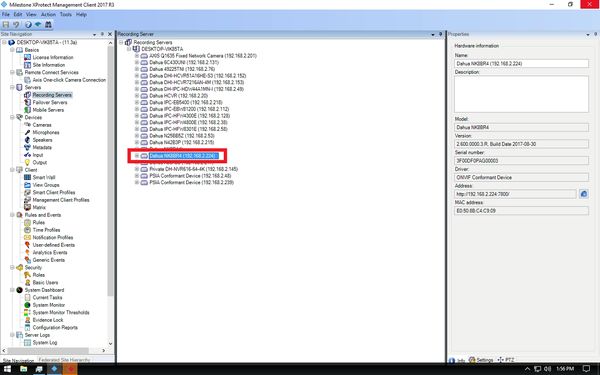
| − | + | 12. The camera should now appear in the list. | |
[[File:AddDahuaDevicetoXProtect013.jpg|600x600px]] | [[File:AddDahuaDevicetoXProtect013.jpg|600x600px]] | ||
Latest revision as of 16:08, 19 October 2017
Contents
Milestone: How to Add Dahua Device to XProtect
Description
This article will run through adding a Dahua device to XProtect.
Prerequisites
- X Protect 2017 R3
- Dahua ONVIF compliant camera
Video Instructions
Step by Step Instructions
1. Begin with launching X Protect Management Client 2017 R3.
2. Select Servers -> Recording Servers. Then right-click the recording server you want to add the camera to and select Add Hardware (Cntrl+N).
3. Select Express, then select Next >.
4. Make sure to input the username and password for the devices ONVIF interface, then select Next >.
5. Wait while searching for the camera you want to add.
6. Once you see the camera(s) you want to add, you can either wait until the search finishes or select Stop. Check the device(s) you want to add and select Next >.
7. Wait for the device to discover hardware capability, then select Next.
8. Enable any or all Hardware features that might apply to your application.
9. You can also adjust your template layout. Select Next >.
10. In this menu, you can create groupings and then assigned the camera's
11. Here is an exampled of the groupings. Select Finished.
12. The camera should now appear in the list.
