Difference between revisions of "Software/Dahua Toolbox/Disk Manager"
| (8 intermediate revisions by 3 users not shown) | |||
| Line 1: | Line 1: | ||
| − | =How to use | + | =How to use DiskManager= |
==Description== | ==Description== | ||
| − | The | + | The DiskManager is a program inside the [[Software/Dahua_Toolbox|Dahua Toolbox]] program. This program will allow Windows based systems to read a HDD that was previously recording inside of a Dahua recorder. This tool assists in translating the file system, and is one of Dahua's fastest backup tools. This tool can be useful in the event a Dahua recorder is physically compromised and no longer operational, yet the HDD remains intact. |
==Prerequisites== | ==Prerequisites== | ||
* HDD based out of Dahua recorder with a recording | * HDD based out of Dahua recorder with a recording | ||
| − | * HDD dock interface, or Installed inside desktop | + | * HDD dock interface, or Installed inside a desktop computer |
| − | * | + | * [[File:Dahua-Toolbox_Icon.png|link=https://dahuawiki.com/images/Software/Dahua_Toolbox/Dahua_ToolBox_Eng_V1.02.1.T.20170314.zip|40px]] Dahua Toolbox installed |
==Video Instructions== | ==Video Instructions== | ||
| Line 12: | Line 12: | ||
==Step by Step Instructions== | ==Step by Step Instructions== | ||
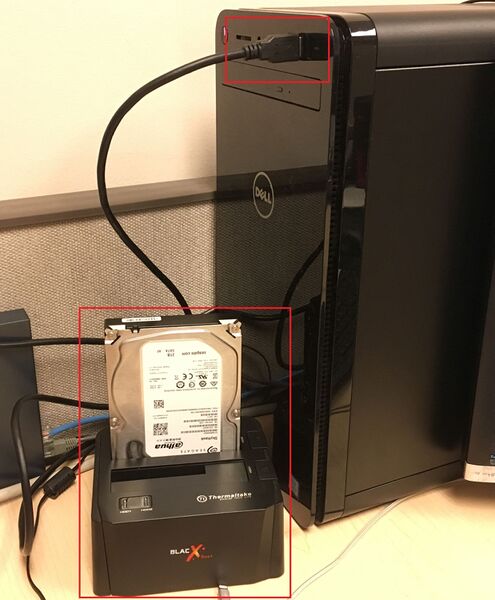
| − | 1. | + | 1. Connect the HDD to a HDD dock, or interface, then launch DiskManager from the ToolBox. |
| − | + | [[File:diskmanager001.jpg|600x600px]] | |
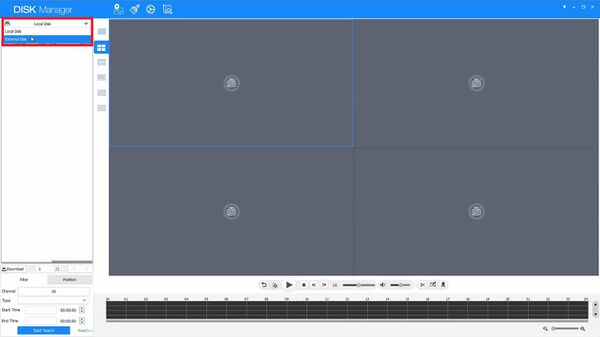
| − | + | 2. Once DiskManager has launched, select the disk. External disk will be used in this scenario since we are using an HDD dock (via USB). If you have installed the HDD inside of a desktop computer, then you would select Local Disk instead. | |
| − | + | [[File:diskmanager002.jpg|600x600px]] | |
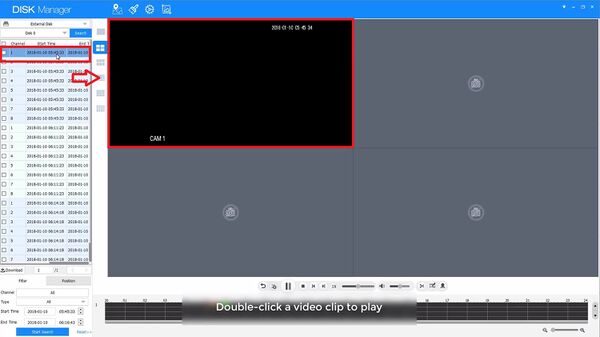
| + | 3. After the recordings load into the file list, you can double click one of the files to playback the video recording. | ||
| + | |||
| + | [[File:diskmanager003.jpg|600x600px]] | ||
| + | |||
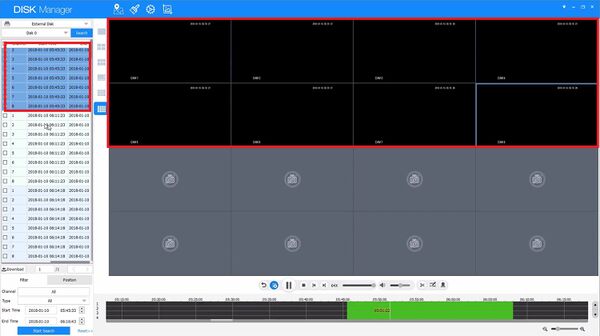
| + | 4. If you check one file and then double click, the group of cameras in that time will playback simultaneously. | ||
| + | |||
| + | [[File:diskmanager006.jpg|600x600px]] | ||
| + | |||
| + | 5. During playback of a record, hover the mouse cursor over the timeline at the bottom and then use the mouse wheel to zoom in or out of the timeline for easier navigation. | ||
| + | |||
| + | [[File:diskmanager004.jpg|600x600px]] | ||
| + | |||
| + | 6. Since the HDD is directly connected to the computer you can accelerate playback up to 64 times! | ||
| + | |||
| + | [[File:diskmanager005.jpg|600x600px]] | ||
| + | |||
| + | 7. When you have found the video file(s) needed for backup on the PC, check their respective listing and then select Download. | ||
| + | |||
| + | [[File:diskmanager007.jpg|600x600px]] | ||
| + | |||
| + | 8. Navigate to a folder you want the video file(s) to be stored in, select it and then select Choose. You can right click and select new folder to create a new directory if needed. The file(s) selected will now backup quickly. | ||
| + | |||
| + | [[File:diskmanager008.jpg|600x600px]] | ||
| + | |||
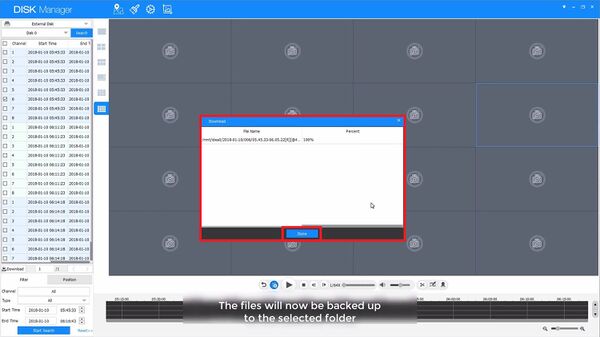
| + | 9. Once all files have downloaded 100% you can now close the program and remove the HDD. These files will be downloaded in *.DAV format. | ||
| + | |||
| + | [[File:diskmanager009.jpg|600x600px]] | ||
| + | |||
| + | 10. If you need to playback the files or convert them to a format many video players require, you will need to use the SmartPlayer located in the ToolBox, or available for download on [[PlaybackTool|Dahuawiki.com]] | ||
[[Category:Internal]] | [[Category:Internal]] | ||
Latest revision as of 16:35, 10 May 2018
Contents
How to use DiskManager
Description
The DiskManager is a program inside the Dahua Toolbox program. This program will allow Windows based systems to read a HDD that was previously recording inside of a Dahua recorder. This tool assists in translating the file system, and is one of Dahua's fastest backup tools. This tool can be useful in the event a Dahua recorder is physically compromised and no longer operational, yet the HDD remains intact.
Prerequisites
- HDD based out of Dahua recorder with a recording
- HDD dock interface, or Installed inside a desktop computer
-
 Dahua Toolbox installed
Video Instructions
Step by Step Instructions
1. Connect the HDD to a HDD dock, or interface, then launch DiskManager from the ToolBox.
2. Once DiskManager has launched, select the disk. External disk will be used in this scenario since we are using an HDD dock (via USB). If you have installed the HDD inside of a desktop computer, then you would select Local Disk instead.
3. After the recordings load into the file list, you can double click one of the files to playback the video recording.
4. If you check one file and then double click, the group of cameras in that time will playback simultaneously.
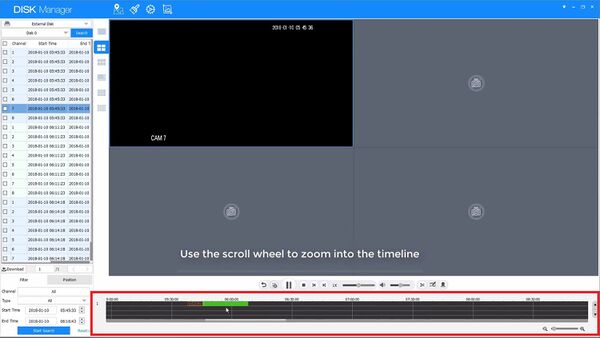
5. During playback of a record, hover the mouse cursor over the timeline at the bottom and then use the mouse wheel to zoom in or out of the timeline for easier navigation.
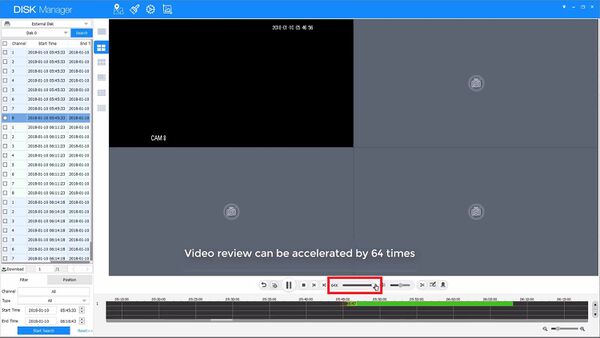
6. Since the HDD is directly connected to the computer you can accelerate playback up to 64 times!
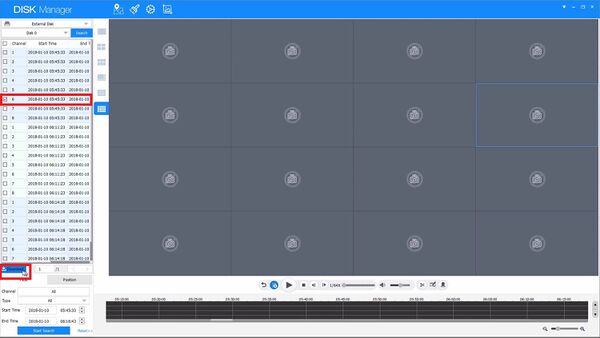
7. When you have found the video file(s) needed for backup on the PC, check their respective listing and then select Download.
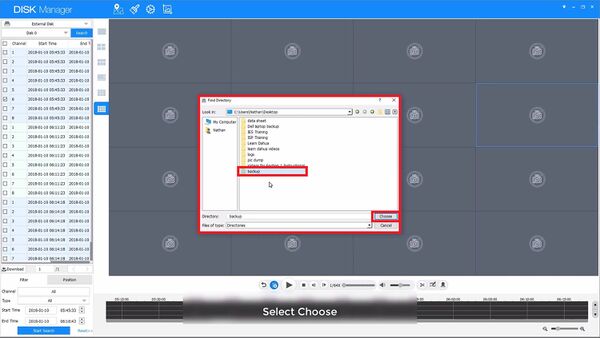
8. Navigate to a folder you want the video file(s) to be stored in, select it and then select Choose. You can right click and select new folder to create a new directory if needed. The file(s) selected will now backup quickly.
9. Once all files have downloaded 100% you can now close the program and remove the HDD. These files will be downloaded in *.DAV format.
10. If you need to playback the files or convert them to a format many video players require, you will need to use the SmartPlayer located in the ToolBox, or available for download on Dahuawiki.com
