Difference between revisions of "Time Attendance/SmartPSS/Setup Attendance Shift"
(Created page with "=Setup Attendance Shift= ==Description== ==Prerequisites== ==Video Instructions== <embedvideo service="youtube">https://www.youtube.com/watch?v=EXAMPLE</embedvideo> ==Step by...") |
|||
| (One intermediate revision by one other user not shown) | |||
| Line 1: | Line 1: | ||
| + | =='''NOTICE'''== | ||
| + | [https://dahuawiki.com/Discontinuation_of_SmartPSS Notice of Discontinuation of SmartPSS] | ||
| + | |||
=Setup Attendance Shift= | =Setup Attendance Shift= | ||
==Description== | ==Description== | ||
| + | This article will show you how create and a setup an Attendance Shift on the ASA2212A | ||
==Prerequisites== | ==Prerequisites== | ||
| − | + | *SmartPSS v2.02 | |
| − | + | *ASA2212A | |
==Step by Step Instructions== | ==Step by Step Instructions== | ||
| − | 1. | + | 1.Open SmartPSS and go to Attendance |
| − | [[File: | + | |
| + | [[File:TImeZoneASA2212ASPSS-1.jpg|700px]] | ||
| + | |||
| + | 2.Click on the "Account Settings" icon and go to "Attendance Shift" | ||
| + | |||
| + | [[File:ShiftASA2212A-1.jpg|700px]] | ||
| + | |||
| + | 3.Click on Add | ||
| + | |||
| + | [[File:ShiftASA2212A-3.jpg|700px]] | ||
| + | |||
| + | 4.Give a name to the shift and click on "Save" | ||
| + | |||
| + | [[File:ShiftASA2212A-4.jpg|500px]] | ||
| + | |||
| + | 5.Select the pencil icon to edit the days and the timezone, save any changes | ||
| + | |||
| + | [[File:ShiftASA2212A-5.jpg|700px]] | ||
| + | |||
| + | 6.Click on the "Shift Schedule" icon on the left and go to the drop-down bar, select the desired department. | ||
| + | |||
| + | [[File:ShiftASA2212A-6.jpg|700px]] | ||
| + | |||
| + | 7.Check the user you want to create a shift for and click on the "Shift" icon on the bottom, check the choose the shift that was created and setup the start and ending dates for the shift. | ||
| + | Save any and all changes | ||
| + | |||
| + | [[File:ShiftASA2212A-7.jpg|700px]] | ||
| + | |||
| + | 8.If done correctly you will see the shift populate on the calander | ||
| + | |||
| + | [[File:ShiftASA2212A-8.jpg|700px]] | ||
Latest revision as of 22:16, 2 October 2024
Contents
NOTICE
Notice of Discontinuation of SmartPSS
Setup Attendance Shift
Description
This article will show you how create and a setup an Attendance Shift on the ASA2212A
Prerequisites
- SmartPSS v2.02
- ASA2212A
Step by Step Instructions
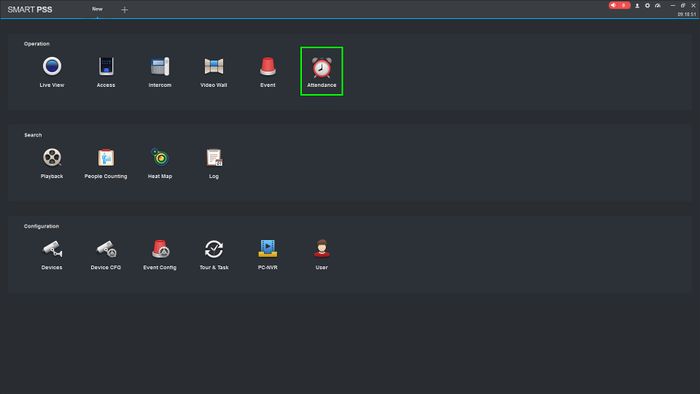
1.Open SmartPSS and go to Attendance
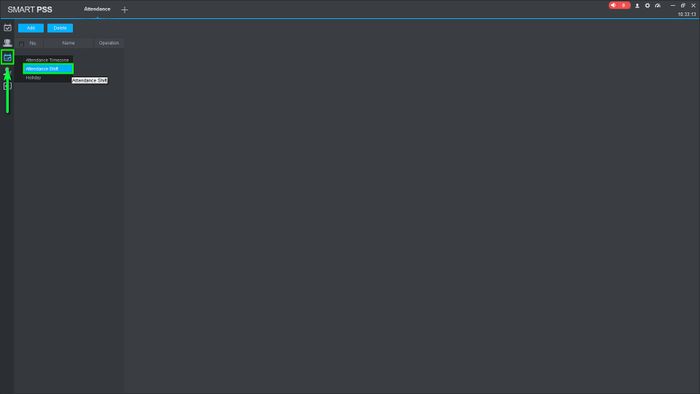
2.Click on the "Account Settings" icon and go to "Attendance Shift"
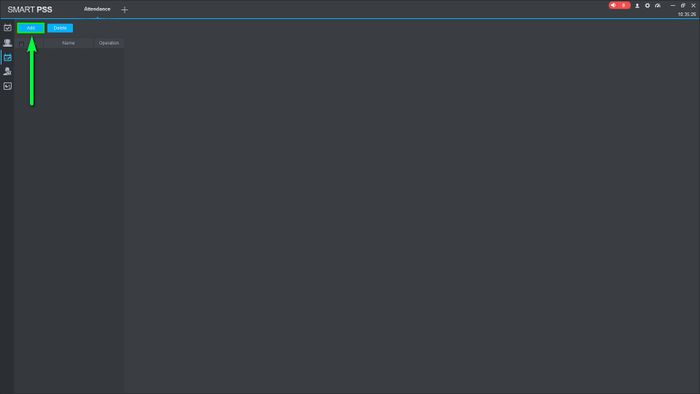
3.Click on Add
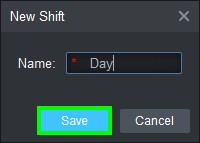
4.Give a name to the shift and click on "Save"
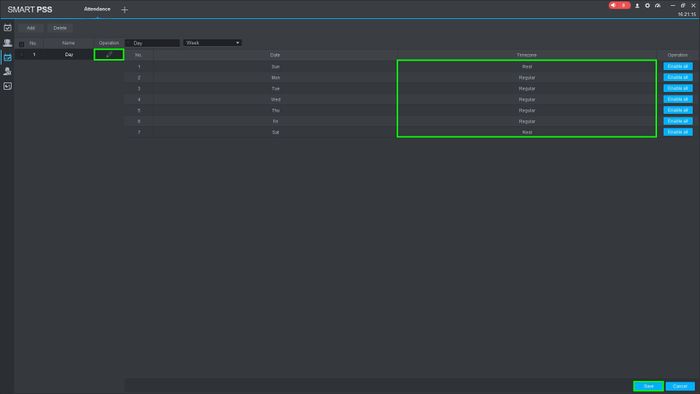
5.Select the pencil icon to edit the days and the timezone, save any changes
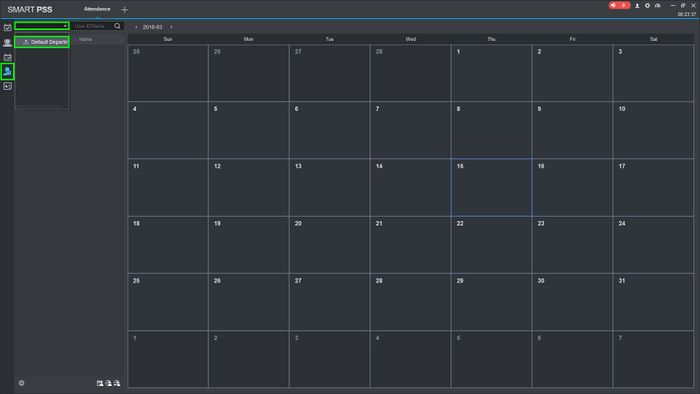
6.Click on the "Shift Schedule" icon on the left and go to the drop-down bar, select the desired department.
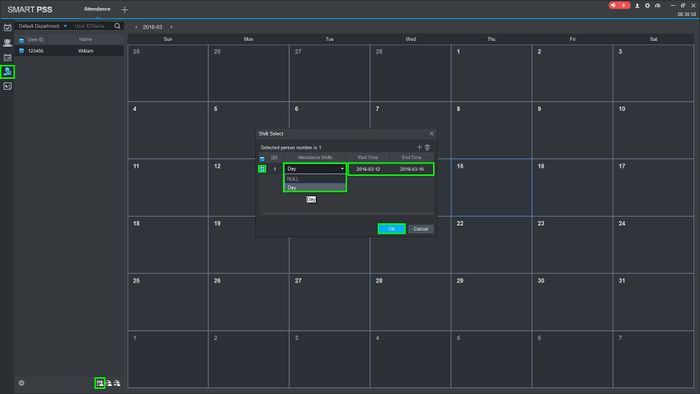
7.Check the user you want to create a shift for and click on the "Shift" icon on the bottom, check the choose the shift that was created and setup the start and ending dates for the shift. Save any and all changes
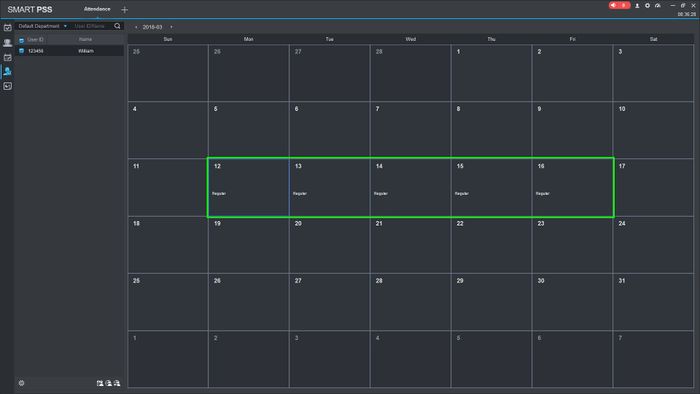
8.If done correctly you will see the shift populate on the calander
