Difference between revisions of "NVR/Basic Setup/Set IP Address"
(→How to set IP address for configuring IP cameras) |
(→Video Instructions) |
||
| (28 intermediate revisions by 4 users not shown) | |||
| Line 1: | Line 1: | ||
==How to set IP address for configuring IP cameras== | ==How to set IP address for configuring IP cameras== | ||
| − | + | ===Description=== | |
| + | If a network video recorder is on one IP gateway without a router (or just on a switch) and your cameras are on another gateway then there can be a problem with changing the IP of the cameras. This article will explain how to set up your computer as the host connection for an IP camera or IP device. From here you can configure the settings of the camera to match that of your network recorder. | ||
| − | + | ===Prerequisites=== | |
| + | * Connect a ethernet cable from camera to NVR Then connect a RJ45 cable from NVR to PC. | ||
| − | + | * Set PC and Camera on same Network. | |
| − | + | * Use Config Tool to locate IP address of IP Camera. Please reference this link of how to use the config tool http://dahuawiki.com/ConfigToolLocate | |
| − | |||
| − | |||
| − | + | Set the IP address of the PC/ laptop same as the camera. | |
| − | + | ===Video Instructions=== | |
| + | <embedvideo service="youtube">https://youtu.be/6rn-K6SqfPQ</embedvideo> | ||
| − | Step | + | ===Step by Step Instructions=== |
| − | |||
| − | Step | + | Step 1. Right Click on the Windows Start up ➞ Click on Control Panel. |
| − | [[File: | + | [[File:set_ip_locally_wiki_1.png|500px]] |
| − | |||
| − | + | Step 2. Click on Network and Internet ➞ Select Network Sharing Center ➞ Select on Change Adapter Settings ➞ Select Ethernet | |
| − | + | [[File:set_ip_locally_wiki_2.png|500px]] | |
| − | [[File: | + | [[File:set_ip_locally_wiki_3.png|500px]] |
| − | + | [[File:set_ip_locally_wiki_4.png|500px]] | |
| + | |||
| + | [[File:set_ip_locally_wiki_5.png|500px]] | ||
| + | |||
| + | |||
| + | Step 3. Select the Network Tab ➞ Check off Internet Protocol Version 4 (TCP/IPv4) ➞ Click on Internet Protocol Version 4 to highlight ➞ Click on Properties | ||
| + | |||
| + | [[File:set_ip_locally_wiki_6.png|500px]]. | ||
| + | |||
| + | |||
| + | Step 4. Set IP Address in the same range as the IP Camera Address. Ensure the Subnet Mask and Default Gateway of the PC are the same from the camera. Click OK . | ||
| + | |||
| + | [[File:set_ip_locally_wiki_7.png|500px]] | ||
| + | |||
| + | |||
| + | [[Category:Troubleshoot]] | ||
Latest revision as of 20:48, 29 July 2016
Contents
How to set IP address for configuring IP cameras
Description
If a network video recorder is on one IP gateway without a router (or just on a switch) and your cameras are on another gateway then there can be a problem with changing the IP of the cameras. This article will explain how to set up your computer as the host connection for an IP camera or IP device. From here you can configure the settings of the camera to match that of your network recorder.
Prerequisites
- Connect a ethernet cable from camera to NVR Then connect a RJ45 cable from NVR to PC.
- Set PC and Camera on same Network.
- Use Config Tool to locate IP address of IP Camera. Please reference this link of how to use the config tool http://dahuawiki.com/ConfigToolLocate
Set the IP address of the PC/ laptop same as the camera.
Video Instructions
Step by Step Instructions
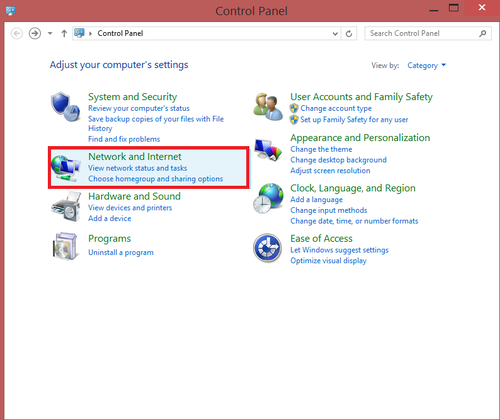
Step 1. Right Click on the Windows Start up ➞ Click on Control Panel.
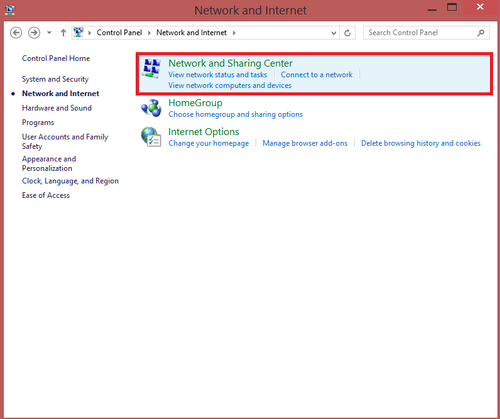
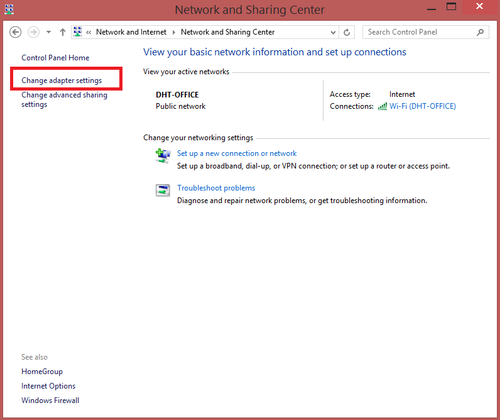
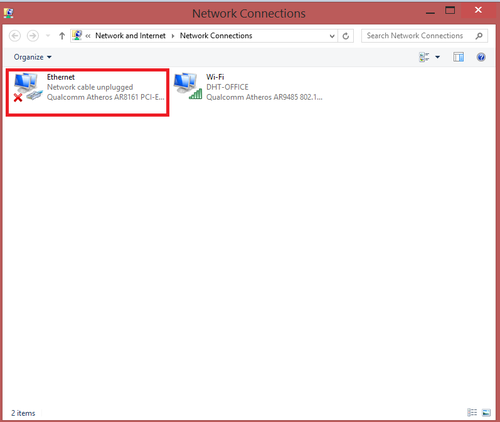
Step 2. Click on Network and Internet ➞ Select Network Sharing Center ➞ Select on Change Adapter Settings ➞ Select Ethernet
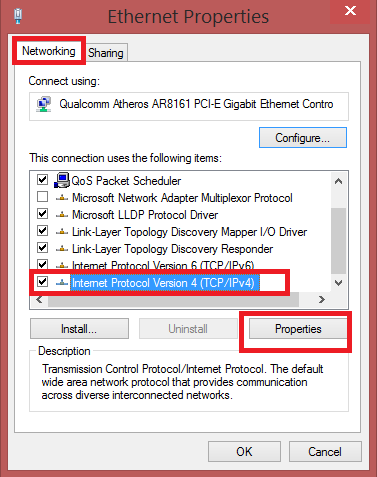
Step 3. Select the Network Tab ➞ Check off Internet Protocol Version 4 (TCP/IPv4) ➞ Click on Internet Protocol Version 4 to highlight ➞ Click on Properties
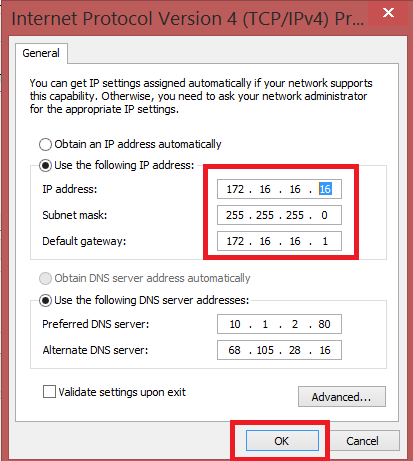
Step 4. Set IP Address in the same range as the IP Camera Address. Ensure the Subnet Mask and Default Gateway of the PC are the same from the camera. Click OK .

