Difference between revisions of "Mobile/Backup"
(→Prerequisites) |
|||
| (17 intermediate revisions by one other user not shown) | |||
| Line 1: | Line 1: | ||
| + | =='''NOTICE'''== | ||
| + | [https://dahuawiki.com/Discontinuation_of_iDMSS_and_gDMSS Notice of Discontinuation of iDMSS and gDMSS] | ||
| + | |||
=How to Backup Video via Mobile (iDMSS or gDMSS)= | =How to Backup Video via Mobile (iDMSS or gDMSS)= | ||
==Description== | ==Description== | ||
| Line 8: | Line 11: | ||
* Dahua Recorder with HDD installed and record configuration enabled | * Dahua Recorder with HDD installed and record configuration enabled | ||
* IDMSS/ GDMSS app installed on iPhone or Android mobile phone | * IDMSS/ GDMSS app installed on iPhone or Android mobile phone | ||
| + | [[file:gDMSSIcon.png|75px]] [[file:iDMSSIcon.png|75px]] | ||
Mobile phone must be connected to a network which has access to Dahua Recorder. | Mobile phone must be connected to a network which has access to Dahua Recorder. | ||
| Line 15: | Line 19: | ||
==Video Instructions== | ==Video Instructions== | ||
| + | Coming Soon... | ||
<embedvideo service="youtube">https://www.youtube.com/watch?v=EXAMPLE</embedvideo> | <embedvideo service="youtube">https://www.youtube.com/watch?v=EXAMPLE</embedvideo> | ||
| + | |||
==Step by Step Instructions== | ==Step by Step Instructions== | ||
===Start Playback=== | ===Start Playback=== | ||
| Line 21: | Line 27: | ||
Up to 4 cameras can be selected for remote playback at the same time. | Up to 4 cameras can be selected for remote playback at the same time. | ||
| − | 1. Tap on | + | 1. Tap on [[file:menu.png|30px]] from the top left, then it will launch left menu pane. |
| + | |||
| + | [[File:LeftPaneMenu.png|300px]] | ||
2. Tap on '''Playback'''. | 2. Tap on '''Playback'''. | ||
| − | 3. Tap on | + | 3. Tap on [[file:CamSelection.png|30px]] from the top right corner. |
| + | |||
| + | For Step 4-7, please refer to the following screenshot: | ||
| + | |||
| + | [[File:PlaybackProperties.PNG|300px]] | ||
| + | |||
| + | 4. Set the '''Start and End Time'''. | ||
| + | |||
| + | 5. Select the '''Record Type''' to view. | ||
| − | + | 6. Select the '''Camera Channel''' you like to play. | |
| − | + | 7. Tap on '''Start Playback'''. | |
| − | + | 8. Video Playback is now playing. | |
| − | + | [[File:PlaybackStart.png|300px]] | |
| − | In this playback menu, there are several feature available such as Snapshot, Enable Audio, and Fish-eye view Expansion. | + | In this playback menu, there are several feature available such as Snapshot [[file:CaptureVideo.png|30px]], Enable Audio [[file:EnableAudio.png|30px]], and Fish-eye view Expansion. |
| − | === | + | ===Clip the playback video=== |
1. Start Playback. | 1. Start Playback. | ||
| Line 44: | Line 60: | ||
2. Select the camera window, video clipping is only allow 1 channel at the same time. | 2. Select the camera window, video clipping is only allow 1 channel at the same time. | ||
| − | 3. | + | 3. Tap on [[file:ClipVideo.png|30px]]. And then you start the clip by tapping on [[file:ClipStart.png|30px]]. |
4. Move your Red Cursor to a time frame where to stop the video clip. (Max. 30 mins) | 4. Move your Red Cursor to a time frame where to stop the video clip. (Max. 30 mins) | ||
| − | 5. Tap | + | 5. Tap on [[file:ClipStop.png|30px]] to stop clip. |
6. Tap '''OK'''. | 6. Tap '''OK'''. | ||
| − | The video clip is now save into the temporary app storage. To download the video clip to your mobile phone or to share it via email or other phone app; go to the '''Menu''' > '''Local Files''' > Tap on | + | The video clip is now save into the temporary app storage. To download the video clip to your mobile phone or to share it via email or other phone app; go to the '''Menu''' > '''Local Files''' > Tap on [[file:LocalPencil.png|30px]] > Select the video files > Tap on [[file:LocalExport.png|30px]]. |
| − | You can also | + | You can also tap on Share Icon and select the app to share the video clip. |
| + | To remove the file from local storage, select the video file, and tap on [[file:LocalDelete.png|30px]]. | ||
| − | ===Record the video=== | + | ===Record the playback video=== |
1. Start Playback. | 1. Start Playback. | ||
| − | 2. Tap | + | 2. Tap on [[file:RecordVideo.png|30px]]. |
| − | 3. Tap on | + | 3. Tap on [[file:RecordVideo.png|30px]] again to stop the recording mode. |
For this feature, dragging the time frame is not allow since the purpose of this feature is to quick record file during playback view. | For this feature, dragging the time frame is not allow since the purpose of this feature is to quick record file during playback view. | ||
Latest revision as of 17:01, 2 October 2024
Contents
NOTICE
Notice of Discontinuation of iDMSS and gDMSS
How to Backup Video via Mobile (iDMSS or gDMSS)
Description
This article will show how to search and download a video clip thru mobile app. Playback menu on the mobile app allow user to search the recorded video files stored in the added device for remote playback.
Prerequisites
- Dahua Recorder with HDD installed and record configuration enabled
- IDMSS/ GDMSS app installed on iPhone or Android mobile phone
Mobile phone must be connected to a network which has access to Dahua Recorder.
For this article, we are using Dahua Recorder DH-NVR608-128-4K and Dahua Camera 1A203TNI. The Recording type in this example is Continuous Record Schedule.
Video Instructions
Coming Soon...
Step by Step Instructions
Start Playback
Up to 4 cameras can be selected for remote playback at the same time.
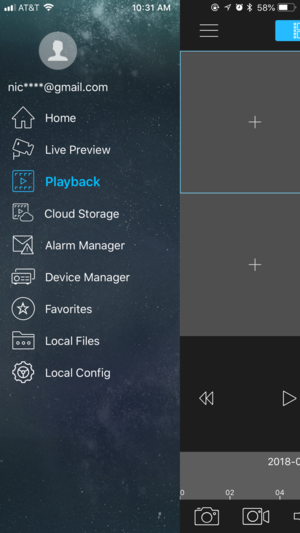
1. Tap on 30px from the top left, then it will launch left menu pane.
2. Tap on Playback.
3. Tap on ![]() from the top right corner.
from the top right corner.
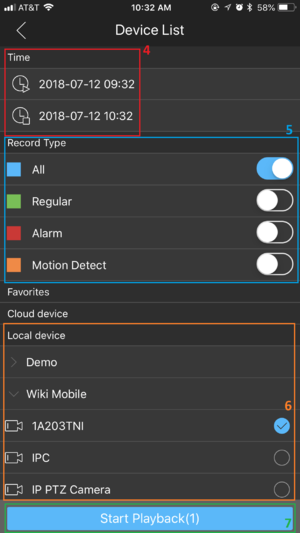
For Step 4-7, please refer to the following screenshot:
4. Set the Start and End Time.
5. Select the Record Type to view.
6. Select the Camera Channel you like to play.
7. Tap on Start Playback.
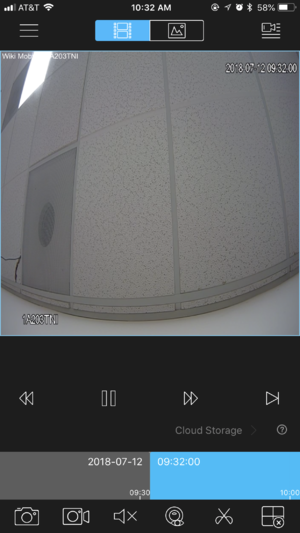
8. Video Playback is now playing.
In this playback menu, there are several feature available such as Snapshot ![]() , Enable Audio
, Enable Audio ![]() , and Fish-eye view Expansion.
, and Fish-eye view Expansion.
Clip the playback video
1. Start Playback.
2. Select the camera window, video clipping is only allow 1 channel at the same time.
3. Tap on ![]() . And then you start the clip by tapping on
. And then you start the clip by tapping on ![]() .
.
4. Move your Red Cursor to a time frame where to stop the video clip. (Max. 30 mins)
6. Tap OK.
The video clip is now save into the temporary app storage. To download the video clip to your mobile phone or to share it via email or other phone app; go to the Menu > Local Files > Tap on ![]() > Select the video files > Tap on
> Select the video files > Tap on ![]() .
.
You can also tap on Share Icon and select the app to share the video clip.
To remove the file from local storage, select the video file, and tap on ![]() .
.
Record the playback video
1. Start Playback.
3. Tap on ![]() again to stop the recording mode.
again to stop the recording mode.
For this feature, dragging the time frame is not allow since the purpose of this feature is to quick record file during playback view.


