Difference between revisions of "Access Control/How To Update ASC1204B Firmware"
(→Step by Step Instructions) |
|||
| (8 intermediate revisions by the same user not shown) | |||
| Line 1: | Line 1: | ||
=How to Update ASC1204B Firmware= | =How to Update ASC1204B Firmware= | ||
| + | |||
==Description== | ==Description== | ||
| + | In this guide, we will show you how to upgrade the ASC1204B two different methods. | ||
| + | |||
| + | - ASC Config (Found in our toolbox) | ||
| + | |||
| + | - SmartPSS Version 1.16 or 2.01 | ||
| + | |||
==Prerequisites== | ==Prerequisites== | ||
| − | *[https://dahuawiki.com/images/c/c9/483223_dh_smartpss_en_is_v1.16.1.r.20170220.zip SmartPSS Version: 1.16.1] | + | * [[Software/Dahua Toolbox|Dahua Toolbox]] |
| − | *ASC1204B Firmware | + | * [https://dahuawiki.com/images/c/c9/483223_dh_smartpss_en_is_v1.16.1.r.20170220.zip SmartPSS Version: 1.16.1] or [https://dahuawiki.com/images/Software/SmartPSS/20170802031724_dhsmartpsschnengwin32isv2.01.0.t.170724%20(1).zip SmartPSS Version 2.01] |
| + | * [https://dahuawiki.com/images/Firmware/Access_Control/General_ASC1204B_V1.104.0000.0.R.20171106.zip ASC1204B Firmware] | ||
| + | * Windows PC | ||
| − | |||
| − | |||
==Step by Step Instructions== | ==Step by Step Instructions== | ||
| − | |||
| − | |||
| − | 2. | + | ===ASC Config=== |
| + | |||
| + | 1. Run Toolbox and open ASCConfig | ||
| + | |||
| + | [[File:ASC1204BFWUPD-1.png|700px]] | ||
| + | |||
| + | 2. Before doing anything click on "Search Setting" to edit the username and password to the ASC1204B | ||
| + | |||
| + | [[File:ASC1204BFWUPD-2.png|700px]] | ||
| + | |||
| + | 3. Input the login information of the Four Door Controller (Default Password "123456") | ||
| + | |||
| + | [[File:ASC1204BFWUPD-3.png|700px]] | ||
| + | |||
| + | 4. Click on the upgrade icon | ||
| + | |||
| + | [[File:ASC1204BFWUPD-4.png|700px]] | ||
| + | |||
| + | 5. Select the "Browse" tab to select the file | ||
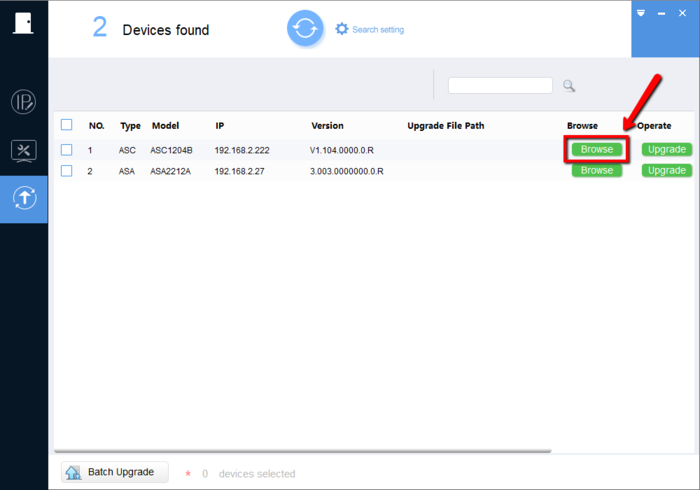
| + | |||
| + | [[File:ASC1204BFWUPD-5.png|700px]] | ||
| + | |||
| + | 6. Go to the directory you saved the file to and select the BIN file in the folder. (The BIN file has the exact same name as the folder) | ||
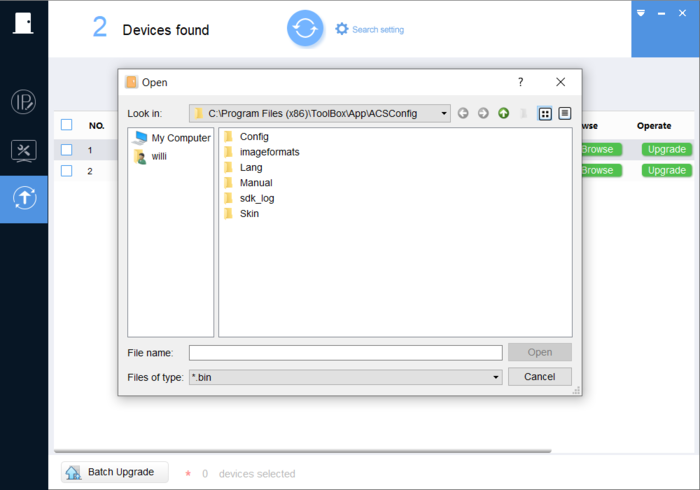
| + | |||
| + | [[File:ASC1204BFWUPD-6.png|700px]] | ||
| + | |||
| + | 7. Click on Upgrade once the file has been selected | ||
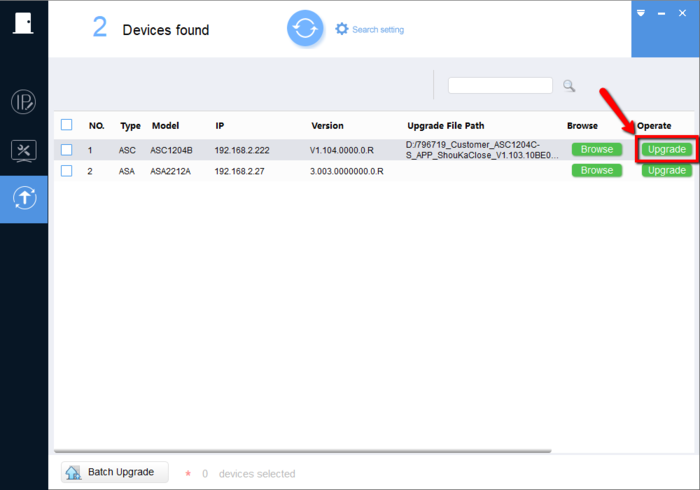
| + | |||
| + | [[File:ASC1204BFWUPD-7.png|700px]] | ||
| + | |||
| + | 8. If done correctly you will get a green check mark | ||
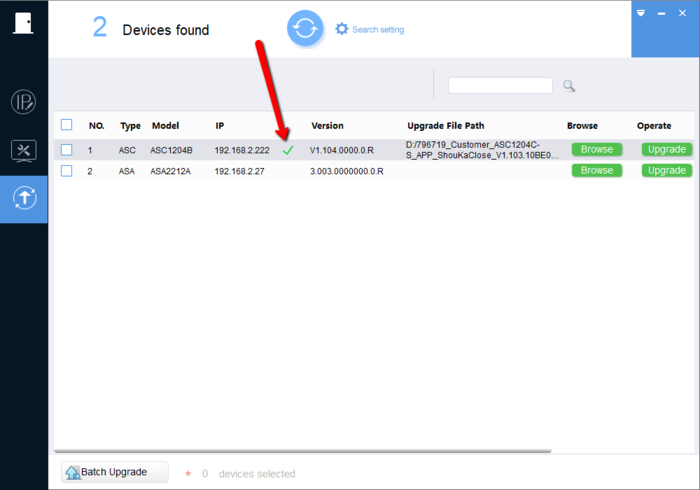
| + | |||
| + | [[File:ASC1204BFWUPD-8.png|700px]] | ||
| + | |||
| + | |||
| + | ===SmartPSS v2.01=== | ||
| + | |||
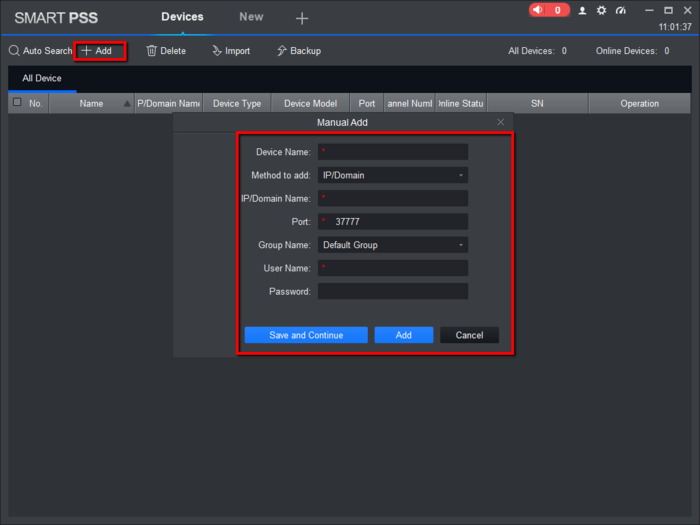
| + | 1. First add the Controller to SmartPSS by clicking on "Add" and inputting the information | ||
| + | |||
| + | [[File:ASC1204BFWUPD-9.png|700px]] | ||
| + | |||
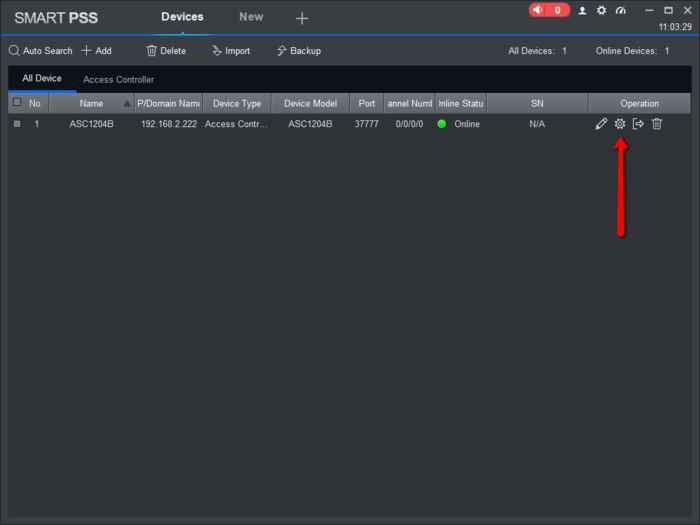
| + | 2. After adding the unit, click on the "Device CFG" icon. (Looks like gear) | ||
| + | |||
| + | [[File:ASC1204BFWUPD-10.png|700px]] | ||
| + | |||
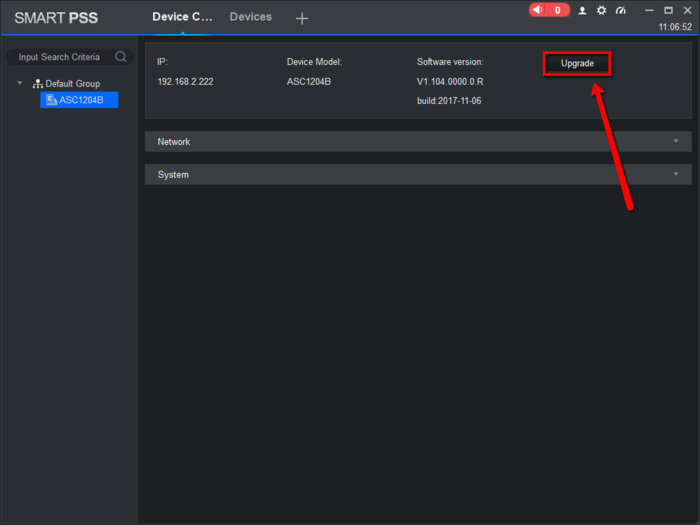
| + | 3. Select the Controller on the left and make sure its highlighted. Then click on "Upgrade" | ||
| + | |||
| + | [[File:ASC1204BFWUPD-11.png|700px]] | ||
| + | |||
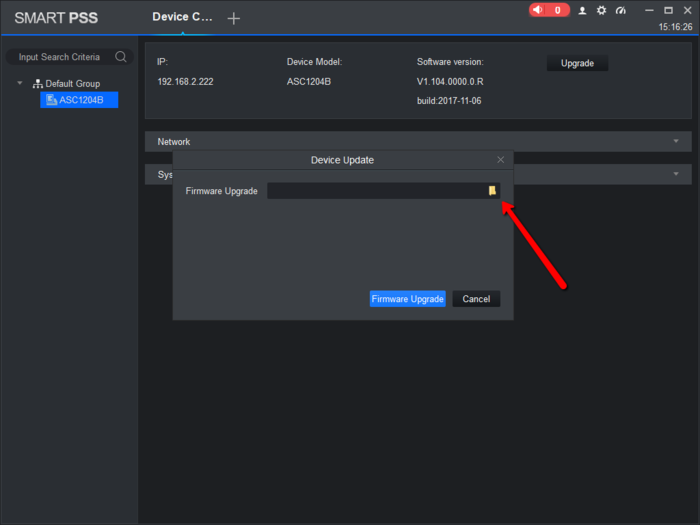
| + | 4. Select the Folder icon to browse for the BIN file | ||
| + | |||
| + | [[File:ASC1204BFWUPD-12.png|700px]] | ||
| + | |||
| + | 5. Go into the folder and select the BIN file with the exact name as the folder | ||
| + | |||
| + | [[File:ASC1204BFWUPD-13.png|700px]] | ||
| + | |||
| + | 6. Once you do click on "Firmware Upgrade" and the firmware will go through | ||
| + | |||
| + | [[File:ASC1204BFWUPD-14.png|700px]] | ||
| + | |||
| + | ===SmartPSS V1.16=== | ||
| + | |||
| + | 1. First add the Controller to SmartPSS by clicking on "Add". Input all the information from the unit | ||
| + | |||
| + | [[File:ASC1204BFWUPD-15.png|700px]] | ||
| + | |||
| + | 2. After adding the unit, click on the "Device CFG" icon. (Looks like gear) | ||
| + | |||
| + | [[File:ASC1204BFWUPD-16.png|700px]] | ||
| + | |||
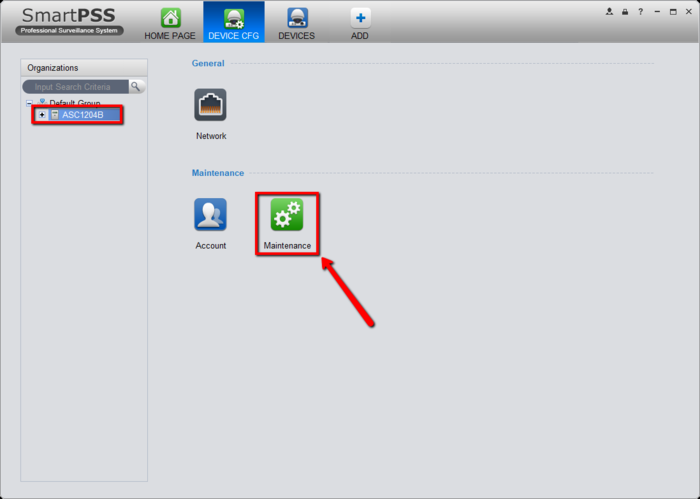
| + | 3. Select the Controller on the left and make sure its highlighted, then select "Maintenance" | ||
| + | |||
| + | [[File:ASC1204BFWUPD-17.png|700px]] | ||
| + | |||
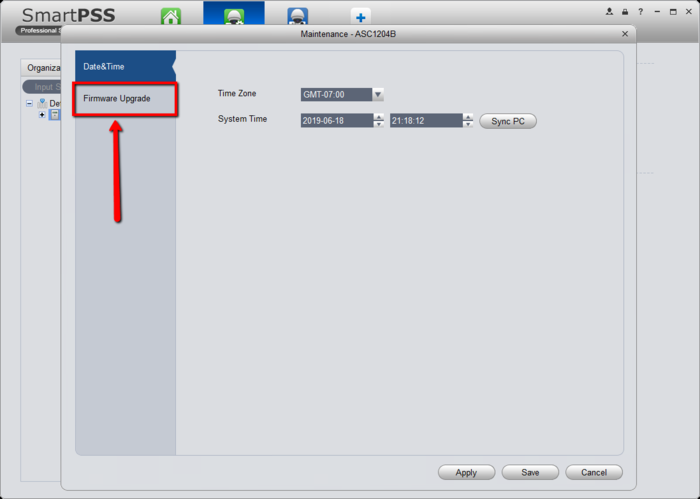
| + | 4. Click on "Firmware Upgrade" | ||
| + | |||
| + | [[File:ASC1204BFWUPD-18.png|700px]] | ||
| + | |||
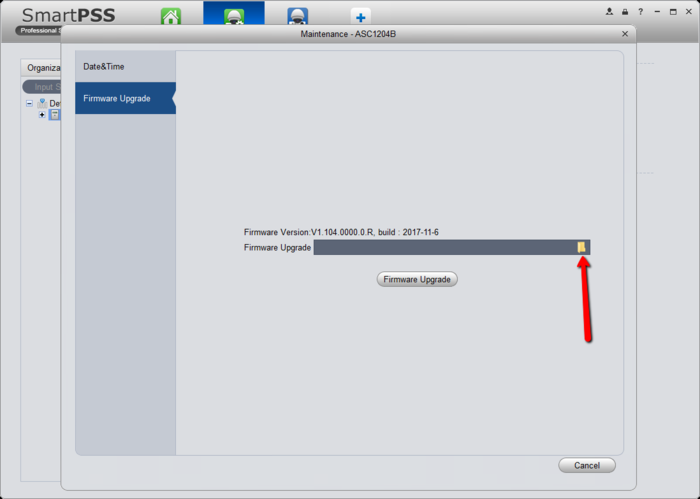
| + | 5. Select the Folder icon to browse for the BIN file | ||
| + | |||
| + | [[File:ASC1204BFWUPD-19.png|700px]] | ||
| + | |||
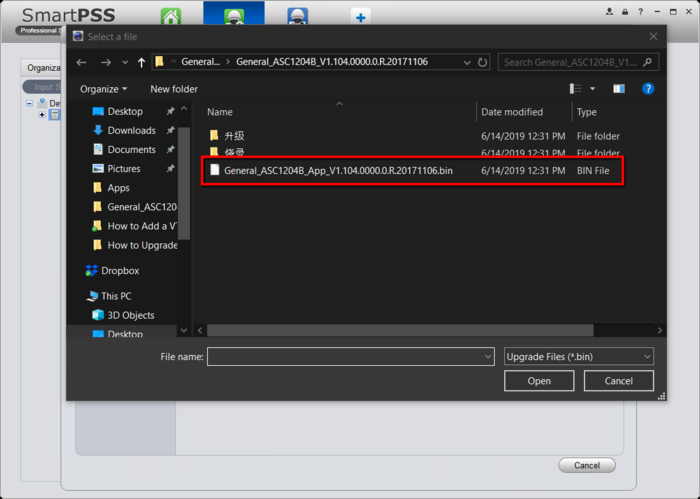
| + | 6. Go into the folder and select the BIN file with the exact name as the folder | ||
| + | |||
| + | [[File:ASC1204BFWUPD-20.png|700px]] | ||
| + | |||
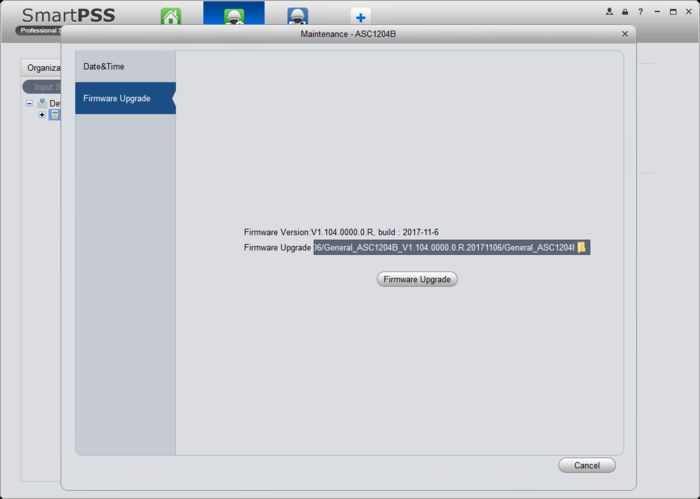
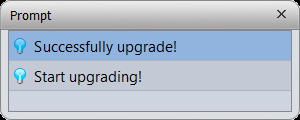
| + | 7. Once you select the BIN file click on "Firmware Upgrade", you'll then a a prompt notification indicating that the firmware went through | ||
| + | |||
| + | [[File:ASC1204BFWUPD-21.png|700px]] | ||
| + | [[File:ASC1204BFWUPD-22.png]] | ||
| + | |||
| + | |||
| + | ==FAQs== | ||
| + | |||
| + | ACS Config | ||
| + | |||
| + | Q. My ACSConfig doesn't locate the Four Door Controller | ||
| + | |||
| + | A. If you're trying to locate the controller over the local Network, then try a 1:1 connection and refresh the device list. | ||
| + | |||
| + | |||
| + | Q. I get a "Failed to open file" error message when opening the BIN file. | ||
| + | |||
| + | A. Move or Copy the BIN file from the original directory to your desktop. Try again and the BIN file should load. | ||
Latest revision as of 15:35, 1 July 2019
Contents
How to Update ASC1204B Firmware
Description
In this guide, we will show you how to upgrade the ASC1204B two different methods.
- ASC Config (Found in our toolbox)
- SmartPSS Version 1.16 or 2.01
Prerequisites
Step by Step Instructions
ASC Config
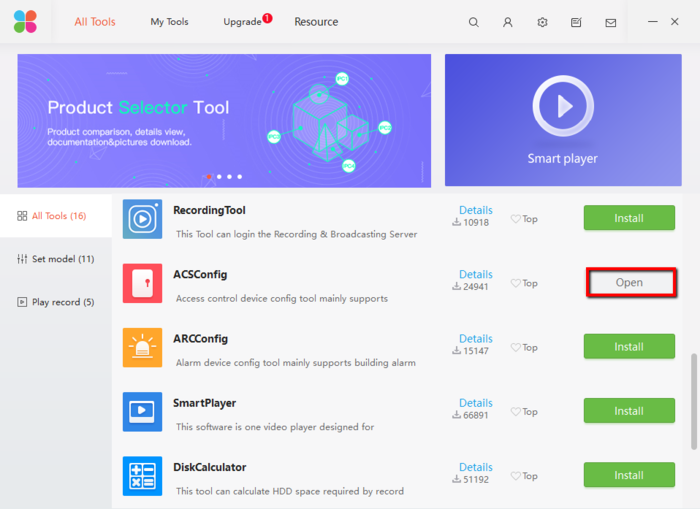
1. Run Toolbox and open ASCConfig
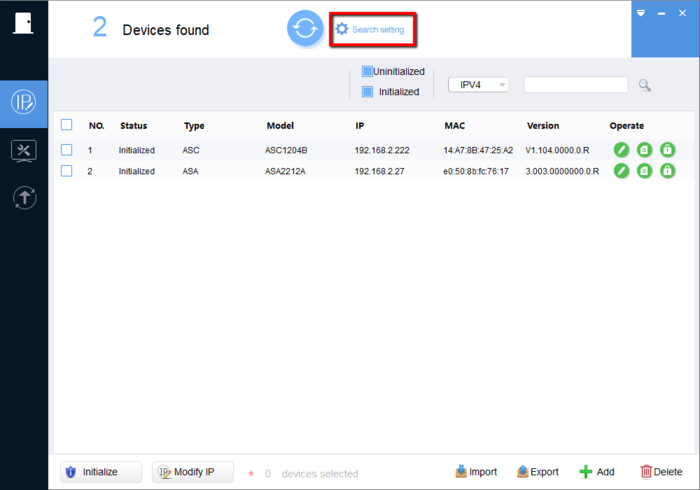
2. Before doing anything click on "Search Setting" to edit the username and password to the ASC1204B
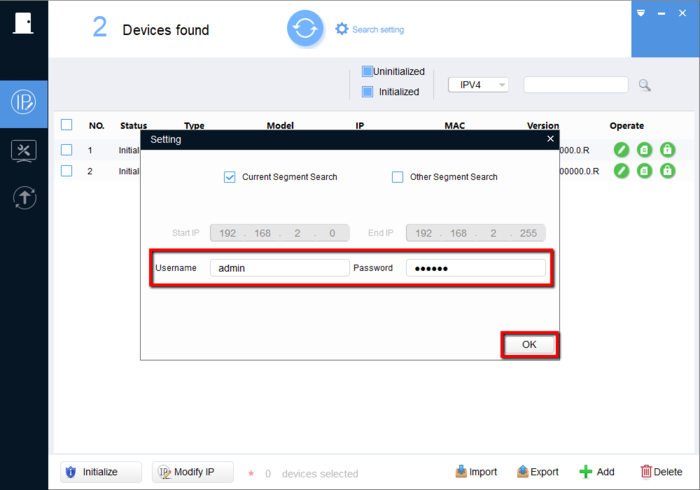
3. Input the login information of the Four Door Controller (Default Password "123456")
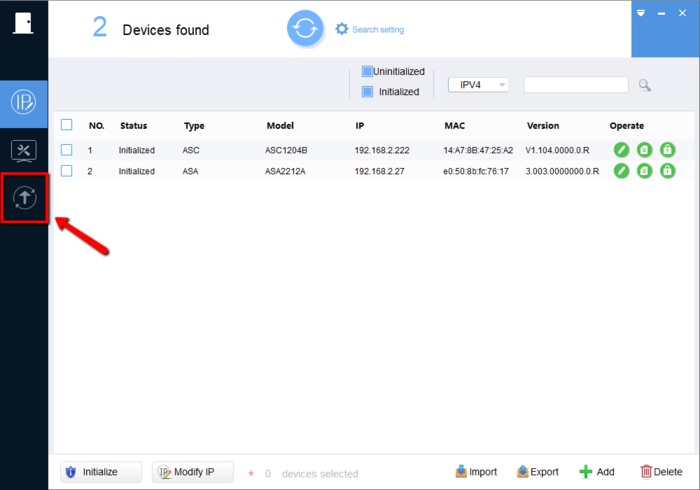
4. Click on the upgrade icon
5. Select the "Browse" tab to select the file
6. Go to the directory you saved the file to and select the BIN file in the folder. (The BIN file has the exact same name as the folder)
7. Click on Upgrade once the file has been selected
8. If done correctly you will get a green check mark
SmartPSS v2.01
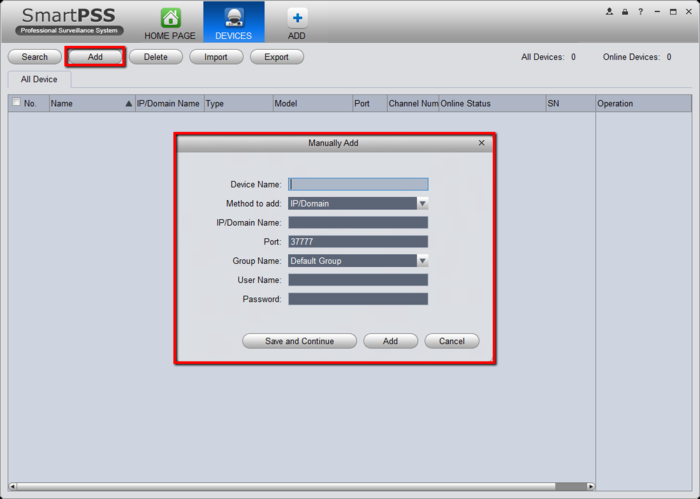
1. First add the Controller to SmartPSS by clicking on "Add" and inputting the information
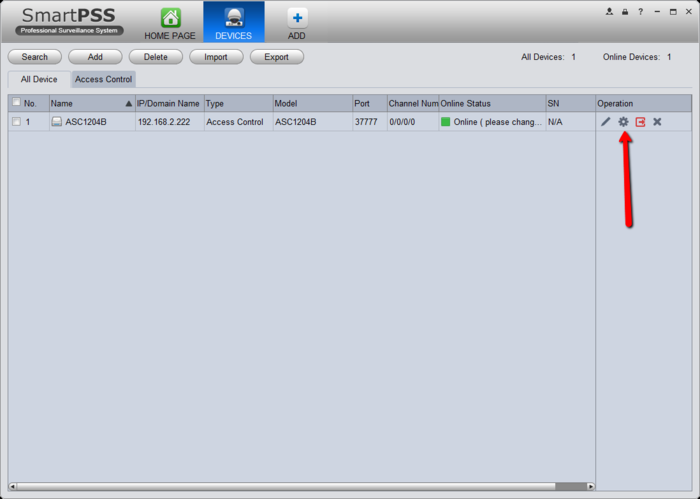
2. After adding the unit, click on the "Device CFG" icon. (Looks like gear)
3. Select the Controller on the left and make sure its highlighted. Then click on "Upgrade"
4. Select the Folder icon to browse for the BIN file
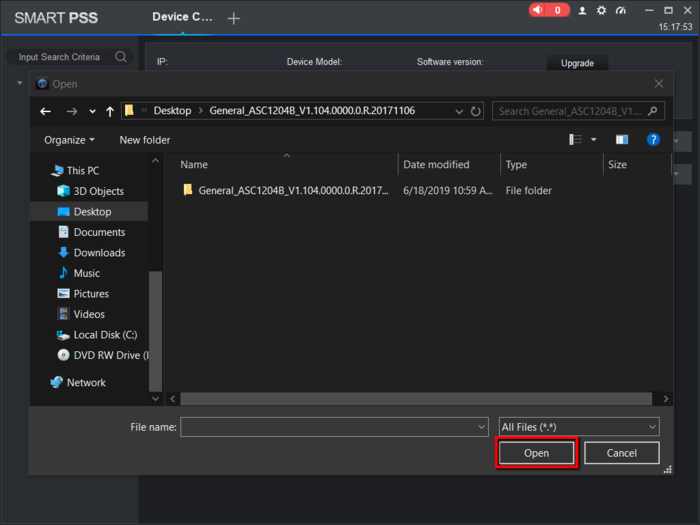
5. Go into the folder and select the BIN file with the exact name as the folder
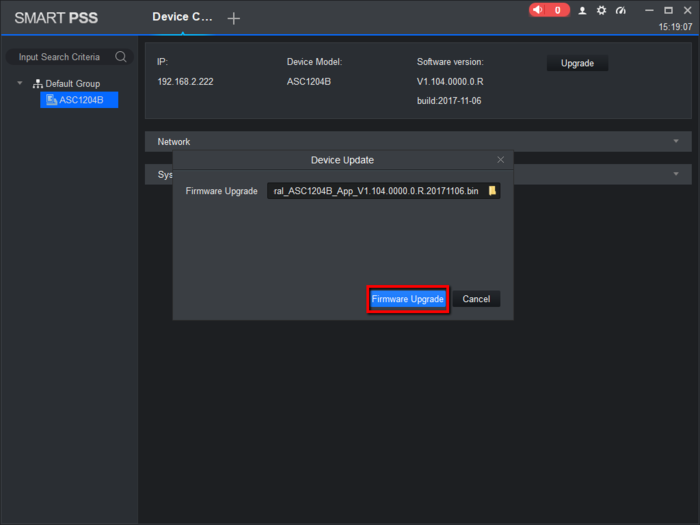
6. Once you do click on "Firmware Upgrade" and the firmware will go through
SmartPSS V1.16
1. First add the Controller to SmartPSS by clicking on "Add". Input all the information from the unit
2. After adding the unit, click on the "Device CFG" icon. (Looks like gear)
3. Select the Controller on the left and make sure its highlighted, then select "Maintenance"
4. Click on "Firmware Upgrade"
5. Select the Folder icon to browse for the BIN file
6. Go into the folder and select the BIN file with the exact name as the folder
7. Once you select the BIN file click on "Firmware Upgrade", you'll then a a prompt notification indicating that the firmware went through
FAQs
ACS Config
Q. My ACSConfig doesn't locate the Four Door Controller
A. If you're trying to locate the controller over the local Network, then try a 1:1 connection and refresh the device list.
Q. I get a "Failed to open file" error message when opening the BIN file.
A. Move or Copy the BIN file from the original directory to your desktop. Try again and the BIN file should load.
