Difference between revisions of "Mac/Add IP Camera to SmartPSS"
| Line 17: | Line 17: | ||
2.Select Devices from the home page | 2.Select Devices from the home page | ||
| − | [[file:selectdevices.png| | + | [[file:selectdevices.png|600px]] |
3.Select Auto Search in the top left side of the application | 3.Select Auto Search in the top left side of the application | ||
| − | [[file:selectautosearch.png| | + | [[file:selectautosearch.png|600px]] |
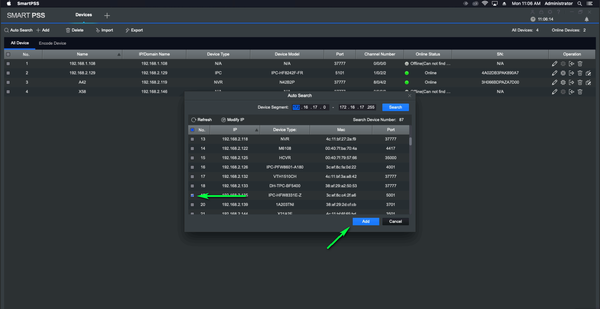
4.Put a check mark on the device you wish to add and select add | 4.Put a check mark on the device you wish to add and select add | ||
| − | [[file:selectcamera.png| | + | [[file:selectcamera.png|600px]] |
5.Enter the username and password to the device | 5.Enter the username and password to the device | ||
| − | [[file:usernamepassword.png| | + | [[file:usernamepassword.png|600px]] |
6.You should now be able to view and access your cameras settings | 6.You should now be able to view and access your cameras settings | ||
Latest revision as of 19:49, 9 July 2019
Contents
How to Add IP Camera to SmartPSS for Mac
Description
How to add a network camera to SmartPSS
Prerequisites
1.Mac Computer
2.Configured Network camera
Step by step instruction
1.Launch SmartPSS
2.Select Devices from the home page
3.Select Auto Search in the top left side of the application
4.Put a check mark on the device you wish to add and select add
5.Enter the username and password to the device
6.You should now be able to view and access your cameras settings


