Difference between revisions of "New GUI/AI/People Counting Setup"
(Created page with "==People Counting== ===Description=== This article will show you how to use the People Counting feature ===Prerequisites=== * Supported device with People Counting feature...") |
|||
| (35 intermediate revisions by 2 users not shown) | |||
| Line 4: | Line 4: | ||
This article will show you how to use the People Counting feature | This article will show you how to use the People Counting feature | ||
| + | |||
| + | [[File:How_To_Setup_People_Counting_-_NewGUI_-_12.jpg|500px]] | ||
| + | |||
===Prerequisites=== | ===Prerequisites=== | ||
* Supported device with People Counting feature | * Supported device with People Counting feature | ||
| + | ===Video Instructions=== | ||
| + | |||
| + | <embedvideo service="youtube">https://www.youtube.com/watch?v=OtYJGIQ30EQ | ||
| + | </embedvideo> | ||
| + | |||
| + | ===Step by Step Instructions=== | ||
| + | 1. From the Main Menu click AI | ||
| + | |||
| + | [[File:How_To_Create_Face_Database_-_NewGUI_-_1.jpg|500px]] | ||
| + | |||
| + | 2. Click Parameters > Smart Plan | ||
| + | |||
| + | [[File:How_To_Setup_People_Counting_-_NewGUI_-_1.jpg|500px]] | ||
| + | |||
| + | 3. Click the People Counting icon to enable. | ||
| + | |||
| + | [[File:How_To_Setup_People_Counting_-_NewGUI_-_2.jpg|500px]] | ||
| + | |||
| + | |||
| + | 4. The icon will turn blue when selected. | ||
| + | |||
| + | Click Apply to save | ||
| + | |||
| + | [[File:How_To_Setup_People_Counting_-_NewGUI_-_3.jpg|500px]] | ||
| + | |||
| + | |||
| + | 5. Click Parameters > People Counting | ||
| + | |||
| + | [[File:How_To_Setup_People_Counting_-_NewGUI_-_4.jpg|500px]] | ||
| + | |||
| + | |||
| + | 6. Use the drop-down box to select the channel. | ||
| + | |||
| + | Click the toggle button to enable | ||
| + | |||
| + | [[File:How_To_Setup_People_Counting_-_NewGUI_-_5.jpg|500px]] | ||
| + | |||
| + | |||
| + | 7. Use the drop-down box next to Rule Type to select from the People Counting feature options. There are two options: | ||
| + | |||
| + | *People Counting | ||
| + | *In Area No. | ||
| + | |||
| + | [[File:How_To_Setup_People_Counting_-_NewGUI_-_6.jpg|500px]] | ||
| + | |||
| + | |||
| + | 8. Click the RULE button to create the area and rule for the People Counting | ||
| + | |||
| + | [[File:How_To_Setup_People_Counting_-_NewGUI_-_7.jpg|500px]] | ||
| + | |||
| + | |||
| + | 9. You can enter a name for the rule in the Name field | ||
| + | |||
| + | Click Draw Area or Draw Rule to create/edit the current rules. | ||
| + | |||
| + | Click the [[File:trash_icon.jpg]] icon to delete the rule. | ||
| + | |||
| + | [[File:How_To_Setup_People_Counting_-_NewGUI_-_8.jpg|500px]] | ||
| + | |||
| + | |||
| + | 10. To create the detection area start by clicking 'Draw Area' then left click and drag in the video frame to draw the area. | ||
| + | |||
| + | [[File:How_To_Setup_People_Counting_-_NewGUI_-_8-1.jpg|500px]] | ||
| + | |||
| + | |||
| + | [[File:How_To_Setup_People_Counting_-_NewGUI_-_8-2.jpg|500px]] | ||
| + | |||
| + | |||
| + | Right click to complete the drawing | ||
| + | |||
| + | 11. To create the detection line start by clicking 'Draw Rule' then left click and drag in the video frame to draw the line. | ||
| + | |||
| + | |||
| + | [[File:How_To_Setup_People_Counting_-_NewGUI_-_8-4.jpg|500px]] | ||
| + | |||
| + | The arrow in the line will denote which direction will count as a 'Enter' or 'Exit' | ||
| + | |||
| + | Draw the arrow from Left to Right | ||
| + | |||
| + | To create a Downward facing arrow | ||
| + | |||
| + | [[File:How_To_Setup_People_Counting_-_NewGUI_-_8-5.jpg|500px]] | ||
| + | |||
| + | Draw the arrow from Right to Left | ||
| + | |||
| + | To create an upward facing arrow | ||
| + | |||
| + | [[File:How_To_Setup_People_Counting_-_NewGUI_-_8-6.jpg|500px]] | ||
| + | |||
| + | 12. Click OK to save the Area and Rule Drawings | ||
| + | |||
| + | [[File:How_To_Setup_People_Counting_-_NewGUI_-_8-7.jpg|500px]] | ||
| + | |||
| + | 13. Click 'Setting' next to Alarm to configure additional settings for People Counting | ||
| + | |||
| + | [[File:How_To_Setup_People_Counting_-_NewGUI_-_9.jpg|500px]] | ||
| + | |||
| + | |||
| + | 14. Use the top part of the menu to configure the settings for the On Screen Display Overlay for People Counting | ||
| + | |||
| + | [[File:How_To_Setup_People_Counting_-_NewGUI_-_10.jpg|500px]] | ||
| + | |||
| + | OSD Overlay: Toggle to enable or disable overlay. Press the 'Clear' button to clear the current People Counting values | ||
| + | |||
| + | Enter No.: Toggle to enable or disable the overlay for counting people who Enter | ||
| + | |||
| + | Leave No.: Toggle to enable or disable the overlay for counting people who Leave | ||
| + | |||
| + | 15. Use the lower part of the menu to configure the parameters for the People Counting alerts and installation configuration | ||
| + | |||
| + | [[File:How_To_Setup_People_Counting_-_NewGUI_-_11.jpg|500px]] | ||
| + | |||
| + | |||
| + | Enter No. - Alarm will trigger when this # of people are counted who Enter | ||
| + | |||
| + | Leave No. - Alarm will trigger when this # of people are counted who Leave | ||
| + | |||
| + | Stranded No. | ||
| + | |||
| + | Max Detect Height (in cm) | ||
| + | |||
| + | Min. Detect Height (in cm) | ||
| + | |||
| + | Click OK once all parameters have been set | ||
| + | |||
| + | |||
| + | 16. To create a schedule for People Counting click the 'Setting' button next to Period | ||
| + | |||
| + | [[File:How_To_Setup_People_Counting_-_NewGUI_-_13.jpg|500px]] | ||
| + | |||
| + | 17. Use the interface to create a schedule for People Counting | ||
| + | |||
| + | [[File:How_To_Setup_People_Counting_-_NewGUI_-_14.jpg|500px]] | ||
| + | |||
| + | Click OK once the schedule has been completed | ||
| − | + | By default it will count 7 days a week, 24 hours a day | |
| + | |||
| + | 18. Configure the alarm output for when the People Counting alarms are met (Enter/Exit Number, Stranded) | ||
| − | + | [[File:How_To_Setup_People_Counting_-_NewGUI_-_15.jpg|500px]] | |
| − | + | Click Apply once parameters have been set | |
| + | Completed People Counting setup with On Screen Display enabled at Live View | ||
| − | + | [[File:How_To_Setup_People_Counting_-_NewGUI_-_12.jpg|500px]] | |
| − | + | ||
| + | |||
| + | [[Category:IVS/Analytics+/People_Counting]] | ||
| + | [[Category:IVS]] | ||
| + | [[Category:Analytics+]] | ||
| + | [[Category:People_Counting]] | ||
| − | |||
| − | |||
| − | + | [[Category:UI]] | |
| + | [[Category:SystemUI]] | ||
Latest revision as of 17:06, 22 January 2024
Contents
People Counting
Description
This article will show you how to use the People Counting feature
Prerequisites
- Supported device with People Counting feature
Video Instructions
Step by Step Instructions
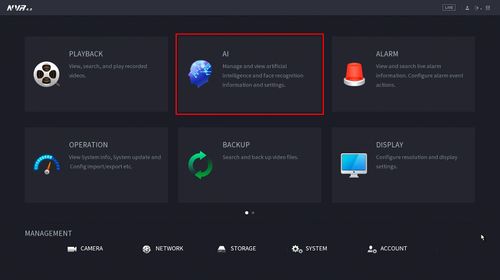
1. From the Main Menu click AI
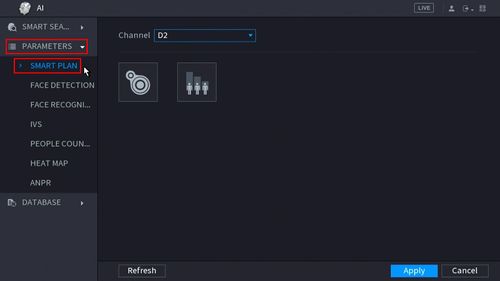
2. Click Parameters > Smart Plan
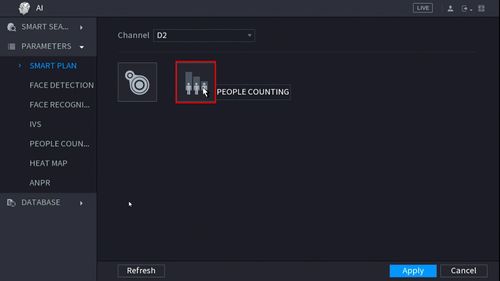
3. Click the People Counting icon to enable.
4. The icon will turn blue when selected.
Click Apply to save
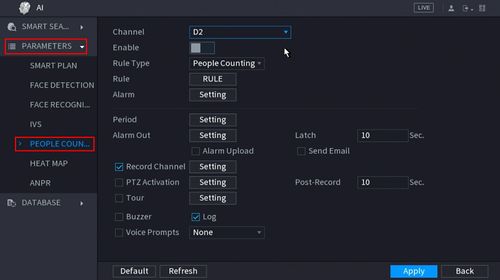
5. Click Parameters > People Counting
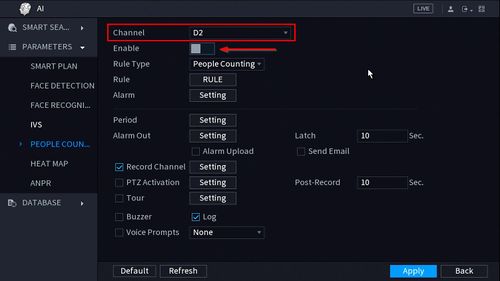
6. Use the drop-down box to select the channel.
Click the toggle button to enable
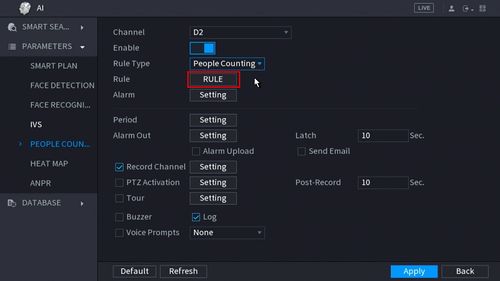
7. Use the drop-down box next to Rule Type to select from the People Counting feature options. There are two options:
- People Counting
- In Area No.
8. Click the RULE button to create the area and rule for the People Counting
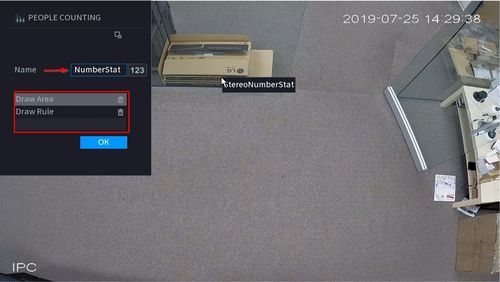
9. You can enter a name for the rule in the Name field
Click Draw Area or Draw Rule to create/edit the current rules.
Click the ![]() icon to delete the rule.
icon to delete the rule.
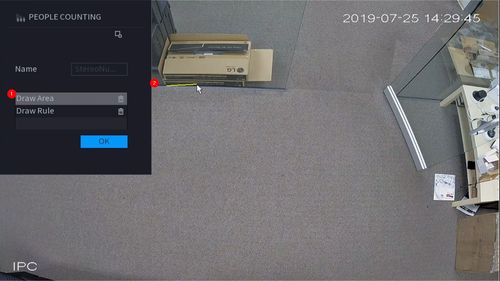
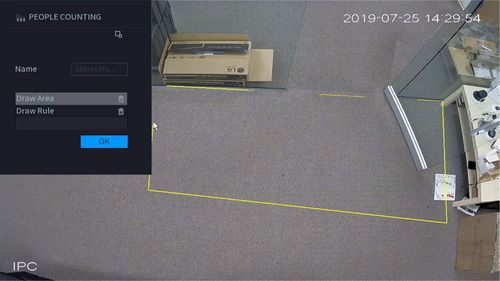
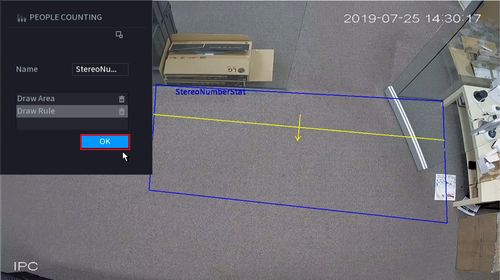
10. To create the detection area start by clicking 'Draw Area' then left click and drag in the video frame to draw the area.
Right click to complete the drawing
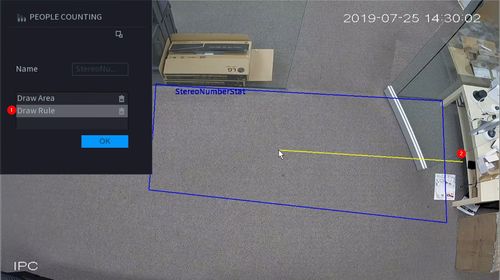
11. To create the detection line start by clicking 'Draw Rule' then left click and drag in the video frame to draw the line.
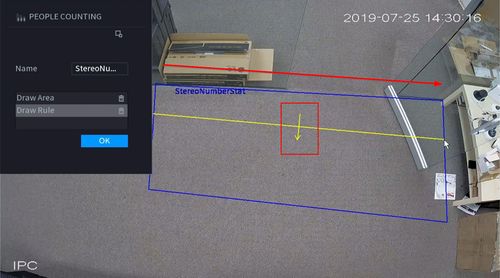
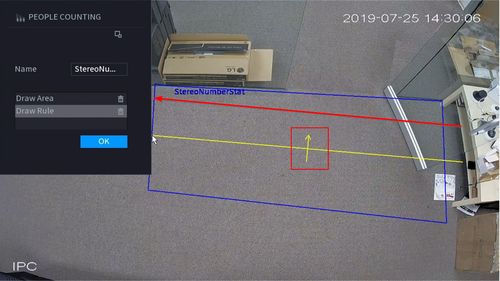
The arrow in the line will denote which direction will count as a 'Enter' or 'Exit'
Draw the arrow from Left to Right
To create a Downward facing arrow
Draw the arrow from Right to Left
To create an upward facing arrow
12. Click OK to save the Area and Rule Drawings
13. Click 'Setting' next to Alarm to configure additional settings for People Counting
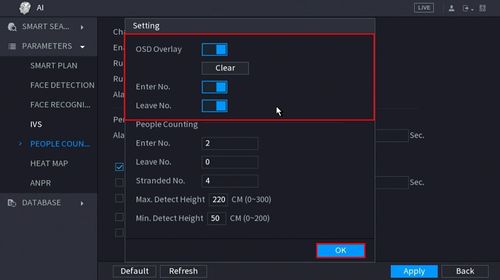
14. Use the top part of the menu to configure the settings for the On Screen Display Overlay for People Counting
OSD Overlay: Toggle to enable or disable overlay. Press the 'Clear' button to clear the current People Counting values
Enter No.: Toggle to enable or disable the overlay for counting people who Enter
Leave No.: Toggle to enable or disable the overlay for counting people who Leave
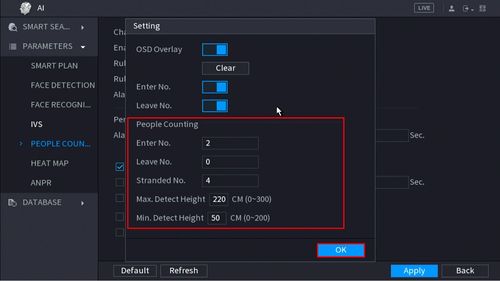
15. Use the lower part of the menu to configure the parameters for the People Counting alerts and installation configuration
Enter No. - Alarm will trigger when this # of people are counted who Enter
Leave No. - Alarm will trigger when this # of people are counted who Leave
Stranded No.
Max Detect Height (in cm)
Min. Detect Height (in cm)
Click OK once all parameters have been set
16. To create a schedule for People Counting click the 'Setting' button next to Period
17. Use the interface to create a schedule for People Counting
Click OK once the schedule has been completed
By default it will count 7 days a week, 24 hours a day
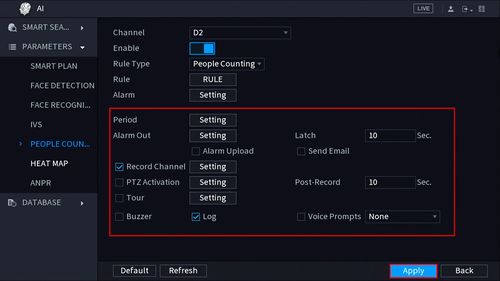
18. Configure the alarm output for when the People Counting alarms are met (Enter/Exit Number, Stranded)
Click Apply once parameters have been set
Completed People Counting setup with On Screen Display enabled at Live View

