Difference between revisions of "DSS Windows/Express/Video Intercom"
(→Video Instructions) |
(→DSS Express S Setup) |
||
| (13 intermediate revisions by 3 users not shown) | |||
| Line 1: | Line 1: | ||
| − | =How use Video Intercom= | + | =How to use Video Intercom= |
==Description== | ==Description== | ||
| − | This page is to assist with integration of Dahua Video Intercom products with DSS | + | This page is to assist with integration of Dahua Video Intercom products with DSS Express |
| − | The device information listed above each Step By Instructions is meant to be used as a reference | + | The example device information listed above each Step By Instructions is meant to be used as a reference |
Make sure each step is followed in order and that no information is incorrect or left missing | Make sure each step is followed in order and that no information is incorrect or left missing | ||
| + | |||
==Prerequisites== | ==Prerequisites== | ||
*Preconfigured DSS Server and Client Software | *Preconfigured DSS Server and Client Software | ||
| Line 56: | Line 57: | ||
<embedvideo service="youtube">https://www.youtube.com/watch?v=d66uwMBvHf0</embedvideo> | <embedvideo service="youtube">https://www.youtube.com/watch?v=d66uwMBvHf0</embedvideo> | ||
====Step by Step Instructions==== | ====Step by Step Instructions==== | ||
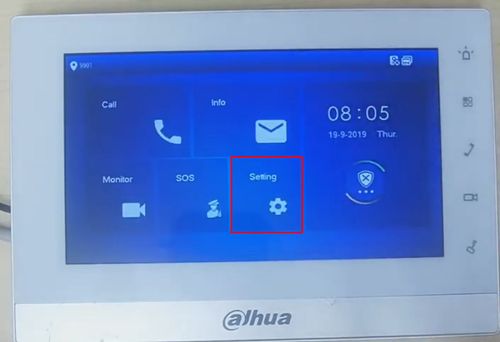
| − | 1. | + | 1. At the main screen of the device, Long press (for about 5 seconds) the Settings icon until a window pops up asking for a password |
| − | [[File: | + | |
| + | [[File:Video_Intercom_-_VTH_-_DSS_Express_-_1.jpg|500px]] | ||
| + | |||
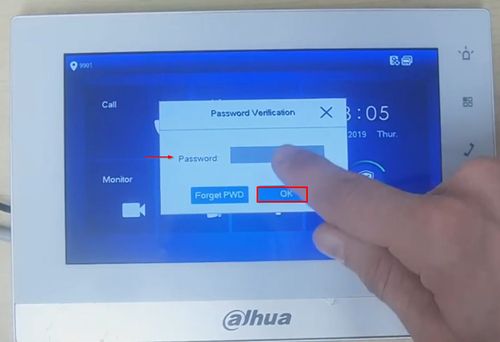
| + | 2. Enter the password (Default: 123456) and press OK | ||
| + | |||
| + | [[File:Video_Intercom_-_VTH_-_DSS_Express_-_2.jpg|500px]] | ||
| + | |||
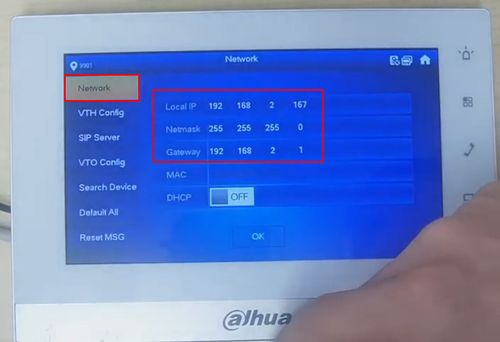
| + | 3. The Advanced Settings will be displayed | ||
| + | |||
| + | Under the Network information, confirm the Network information of the VTH device | ||
| + | |||
| + | [[File:Video_Intercom_-_VTH_-_DSS_Express_-_3.jpg|500px]] | ||
| + | |||
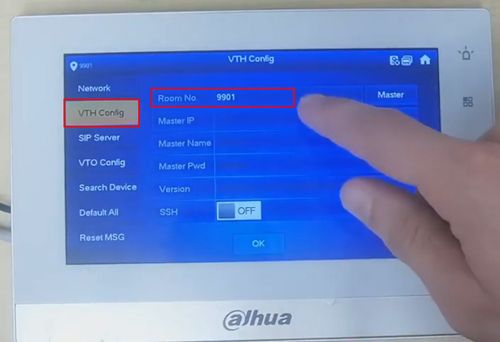
| + | 4. Under VTH Config - The Room No. can be adjusted by pressing/tapping inside the field and a keyboard will be displayed | ||
| + | |||
| + | [[File:Video_Intercom_-_VTH_-_DSS_Express_-_4.jpg|500px]] | ||
| + | |||
| + | 5. Enter the correct Room No. , for this guide it will be 9901#0 . | ||
| + | |||
| + | Press OK | ||
| + | |||
| + | [[File:Video_Intercom_-_VTH_-_DSS_Express_-_5.jpg|500px]] | ||
| + | |||
| + | 6. A message will appear confirming the settings have been set successfully | ||
| + | |||
| + | [[File:Video_Intercom_-_VTH_-_DSS_Express_-_6.jpg|500px]] | ||
| + | |||
| + | 7. Under SIP Server, enter the information from the DSS Express Server, since it will be acting as the SIP server in this deployment. | ||
| + | |||
| + | All information must be entered on this screen | ||
| + | |||
| + | [[File:Video_Intercom_-_VTH_-_DSS_Express_-_7.jpg|500px]] | ||
| + | |||
| + | *Server IP: IP of DSS Express Server - in this example 192.168.2.96 | ||
| + | *Network Port: 5080 | ||
| + | *User Name: Leave at default | ||
| + | *Register Pwd: Leave at default | ||
| + | *Domain:VDP | ||
| + | *User Name:username for DSS Express Server - in this example system | ||
| + | *Login Pwd:password for user in DSS Express | ||
| + | |||
| + | 8. Once the SIP Server information is entered, make sure Enable Status is set to On, then press OK | ||
| + | |||
| + | [[File:Video_Intercom_-_VTH_-_DSS_Express_-_7-1.jpg|500px]] | ||
| + | |||
| + | [[File:Video_Intercom_-_VTH_-_DSS_Express_-_8.jpg|500px]] | ||
| + | |||
| + | [[File:Video_Intercom_-_VTH_-_DSS_Express_-_9.jpg|500px]] | ||
| + | |||
| + | [[File:Video_Intercom_-_VTH_-_DSS_Express_-_10.jpg|500px]] | ||
| + | |||
| + | [[File:Video_Intercom_-_VTH_-_DSS_Express_-_11.jpg|500px]] | ||
| + | |||
| + | [[File:Video_Intercom_-_VTH_-_DSS_Express_-_12.jpg|500px]] | ||
| + | |||
| + | [[File:Video_Intercom_-_VTH_-_DSS_Express_-_13.jpg|500px]] | ||
| + | |||
| + | [[File:Video_Intercom_-_VTH_-_DSS_Express_-_14.jpg|500px]] | ||
===VTO Setup=== | ===VTO Setup=== | ||
| − | |||
| − | |||
Example Device Information: | Example Device Information: | ||
| Line 118: | Line 174: | ||
|- | |- | ||
|} | |} | ||
| + | |||
| + | ====Video Instructions==== | ||
| + | <embedvideo service="youtube">https://www.youtube.com/watch?v=oV44CZEi9wo</embedvideo> | ||
====Step by Step Instructions==== | ====Step by Step Instructions==== | ||
1. | 1. | ||
| − | |||
| − | ===DSS Express | + | ===DSS Express Setup=== |
====Video Instructions==== | ====Video Instructions==== | ||
<embedvideo service="youtube">https://www.youtube.com/watch?v=9XcCOtL87bI</embedvideo> | <embedvideo service="youtube">https://www.youtube.com/watch?v=9XcCOtL87bI</embedvideo> | ||
| Line 129: | Line 187: | ||
====Step by Step Instructions==== | ====Step by Step Instructions==== | ||
1. | 1. | ||
| − | + | ||
Latest revision as of 22:12, 1 April 2021
Contents
How to use Video Intercom
Description
This page is to assist with integration of Dahua Video Intercom products with DSS Express
The example device information listed above each Step By Instructions is meant to be used as a reference
Make sure each step is followed in order and that no information is incorrect or left missing
Prerequisites
- Preconfigured DSS Server and Client Software
- VTO/VTH Device(s) powered on, connected to network
Instructions
- VTH Setup
- VTO Setup
- DSS Express Setup
[Setup]
VTH Setup
Example Device Information:
| Local Setting | |||||||||||||
|---|---|---|---|---|---|---|---|---|---|---|---|---|---|
| Device | IP Address | Room No. | |||||||||||
| VTH1510CH | 192.168.2.167 | 9901#0 | |||||||||||
| SIP Server | |||||||||||||
| Server IP | Network Port | User Name | Register Password | Domain | User Name | Logon Password | |||||||
| 192.168.2.113 | 5080 | (VTH Building Number) | 123456 (Always This Password) | VDP | system | DahuaWIN2017 (DSS Express Server Password) | |||||||
Video Instructions
Step by Step Instructions
1. At the main screen of the device, Long press (for about 5 seconds) the Settings icon until a window pops up asking for a password
2. Enter the password (Default: 123456) and press OK
3. The Advanced Settings will be displayed
Under the Network information, confirm the Network information of the VTH device
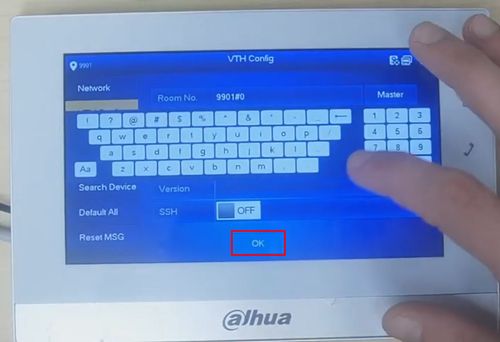
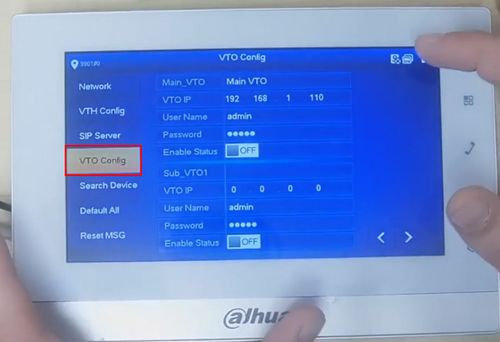
4. Under VTH Config - The Room No. can be adjusted by pressing/tapping inside the field and a keyboard will be displayed
5. Enter the correct Room No. , for this guide it will be 9901#0 .
Press OK
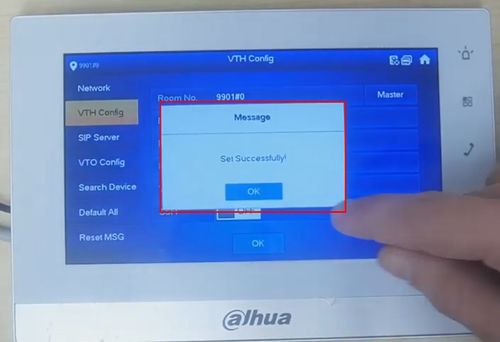
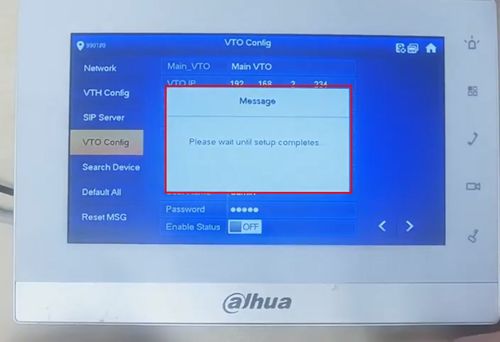
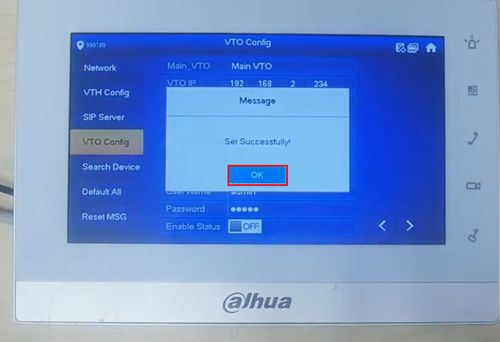
6. A message will appear confirming the settings have been set successfully
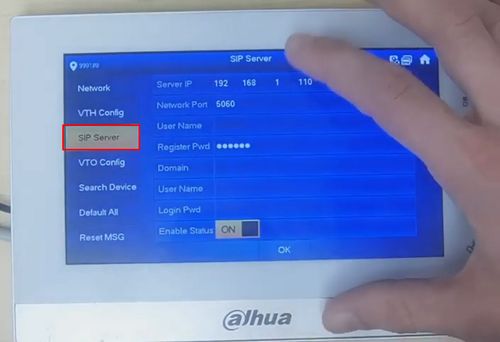
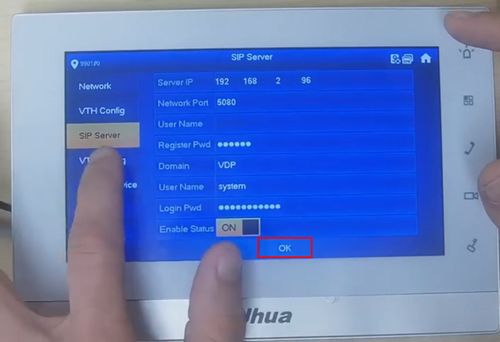
7. Under SIP Server, enter the information from the DSS Express Server, since it will be acting as the SIP server in this deployment.
All information must be entered on this screen
- Server IP: IP of DSS Express Server - in this example 192.168.2.96
- Network Port: 5080
- User Name: Leave at default
- Register Pwd: Leave at default
- Domain:VDP
- User Name:username for DSS Express Server - in this example system
- Login Pwd:password for user in DSS Express
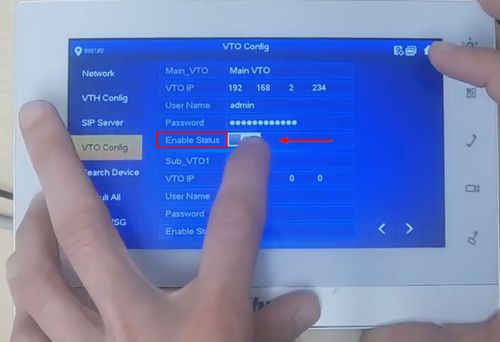
8. Once the SIP Server information is entered, make sure Enable Status is set to On, then press OK
VTO Setup
Example Device Information:
| Local Setting | |||||||||||||
|---|---|---|---|---|---|---|---|---|---|---|---|---|---|
| Device | IP Address | Device Type | Villa Call No | Building No. | Unit No. | VTO No. | Call Centre Time | ||||||
| VTO2111D-WP | 192.168.2.234 | Villa Station | 9901 | 0(Not Enabled) | 0(Not Enabled) | 8001 | Disabled | ||||||
| SIP Server | |||||||||||||
| SIP Server | Server Type | SIP Server IP | Port | Username | Password | SIP Domain | SIP Server Username | SIP Server Password | Alternate IP Addr | Alternate Username | Alternate Password | Alternate VTS Address | Alternate Server |
| Disabled | Express/DSS | (IP of DSS Express) 192.168.2.113 | 5080 | 8001(VTO No.) | 123456(Leave Alone) | VDP | system(DSS Express User Name) | DahuaWIN2017(DSS Express Password) | (Leave Blank) | (Leave Blank) | (Leave Blank) | (Leave Blank) | Disabled |
Video Instructions
Step by Step Instructions
1.
DSS Express Setup
Video Instructions
Step by Step Instructions
1.
