Difference between revisions of "Template:Date and Time SmartPSS"
| (4 intermediate revisions by the same user not shown) | |||
| Line 3: | Line 3: | ||
<span style="font-size:140%;">Description</span> | <span style="font-size:140%;">Description</span> | ||
| − | This guide shows how to adjust the Device Date & Time and adjust Daylight Savings Time settings for a Dahua | + | This guide shows how to adjust the Device Date & Time and adjust Daylight Savings Time settings for a Dahua device in SmartPSS |
<span style="font-size:140%;">Prerequisites</span> | <span style="font-size:140%;">Prerequisites</span> | ||
* SmartPSS installed | * SmartPSS installed | ||
| − | * Dahua | + | * Dahua device added to SmartPSS |
<span style="font-size:140%;">Video Instructions</span> | <span style="font-size:140%;">Video Instructions</span> | ||
| − | <embedvideo service="youtube">https://youtu.be/ | + | <embedvideo service="youtube">https://youtu.be/GicwRp4aWFk</embedvideo> |
<span style="font-size:140%;">Step by Step Instructions</span> | <span style="font-size:140%;">Step by Step Instructions</span> | ||
| − | 1. | + | 1. From the Main Page of SmartPSS |
| + | |||
| + | Click Device CFG | ||
| + | |||
| + | [[File:Device_Date_&_Time_-_SmartPSS_-_1.jpg|600px]] | ||
| + | |||
| + | 2. The device tree on the left will show devices already added to SmartPSS | ||
| + | |||
| + | Left click to select the device from the list | ||
| + | |||
| + | [[File:Device_Date_&_Time_-_SmartPSS_-_2.jpg|600px]] | ||
| + | |||
| + | 3. After a moment the device's configuration will be loaded. | ||
| + | |||
| + | Click the section labeled 'System' | ||
| + | |||
| + | [[File:Device_Date_&_Time_-_SmartPSS_-_3.jpg|600px]] | ||
| + | |||
| + | 4. Click ' General' | ||
| + | |||
| + | [[File:Device_Date_&_Time_-_SmartPSS_-_4.jpg|600px]] | ||
| + | |||
| + | 5. The General Config settings menu will be displayed | ||
| + | |||
| + | Click the 'Time Setup' tab | ||
| + | |||
| + | [[File:Device_Date_&_Time_-_SmartPSS_-_5.jpg|600px]] | ||
| + | |||
| + | 6. The Date & Time interface will be displayed | ||
| + | |||
| + | The System Time can be adjusted by clicking inside the fields. The GMT offset can be adjusted by clicking and using the drop-down box | ||
| + | |||
| + | [[File:Device_Date_&_Time_-_SmartPSS_-_6.jpg|600px]] | ||
| + | |||
| + | 7. Check the box to enable DST | ||
| + | |||
| + | Use the interface to adjust the Daylight Savings Time settings as desired | ||
| + | |||
| + | [[File:Device_Date_&_Time_-_SmartPSS_-_7.jpg|600px]] | ||
| + | |||
| + | * DST Type - Week or Date. | ||
| + | ** Week - Set DST adjustment for a specific calendar week | ||
| + | ** Day - Set DST adjustment for a specific day | ||
| + | |||
| + | The Start / End Time can be adjusted as desired using the interface | ||
| + | * Daylight Saving Time starts on the second Sunday in March | ||
| + | * Daylight Saving Time ends on the first Sunday in November | ||
| + | * Time is adjusted at 02:00 am local time | ||
| + | * Time moves forward from 02:00 am > 03:00am at the start of DST | ||
| + | * Time moves back from 02:00 am to 01:00 am at the end of DST | ||
| + | |||
| + | [[File:Device_Date_&_Time_-_SmartPSS_-_8.jpg|600px]] | ||
| + | |||
| + | [[File:Device_Date_&_Time_-_SmartPSS_-_9.jpg|600px]] | ||
| + | |||
| + | 8. Click Save to save settings | ||
| + | |||
| + | [[File:Device_Date_&_Time_-_SmartPSS_-_10.jpg|600px]] | ||
Latest revision as of 23:43, 1 November 2019
Set Device Date and Time in SmartPSS
Description
This guide shows how to adjust the Device Date & Time and adjust Daylight Savings Time settings for a Dahua device in SmartPSS
Prerequisites
- SmartPSS installed
- Dahua device added to SmartPSS
Video Instructions
Step by Step Instructions
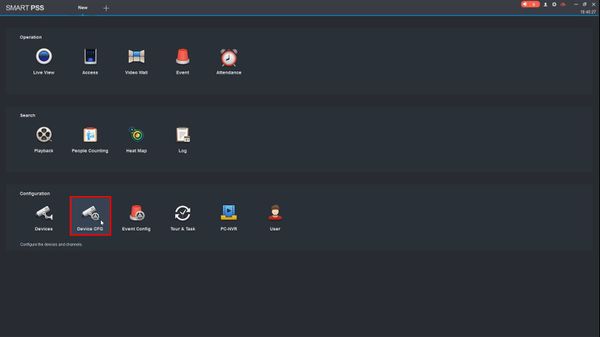
1. From the Main Page of SmartPSS
Click Device CFG
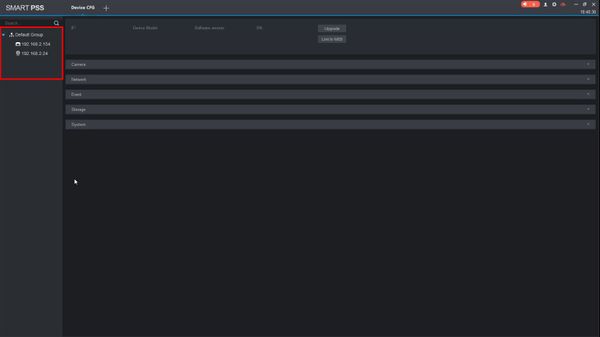
2. The device tree on the left will show devices already added to SmartPSS
Left click to select the device from the list
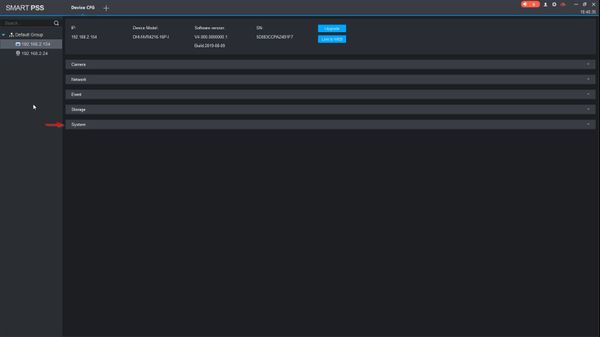
3. After a moment the device's configuration will be loaded.
Click the section labeled 'System'
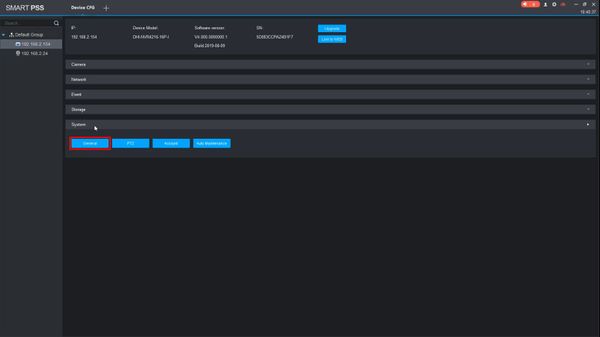
4. Click ' General'
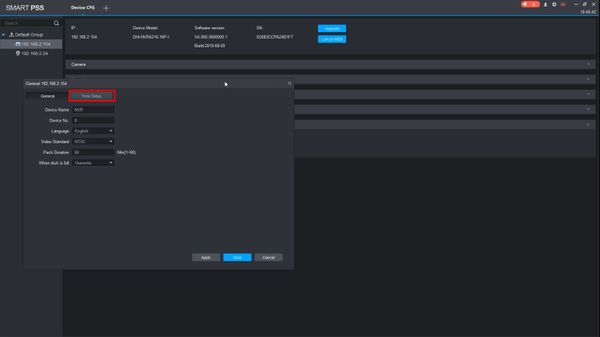
5. The General Config settings menu will be displayed
Click the 'Time Setup' tab
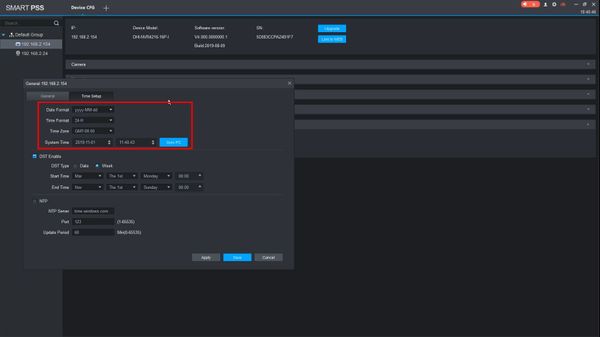
6. The Date & Time interface will be displayed
The System Time can be adjusted by clicking inside the fields. The GMT offset can be adjusted by clicking and using the drop-down box
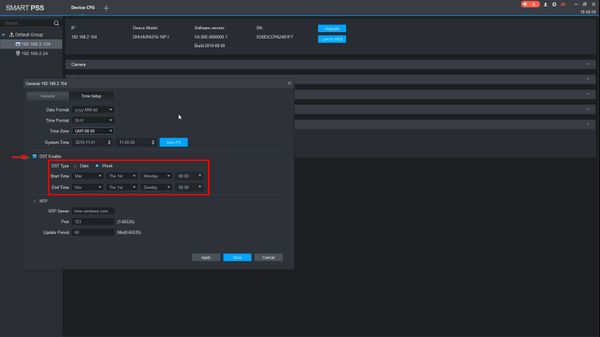
7. Check the box to enable DST
Use the interface to adjust the Daylight Savings Time settings as desired
- DST Type - Week or Date.
- Week - Set DST adjustment for a specific calendar week
- Day - Set DST adjustment for a specific day
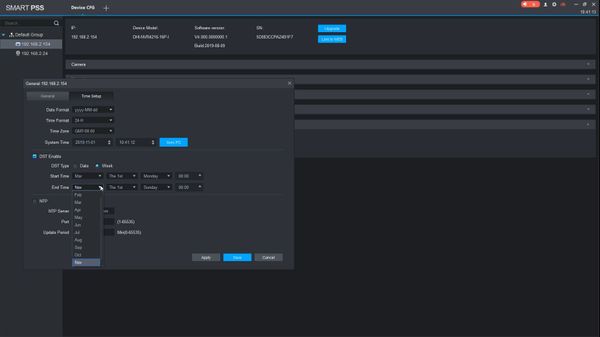
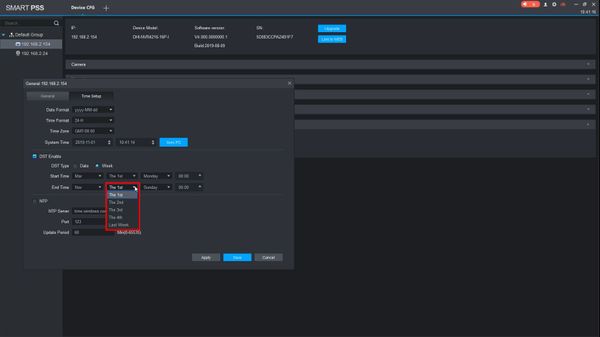
The Start / End Time can be adjusted as desired using the interface
- Daylight Saving Time starts on the second Sunday in March
- Daylight Saving Time ends on the first Sunday in November
- Time is adjusted at 02:00 am local time
- Time moves forward from 02:00 am > 03:00am at the start of DST
- Time moves back from 02:00 am to 01:00 am at the end of DST
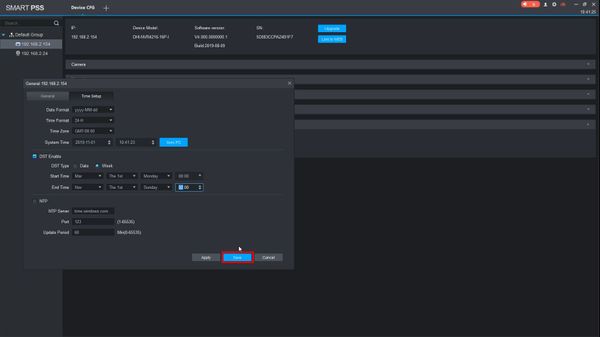
8. Click Save to save settings
