Difference between revisions of "Date and Time"
(→Instructions) |
|||
| (2 intermediate revisions by one other user not shown) | |||
| Line 30: | Line 30: | ||
<div class="toccolours mw-collapsible mw-collapsed"> | <div class="toccolours mw-collapsible mw-collapsed"> | ||
| − | [[File:Icon_for_type_DSS_Express_S.png|250px]]<span style="font-size:180%;">'''DSS Express | + | [[File:Icon_for_type_DSS_Express_S.png|250px]]<span style="font-size:180%;">'''DSS Express'''</span> |
<div class="mw-collapsible-content">{{Template:Date_and_Time_DSS_Express}}</div> | <div class="mw-collapsible-content">{{Template:Date_and_Time_DSS_Express}}</div> | ||
</div> | </div> | ||
Latest revision as of 22:41, 1 April 2021
Date & Time
Warning!
If you have video that needs to be backed up, please be sure to backup your recorded video before modifying the Date & Time on your recorder or cameras. It is strongly recommended that you format the hard drive after modifying the date and time to ensure accurate playback and recording.
Instructions
Description
This guide shows how to adjust the Device Date & Time and adjust Daylight Savings Time settings for a Dahua Recorder at the SystemUI with the OldGUI
Prerequisites
- Device Login information
- Display connected to Dahua recorder
- Mouse connected to Dahua recorder
Video Instructions
Step by Step Instructions
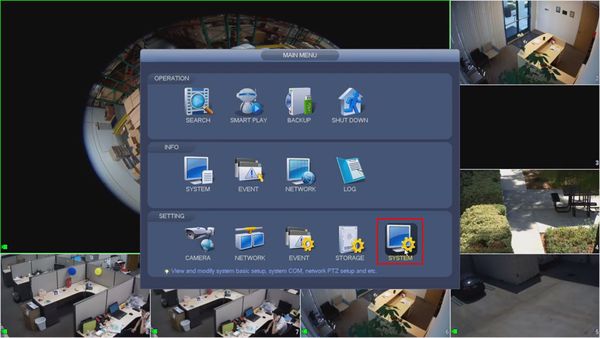
1. From the Main Menu, select System
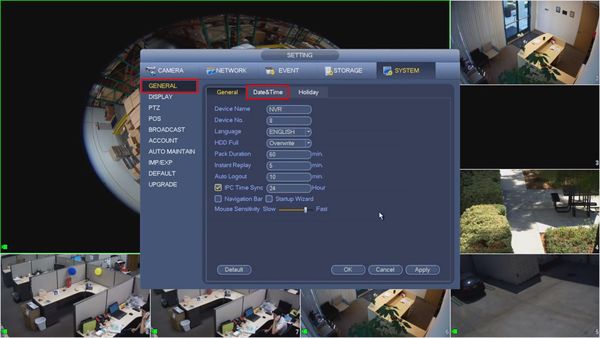
2. From the General menu
Click the Date & Time tab
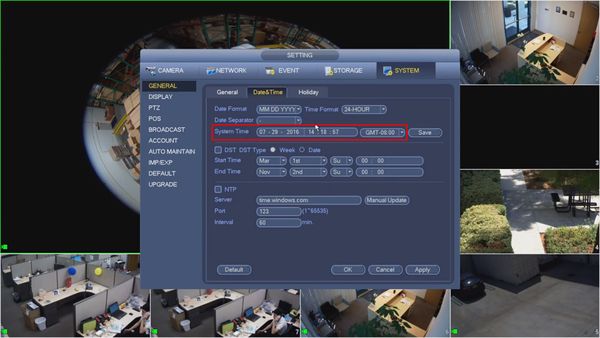
3. The Date & Time interface will be displayed
The System Time can be adjusted by clicking inside the fields. The GMT offset can be adjusted by clicking and using the drop-down box
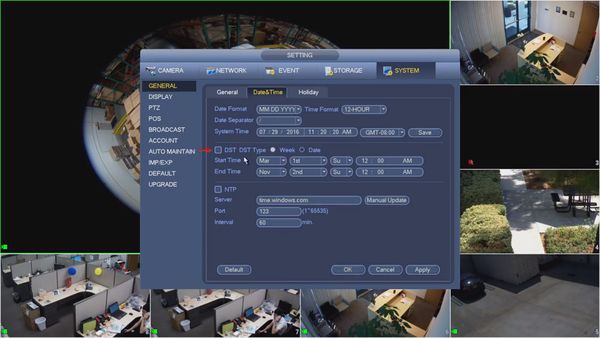
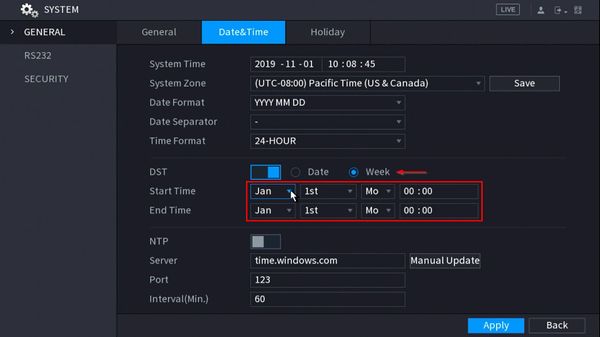
4. Check the box to enable DST
- DST Type - Week or Date.
- Week - Set DST adjustment for a specific calendar week
- Day - Set DST adjustment for a specific day
The Start / End Time can be adjusted as desired using the interface
- Daylight Saving Time starts on the second Sunday in March
- Daylight Saving Time ends on the first Sunday in November
- Time is adjusted at 02:00 am local time
- Time moves forward from 02:00 am > 03:00am at the start of DST
- Time moves back from 02:00 am to 01:00 am at the end of DST
5. Click Apply once all changes have been made
Description
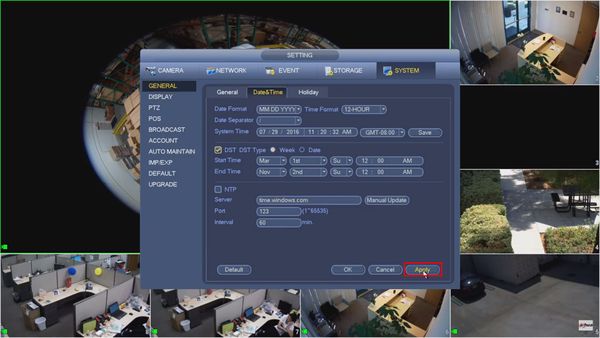
This guide shows how to adjust the Device Date & Time and adjust Daylight Savings Time settings for a Dahua Recorder at the SystemUI with the NewGUI
Prerequisites
- Device Login information
- Display connected to Dahua recorder
- Mouse connected to Dahua recorder
Video Instructions
Step by Step Instructions
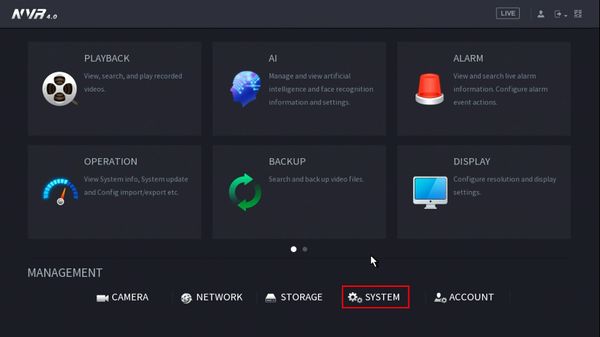
1. From the Main Menu
Click System
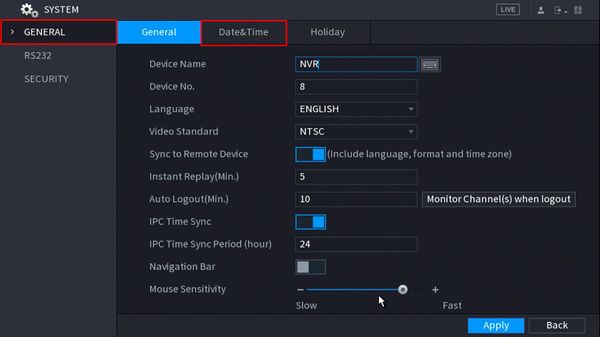
2. From the General menu
Click the Date & Time tab
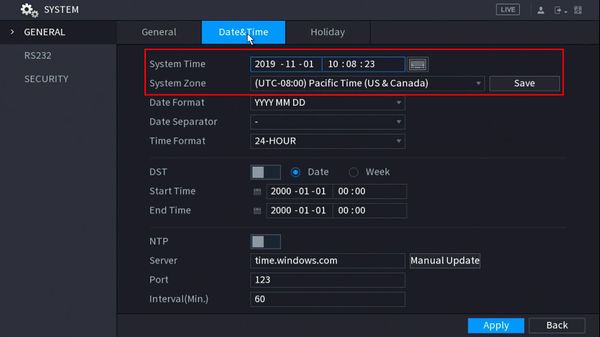
3. The Date & Time interface will be displayed
The System Time can be adjusted by clicking inside the fields. The GMT offset can be adjusted by clicking and using the drop-down box
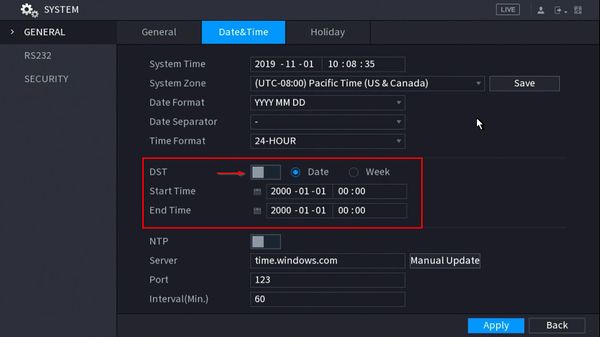
4. Check the box to enable DST
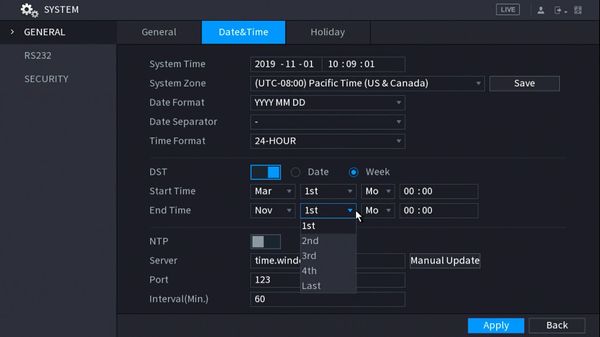
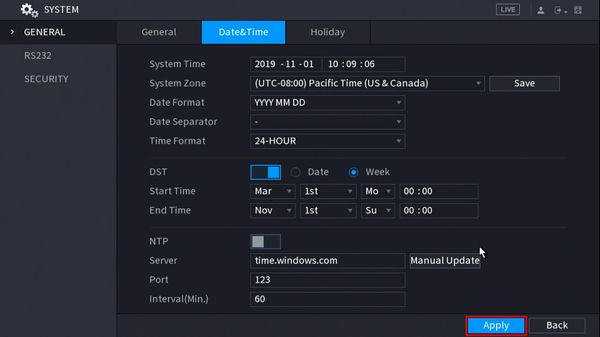
Use the interface to adjust the Daylight Savings Time settings as desired
- DST Type - Week or Date.
- Week - Set DST adjustment for a specific calendar week
- Day - Set DST adjustment for a specific day
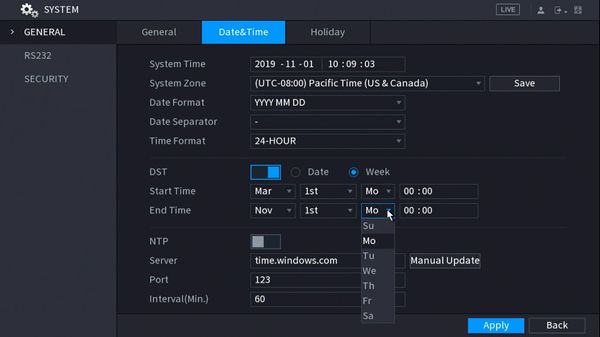
The Start / End Time can be adjusted as desired using the interface
- Daylight Saving Time starts on the second Sunday in March
- Daylight Saving Time ends on the first Sunday in November
- Time is adjusted at 02:00 am local time
- Time moves forward from 02:00 am > 03:00am at the start of DST
- Time moves back from 02:00 am to 01:00 am at the end of DST
5. Click inside a drop-down box to make selections for Month / Week / Day options
6. Click Apply to save settings
Description
Change or set the time and date according to the region of where the device recorder is.
Prerequisites
- Device Web Access and Logins
- SmartPSS
Video Instructions
Step by Step Instructions
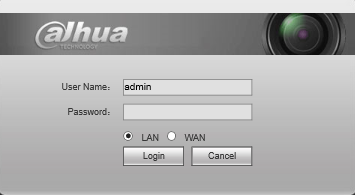
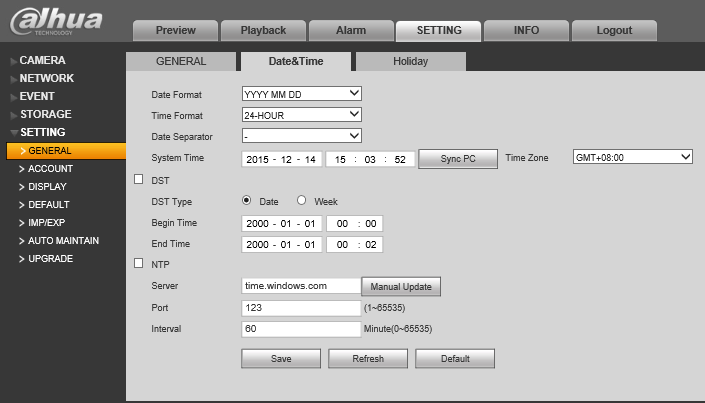
1. Login to the device via Internet Explorer.
2. Go to Settings->Setting->General->Date&Time
3. Input the current date and time, and click, "Save"Description
This guide shows how to adjust the Device Date & Time and adjust Daylight Savings Time settings for a Dahua device in the new WebUI
Prerequisites
- Device Web Access and Logins
- SmartPSS
Video Instructions
Step by Step Instructions
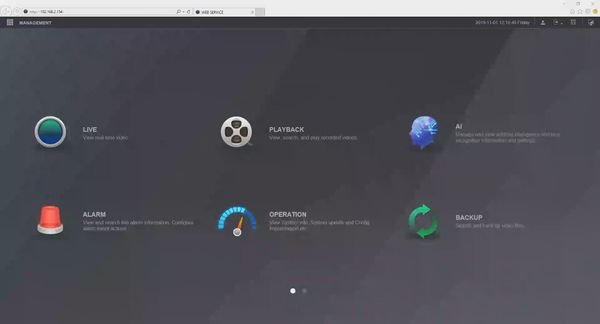
1. Log into the device's WebUI by typing the IP of the device into a web browser and log in using the username/password
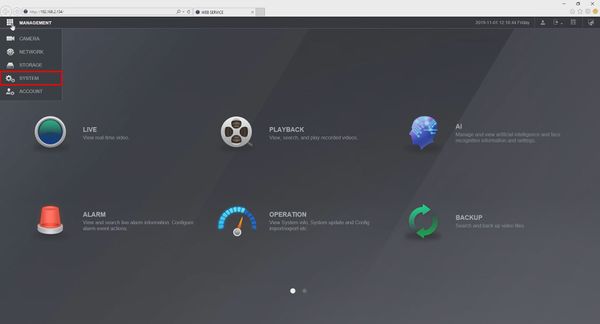
2. Click the top left to access the drop-down menu and select 'System'
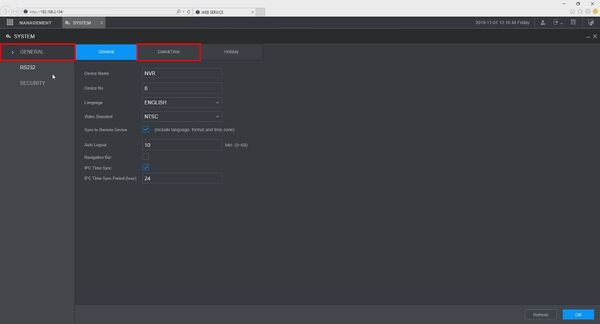
3. In the General section, click the 'Date & Time' tab
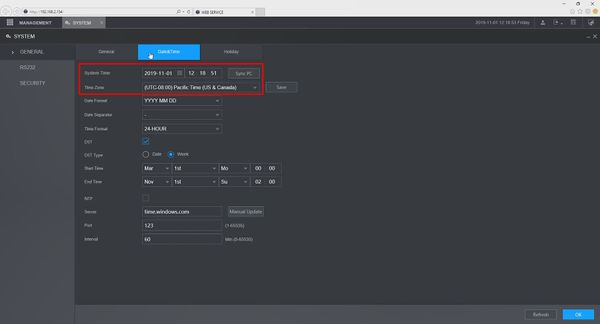
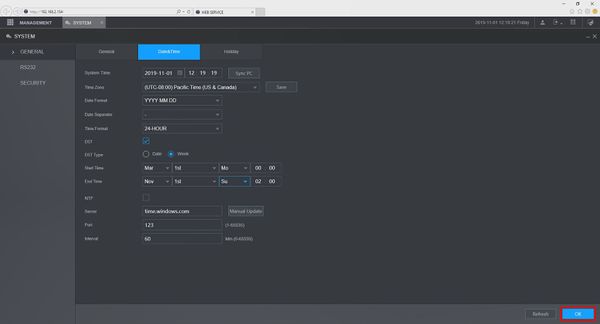
4. The Date & Time interface will be displayed
The System Time can be adjusted by clicking inside the fields. The GMT offset can be adjusted by clicking and using the drop-down box
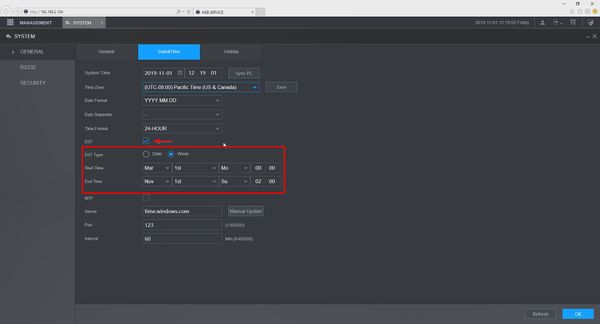
7. Check the box to enable DST
Use the interface to adjust the Daylight Savings Time settings as desired
- DST Type - Week or Date.
- Week - Set DST adjustment for a specific calendar week
- Day - Set DST adjustment for a specific day
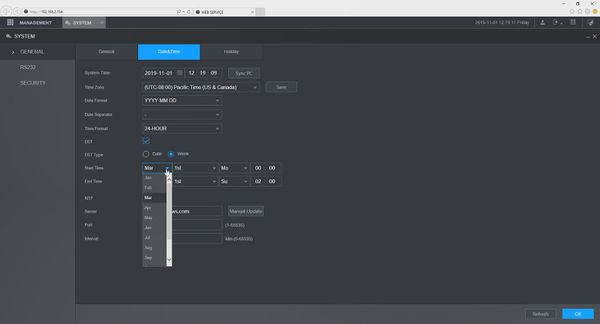
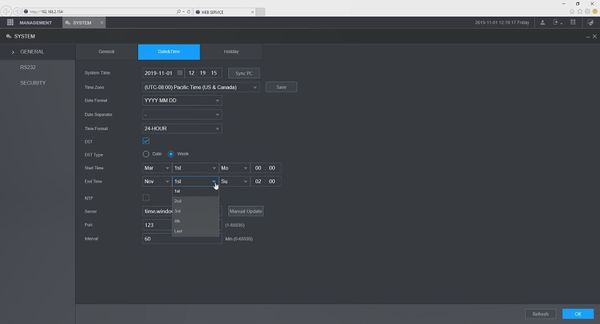
The Start / End Time can be adjusted as desired using the interface
- Daylight Saving Time starts on the second Sunday in March
- Daylight Saving Time ends on the first Sunday in November
- Time is adjusted at 02:00 am local time
- Time moves forward from 02:00 am > 03:00am at the start of DST
- Time moves back from 02:00 am to 01:00 am at the end of DST
8. Click 'OK' to save all settings
Description
This guide shows how to adjust the Device Date & Time and adjust Daylight Savings Time settings for a Dahua device in SmartPSS
Prerequisites
- SmartPSS installed
- Dahua device added to SmartPSS
Video Instructions
Step by Step Instructions
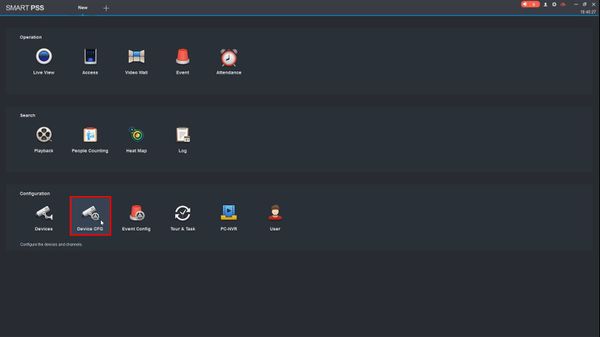
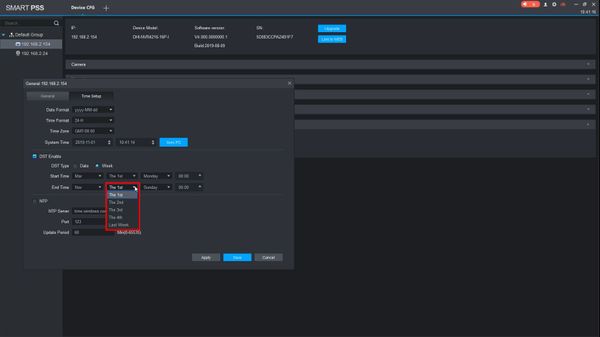
1. From the Main Page of SmartPSS
Click Device CFG
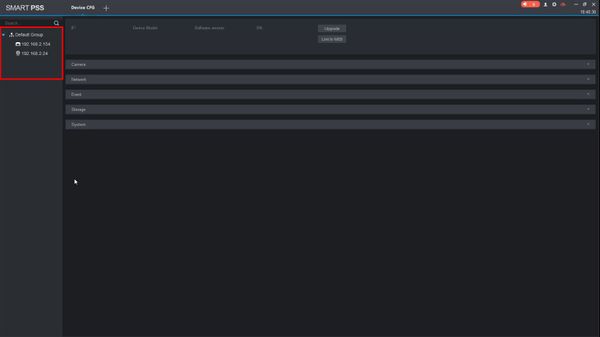
2. The device tree on the left will show devices already added to SmartPSS
Left click to select the device from the list
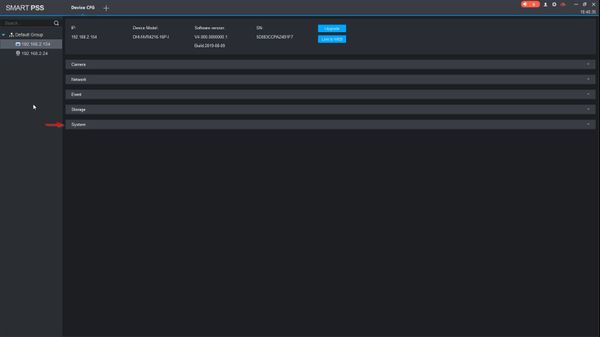
3. After a moment the device's configuration will be loaded.
Click the section labeled 'System'
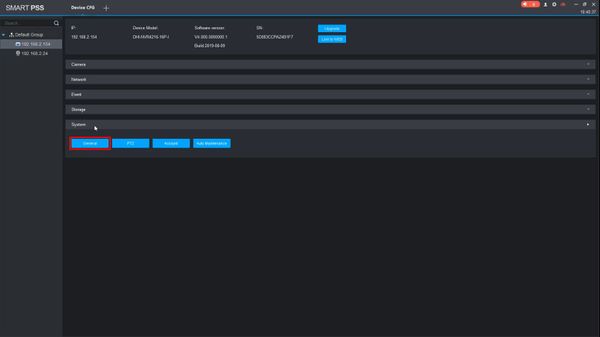
4. Click ' General'
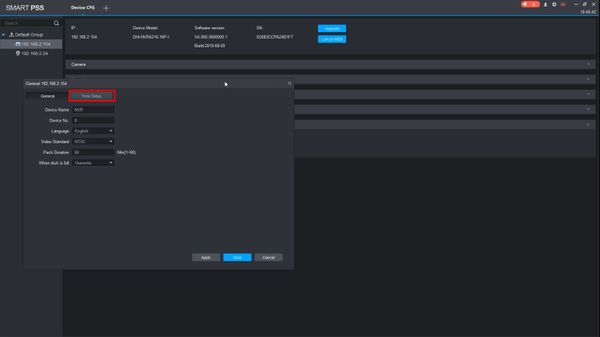
5. The General Config settings menu will be displayed
Click the 'Time Setup' tab
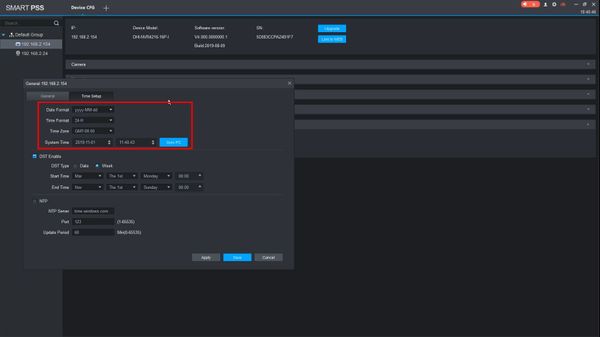
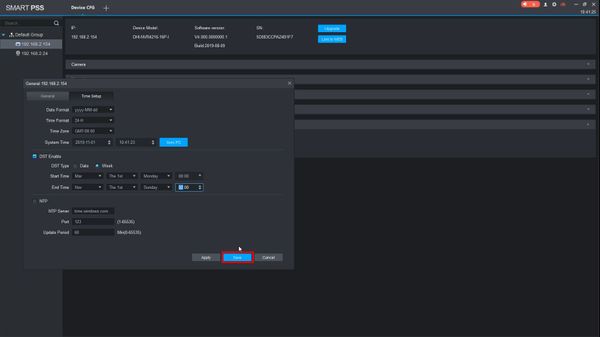
6. The Date & Time interface will be displayed
The System Time can be adjusted by clicking inside the fields. The GMT offset can be adjusted by clicking and using the drop-down box
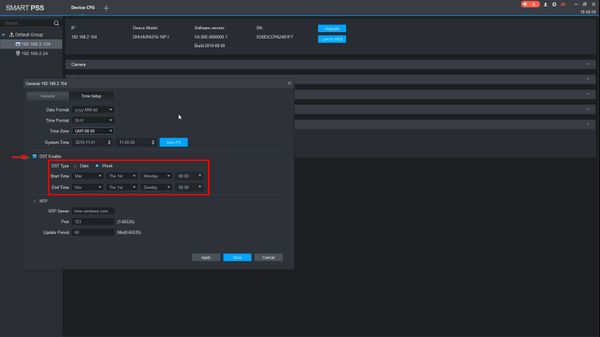
7. Check the box to enable DST
Use the interface to adjust the Daylight Savings Time settings as desired
- DST Type - Week or Date.
- Week - Set DST adjustment for a specific calendar week
- Day - Set DST adjustment for a specific day
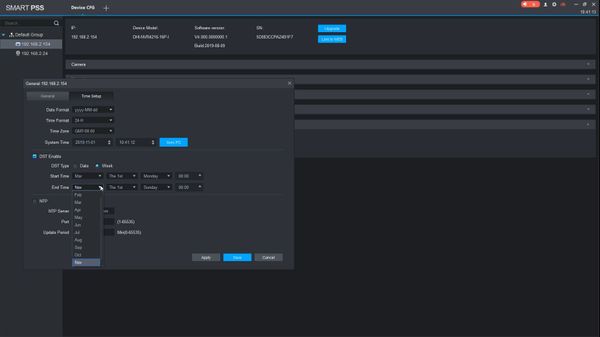
The Start / End Time can be adjusted as desired using the interface
- Daylight Saving Time starts on the second Sunday in March
- Daylight Saving Time ends on the first Sunday in November
- Time is adjusted at 02:00 am local time
- Time moves forward from 02:00 am > 03:00am at the start of DST
- Time moves back from 02:00 am to 01:00 am at the end of DST
8. Click Save to save settings
Description
This guide will show how to set the Date and Time in DSS Express S Server.
Prerequisites
- Device Web Access and Logins
- DSS Express S Installed
Video Instructions
Step by Step Instructions
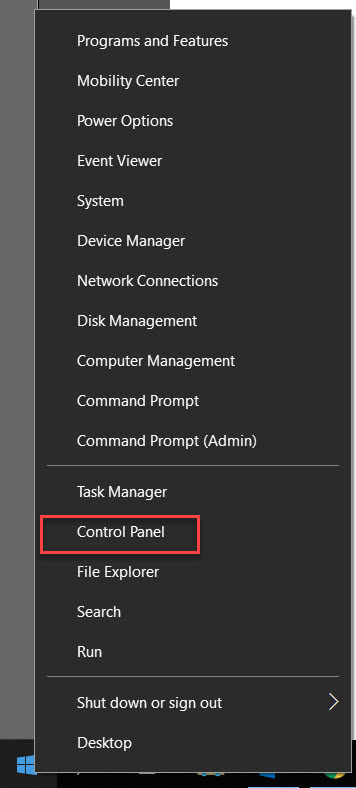
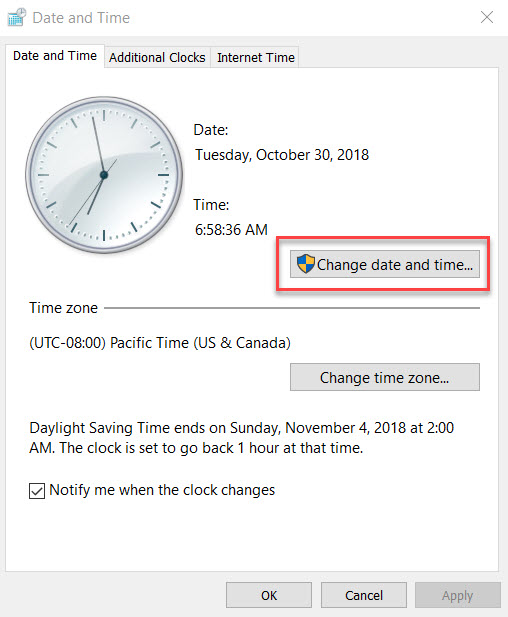
Prior the installation, set or ensure the computer date and time. 1. Right click on windows icon on bottom left, click on Control Panel.
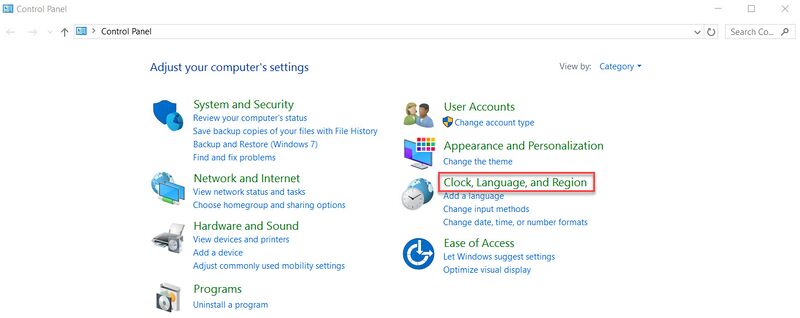
2. Click on Clock, Language, Region
3. Click on Set the time and date
4. Confirm if the time is correct, if not then you can click on Change Date and Time to modify it.
Time Zones
| Region | GMT | Example Image |
|---|---|---|
| West Coast | -8 | 
|
| Mountain Standard Time | -7 | 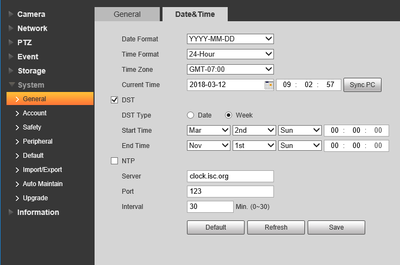
|
| Central Standard Time | -6 | 
|
| Eastern Standard Time | -5 | 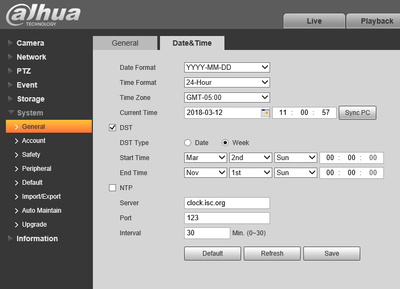
|
