Difference between revisions of "Template:IVS People Counting WebUI New"
| (2 intermediate revisions by the same user not shown) | |||
| Line 1: | Line 1: | ||
===Description=== | ===Description=== | ||
| + | This guide will show how to set up the People Counting feature in the WebUI with NewUI | ||
===Prerequisites=== | ===Prerequisites=== | ||
| − | + | * Dahua device with People Counting feature | |
===Video Instructions=== | ===Video Instructions=== | ||
<embedvideo service="youtube">https://youtu.be/OBzpoSN94WY</embedvideo> | <embedvideo service="youtube">https://youtu.be/OBzpoSN94WY</embedvideo> | ||
===Step By Step Instructions=== | ===Step By Step Instructions=== | ||
| + | 1. Enter the IP of the device in a browser | ||
| + | Enter username and password | ||
| + | |||
| + | Click Login | ||
[[File:People_Counting_-_WebUI_New_UI_-_1.jpg|500px]] | [[File:People_Counting_-_WebUI_New_UI_-_1.jpg|500px]] | ||
| + | |||
| + | 2. Click AI | ||
[[File:People_Counting_-_WebUI_New_UI_-_2.jpg|500px]] | [[File:People_Counting_-_WebUI_New_UI_-_2.jpg|500px]] | ||
| + | |||
| + | 3. Click Parameters | ||
[[File:People_Counting_-_WebUI_New_UI_-_3.jpg|500px]] | [[File:People_Counting_-_WebUI_New_UI_-_3.jpg|500px]] | ||
| + | |||
| + | 4. Click Smart Plan | ||
[[File:People_Counting_-_WebUI_New_UI_-_4.jpg|500px]] | [[File:People_Counting_-_WebUI_New_UI_-_4.jpg|500px]] | ||
| + | |||
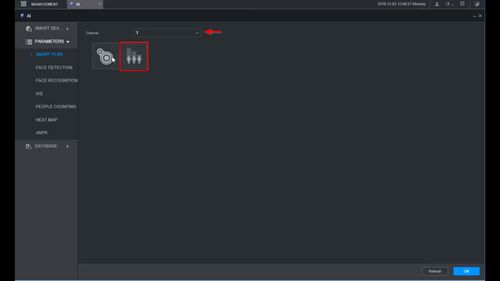
| + | 5. Use the dropdown box to select the Channel | ||
| + | |||
| + | Click the People Counting symbol to enable the Smart Plan | ||
[[File:People_Counting_-_WebUI_New_UI_-_5.jpg|500px]] | [[File:People_Counting_-_WebUI_New_UI_-_5.jpg|500px]] | ||
| + | |||
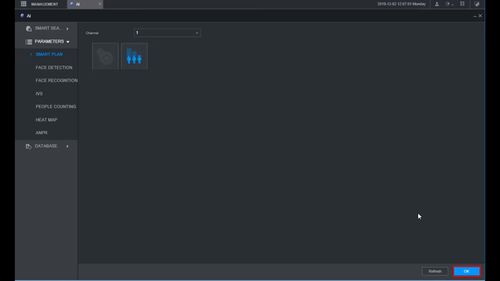
| + | 6. Click OK to save | ||
[[File:People_Counting_-_WebUI_New_UI_-_6.jpg|500px]] | [[File:People_Counting_-_WebUI_New_UI_-_6.jpg|500px]] | ||
| + | |||
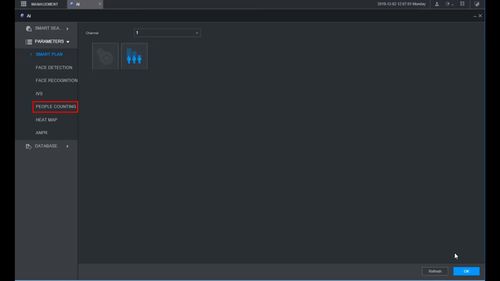
| + | 7. Click People Counting | ||
[[File:People_Counting_-_WebUI_New_UI_-_7.jpg|500px]] | [[File:People_Counting_-_WebUI_New_UI_-_7.jpg|500px]] | ||
| + | |||
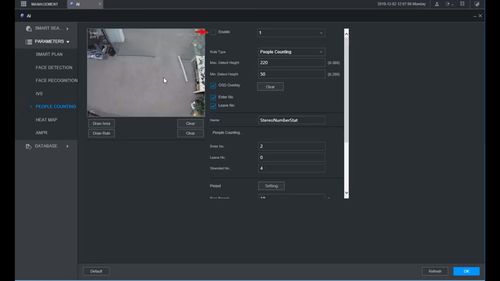
| + | 8. Check the box to enable People Counting | ||
[[File:People_Counting_-_WebUI_New_UI_-_8.jpg|500px]] | [[File:People_Counting_-_WebUI_New_UI_-_8.jpg|500px]] | ||
| + | |||
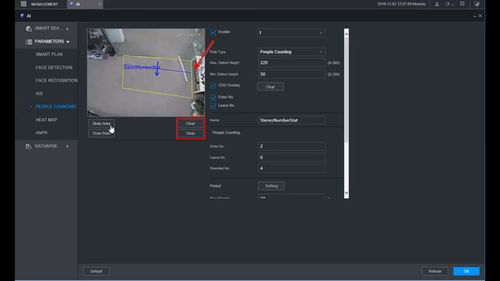
| + | 9. The default rule will appear in the window | ||
| + | |||
| + | Click the Clear buttons to remove the default Area and Rule | ||
[[File:People_Counting_-_WebUI_New_UI_-_9.jpg|500px]] | [[File:People_Counting_-_WebUI_New_UI_-_9.jpg|500px]] | ||
| + | |||
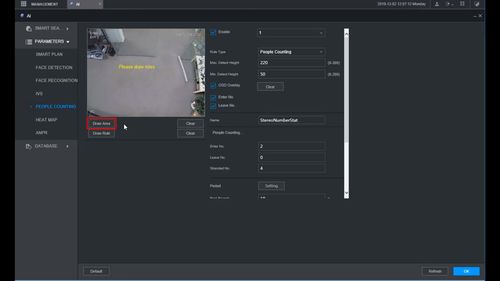
| + | 10. Click Draw Area to create the detection area | ||
[[File:People_Counting_-_WebUI_New_UI_-_10.jpg|500px]] | [[File:People_Counting_-_WebUI_New_UI_-_10.jpg|500px]] | ||
| + | |||
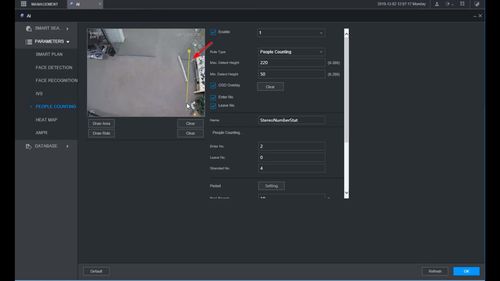
| + | 11. Left click inside the window to begin drawing the detection area | ||
| + | |||
| + | Right click to complete the area and finish drawing | ||
[[File:People_Counting_-_WebUI_New_UI_-_11.jpg|500px]] | [[File:People_Counting_-_WebUI_New_UI_-_11.jpg|500px]] | ||
| + | |||
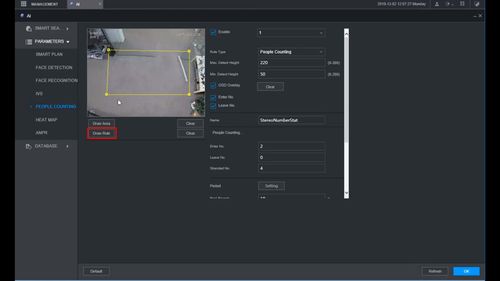
| + | 12. Click Draw Rule | ||
[[File:People_Counting_-_WebUI_New_UI_-_12.jpg|500px]] | [[File:People_Counting_-_WebUI_New_UI_-_12.jpg|500px]] | ||
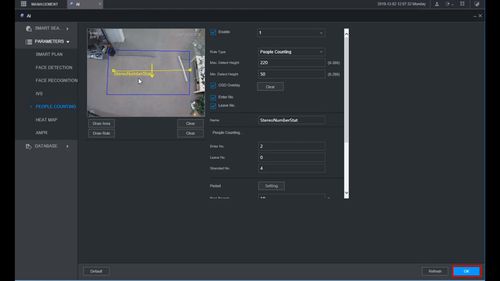
| + | |||
| + | 13. Left click inside the window to draw the Rule. This line will be the trigger for counting people that cross it. | ||
| + | |||
| + | * The arrow defines the direction of people entering the scene (Enter) | ||
| + | ** To create a downward facing arrow, create the Rule by starting on the left hand side then drag the mouse to the right | ||
| + | ** To create an upward facing arrow, create the Rule line by starting on the right hand side then drag the mouse to the left | ||
[[File:People_Counting_-_WebUI_New_UI_-_13.jpg|500px]] | [[File:People_Counting_-_WebUI_New_UI_-_13.jpg|500px]] | ||
| + | |||
| + | 14. Click OK to save all settings | ||
[[File:People_Counting_-_WebUI_New_UI_-_14.jpg|500px]] | [[File:People_Counting_-_WebUI_New_UI_-_14.jpg|500px]] | ||
Latest revision as of 19:12, 3 December 2019
Description
This guide will show how to set up the People Counting feature in the WebUI with NewUI
Prerequisites
- Dahua device with People Counting feature
Video Instructions
Step By Step Instructions
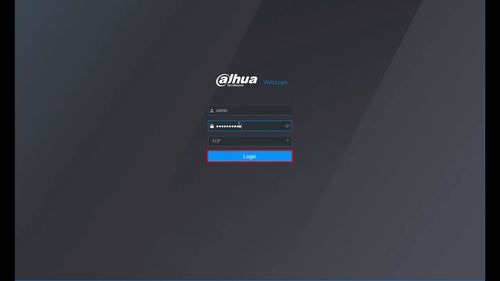
1. Enter the IP of the device in a browser
Enter username and password
Click Login
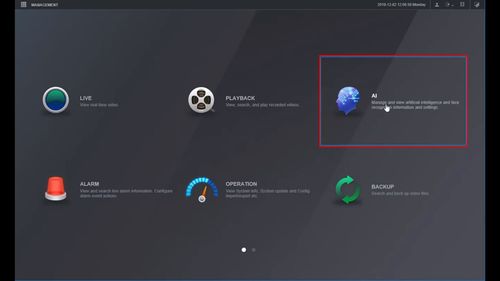
2. Click AI
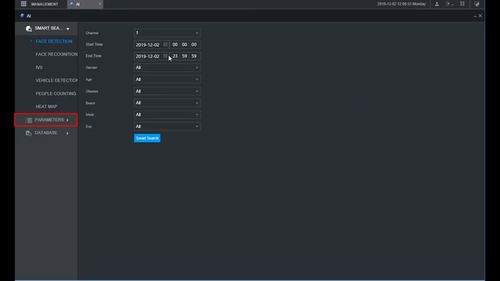
3. Click Parameters
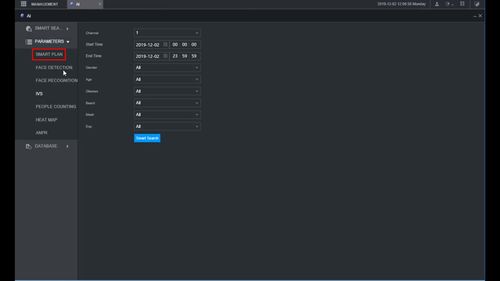
4. Click Smart Plan
5. Use the dropdown box to select the Channel
Click the People Counting symbol to enable the Smart Plan
6. Click OK to save
7. Click People Counting
8. Check the box to enable People Counting
9. The default rule will appear in the window
Click the Clear buttons to remove the default Area and Rule
10. Click Draw Area to create the detection area
11. Left click inside the window to begin drawing the detection area
Right click to complete the area and finish drawing
12. Click Draw Rule
13. Left click inside the window to draw the Rule. This line will be the trigger for counting people that cross it.
- The arrow defines the direction of people entering the scene (Enter)
- To create a downward facing arrow, create the Rule by starting on the left hand side then drag the mouse to the right
- To create an upward facing arrow, create the Rule line by starting on the right hand side then drag the mouse to the left
14. Click OK to save all settings
