Difference between revisions of "Template:IVS Heatmap SystemUI OldGUI"
(→Step By Step Instructions) |
(→Step By Step Instructions) |
||
| Line 12: | Line 12: | ||
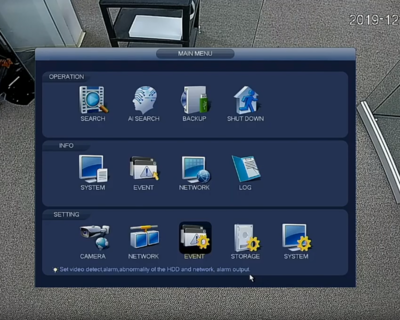
1. From the Main Menu of the recorder, select '''Event''' under '''Setting''' | 1. From the Main Menu of the recorder, select '''Event''' under '''Setting''' | ||
| + | |||
[[File:HeatMapping_OGUI-1.PNG|400px]]] | [[File:HeatMapping_OGUI-1.PNG|400px]]] | ||
| Line 20: | Line 21: | ||
File:HeatMapping_OGUI-3.PNG | File:HeatMapping_OGUI-3.PNG | ||
</gallery> | </gallery> | ||
| + | |||
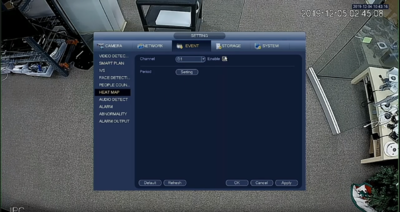
| + | 3. Next while still under Event select '''Heat Map''' from the left-side menu and for the correct channel click the '''Enable''' checkbox and set the schedule using '''Period''' if needed. Hit '''Apply''' to save. | ||
| + | |||
| + | [[File:HeatMapping_OGUI-4.PNG|400px]] | ||
Latest revision as of 20:27, 6 December 2019
Description
This article will cover ow to set up Heat Mapping on the older Dahua NVR interface.
Prerequisites
- A Dahua NVR & Camera with Heat Mapping capabilities
Video Instructions
Step By Step Instructions
1. From the Main Menu of the recorder, select Event under Setting
2. Under Event select Smart Plan and then Heat Map for your SmartPlan. Click Apply to save.
3. Next while still under Event select Heat Map from the left-side menu and for the correct channel click the Enable checkbox and set the schedule using Period if needed. Hit Apply to save.


