Difference between revisions of "Template:Email Notifications SystemUI NewGUI"
(→Video Instructions) |
|||
| (6 intermediate revisions by the same user not shown) | |||
| Line 1: | Line 1: | ||
| − | == | + | ==Email Notifications== |
==Prerequisites== | ==Prerequisites== | ||
| + | * A new throw-away sender email account that can be replaced | ||
| + | * A recipient email account | ||
| + | * An event set up to trigger the email alert | ||
| + | * NVR or HCVR with an internet connection | ||
==Video Instructions== | ==Video Instructions== | ||
<embedvideo service="youtube">https://youtu.be/vsaPTpBqyhM</embedvideo> | <embedvideo service="youtube">https://youtu.be/vsaPTpBqyhM</embedvideo> | ||
==Step by Step Instructions== | ==Step by Step Instructions== | ||
| − | 1. | + | 1. From Live View |
| − | [[File: | + | |
| + | Right click select Main Menu | ||
| + | |||
| + | [[File:Email_-_SystemUI_New_-_1.jpg|600px]] | ||
| + | |||
| + | 2. Click Network | ||
| + | |||
| + | [[File:Email_-_SystemUI_New_-_2.jpg|600px]] | ||
| + | |||
| + | 3. Click Email | ||
| + | |||
| + | [[File:Email_-_SystemUI_New_-_3.jpg|600px]] | ||
| + | |||
| + | 4. Click the toggle button to enable the Email feature | ||
| + | |||
| + | [[File:Email_-_SystemUI_New_-_4.jpg|600px]] | ||
| + | |||
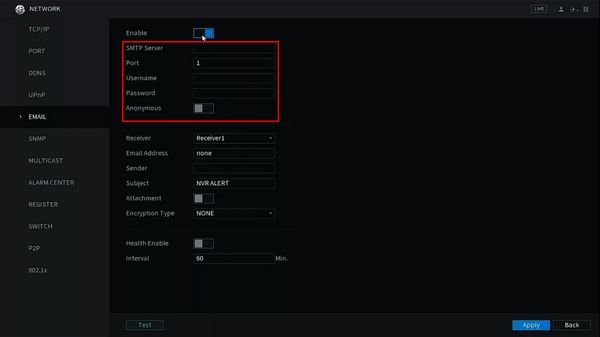
| + | 5. Enter all information for the SMTP Server being used: | ||
| + | |||
| + | * SMTP Server | ||
| + | * Port | ||
| + | * Username - full email address (including @___.com) | ||
| + | * Password - password for email account being used | ||
| + | * Anonymous - toggle to send the email as Anonymous (Email server must support this) | ||
| + | |||
| + | [[File:Email_-_SystemUI_New_-_5.jpg|600px]] | ||
| + | |||
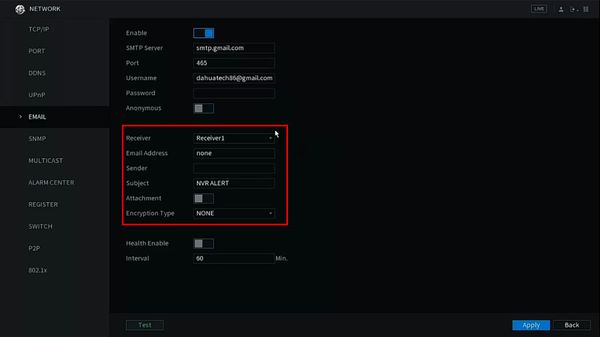
| + | 6. Enter information for the Email that will be sent out | ||
| + | |||
| + | * Receiver - select the Receiver # | ||
| + | * Email Address - enter the full email address that will receive the email | ||
| + | * Sender - enter the full email address that is sending email | ||
| + | * Subject - | ||
| + | * Attachment | ||
| + | * Encryption Type | ||
| + | |||
| + | [[File:Email_-_SystemUI_New_-_6.jpg|600px]] | ||
| + | |||
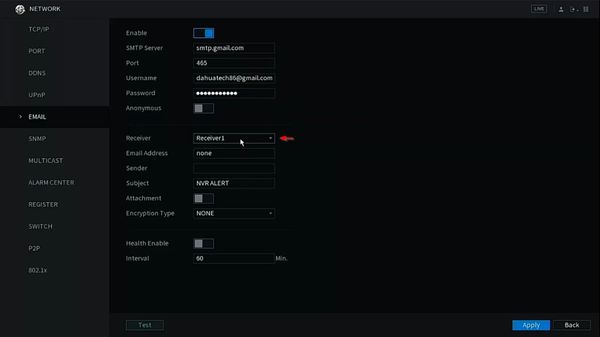
| + | 7. Use the dropdown box next to Receiver to select the Receiver # | ||
| + | |||
| + | [[File:Email_-_SystemUI_New_-_7.jpg|600px]] | ||
| + | |||
| + | 8. Enter the full email address that will receive notifications | ||
| + | |||
| + | [[File:Email_-_SystemUI_New_-_8.jpg|600px]] | ||
| + | |||
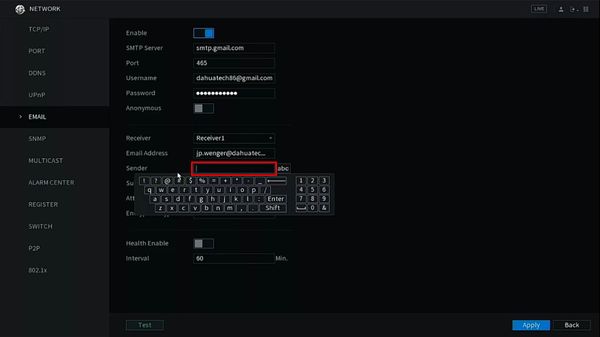
| + | 9. Enter information for Sender, which will be the email address sending the notification | ||
| + | |||
| + | [[File:Email_-_SystemUI_New_-_9.jpg|600px]] | ||
| + | |||
| + | 10. Enter a Subject for the email | ||
| + | |||
| + | [[File:Email_-_SystemUI_New_-_10.jpg|600px]] | ||
| + | |||
| + | 11. Toggle the switch next to Attachment to allow an attachment to also be sent with the notification | ||
| + | |||
| + | [[File:Email_-_SystemUI_New_-_11.jpg|600px]] | ||
| + | |||
| + | 12. Use the dropdown box to select the Encryption Type for the email server being used | ||
| + | |||
| + | [[File:Email_-_SystemUI_New_-_12.jpg|600px]] | ||
| + | |||
| + | 13. Configure additional parameters for Email Notifications as desired: | ||
| + | |||
| + | * Health Enable | ||
| + | * Interval | ||
| + | |||
| + | [[File:Email_-_SystemUI_New_-_13.jpg|600px]] | ||
| + | |||
| + | 14. Click Apply to save | ||
| + | |||
| + | [[File:Email_-_SystemUI_New_-_14.jpg|600px]] | ||
Latest revision as of 22:56, 14 January 2020
Email Notifications
Prerequisites
- A new throw-away sender email account that can be replaced
- A recipient email account
- An event set up to trigger the email alert
- NVR or HCVR with an internet connection
Video Instructions
Step by Step Instructions
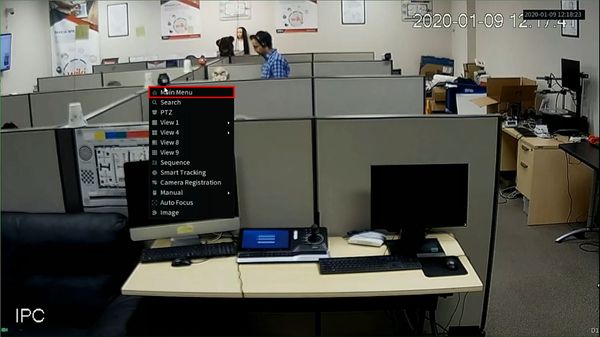
1. From Live View
Right click select Main Menu
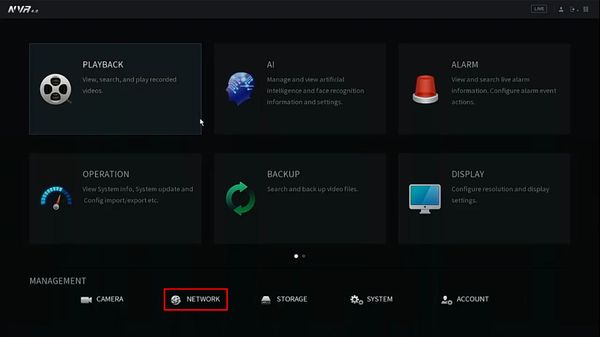
2. Click Network
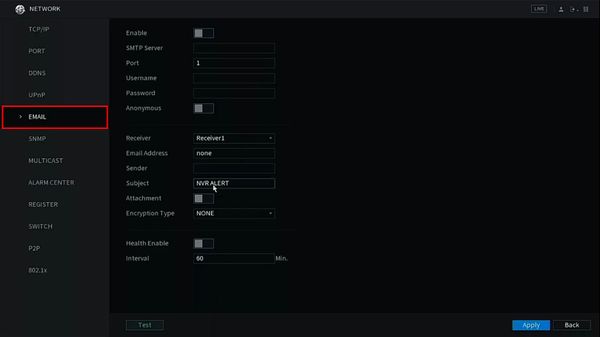
3. Click Email
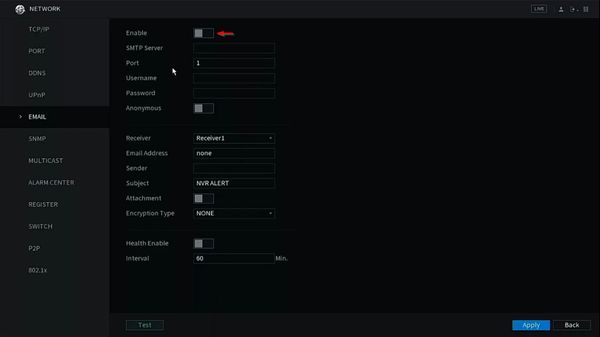
4. Click the toggle button to enable the Email feature
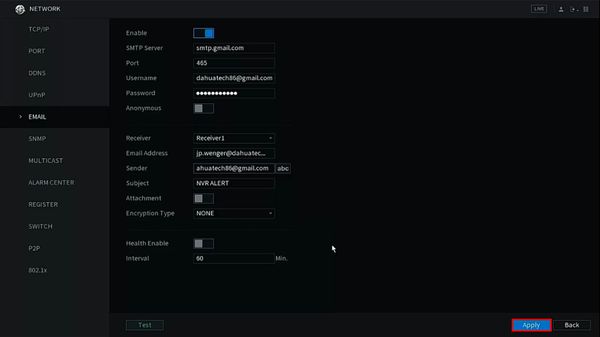
5. Enter all information for the SMTP Server being used:
- SMTP Server
- Port
- Username - full email address (including @___.com)
- Password - password for email account being used
- Anonymous - toggle to send the email as Anonymous (Email server must support this)
6. Enter information for the Email that will be sent out
- Receiver - select the Receiver #
- Email Address - enter the full email address that will receive the email
- Sender - enter the full email address that is sending email
- Subject -
- Attachment
- Encryption Type
7. Use the dropdown box next to Receiver to select the Receiver #
8. Enter the full email address that will receive notifications
9. Enter information for Sender, which will be the email address sending the notification
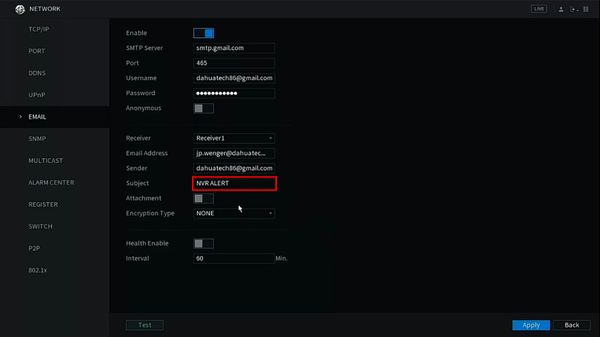
10. Enter a Subject for the email
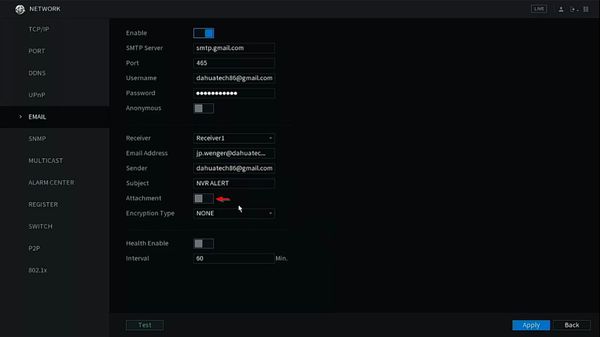
11. Toggle the switch next to Attachment to allow an attachment to also be sent with the notification
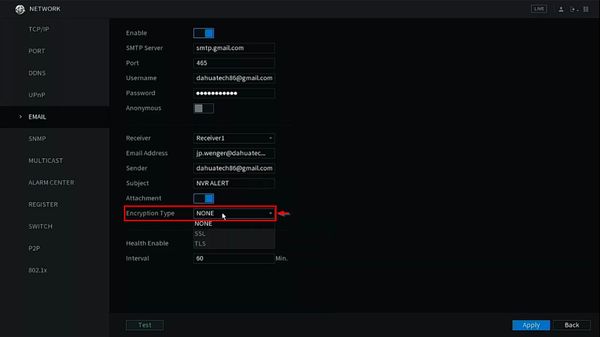
12. Use the dropdown box to select the Encryption Type for the email server being used
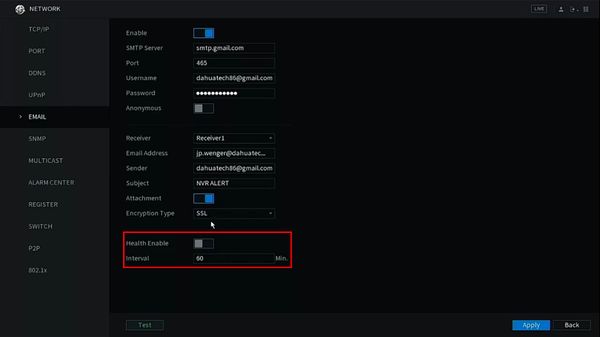
13. Configure additional parameters for Email Notifications as desired:
- Health Enable
- Interval
14. Click Apply to save
