Difference between revisions of "Template:Schedule Record SmartPSS"
(Created page with " ===Description=== Set up regular recordings for SmartPSS 2.0 ===Prerequisites=== * Dahua NVR or DVR * Internal HDD ===Video Instructions=== <embedvideo service="youtube">ht...") |
(→Step By Step Instructions) |
||
| (One intermediate revision by one other user not shown) | |||
| Line 8: | Line 8: | ||
===Video Instructions=== | ===Video Instructions=== | ||
| − | <embedvideo service="youtube">https://youtu.be/ | + | <embedvideo service="youtube">https://youtu.be/AB6hKJOKxIo</embedvideo> |
===Step By Step Instructions=== | ===Step By Step Instructions=== | ||
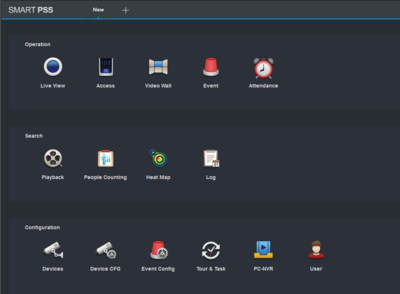
1. From the Main Menu Select "Device CFG" (Device Configuration). | 1. From the Main Menu Select "Device CFG" (Device Configuration). | ||
| − | [[ | + | [[File:SPSS_ScheduledRec_1.PNG|400px]] |
| + | |||
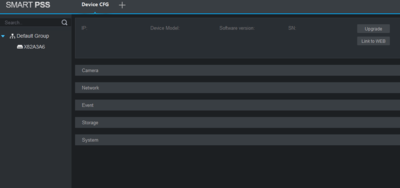
2. From the left hand side select the device the scheduled recording is to be set for. | 2. From the left hand side select the device the scheduled recording is to be set for. | ||
| − | [[ | + | [[File:SPSS_ScheduledRec_2.PNG|400px]] |
| + | |||
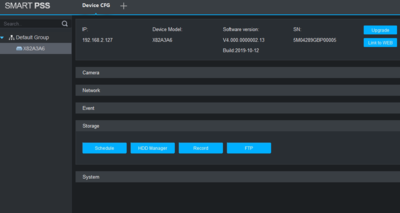
3. Select "Storage" -> Select "Schedule". | 3. Select "Storage" -> Select "Schedule". | ||
| − | [[ | + | [[File:SPSS_ScheduledRec_3.PNG|400px]] |
| + | |||
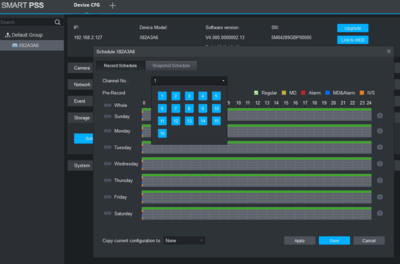
4. From the channel drop down menu select the channel for recording. | 4. From the channel drop down menu select the channel for recording. | ||
| − | [[ | + | [[File:SPSS_ScheduledRec_4.PNG|400px]] |
| + | |||
5. Click on the settings icon. Here you will see a menu for the days and hours for the scheduled recordings. | 5. Click on the settings icon. Here you will see a menu for the days and hours for the scheduled recordings. | ||
| − | [[ | + | [[File:SPSS_ScheduledRec_5.PNG|400px]] |
| + | |||
| + | |||
| + | 6. By default Regular will be selected, for this tutorial Motion Detect (MD) will be added. Check MD -> Check mark the day or days recordings are to be set for -> select save. | ||
| − | + | [[File:SPSS_ScheduledRec_6.PNG|400px]] | |
| − | |||
7. Here you can see green across for the days you set schedule recordings for in the previous step. You can copy the configuration set in the previous step to other channels -> Select "Apply" and "Save" to save configuration. | 7. Here you can see green across for the days you set schedule recordings for in the previous step. You can copy the configuration set in the previous step to other channels -> Select "Apply" and "Save" to save configuration. | ||
| − | [[ | + | [[File:SPSS_ScheduledRec_7.PNG|400px]] |
Latest revision as of 06:44, 7 February 2020
Description
Set up regular recordings for SmartPSS 2.0
Prerequisites
- Dahua NVR or DVR
- Internal HDD
Video Instructions
Step By Step Instructions
1. From the Main Menu Select "Device CFG" (Device Configuration).
2. From the left hand side select the device the scheduled recording is to be set for.
3. Select "Storage" -> Select "Schedule".
4. From the channel drop down menu select the channel for recording.
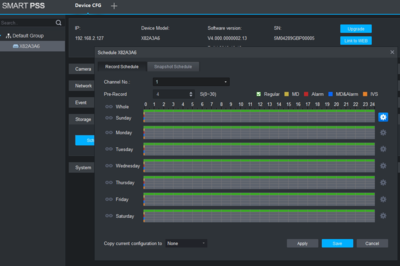
5. Click on the settings icon. Here you will see a menu for the days and hours for the scheduled recordings.
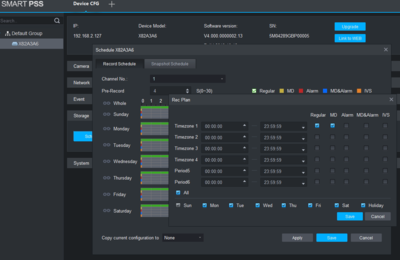
6. By default Regular will be selected, for this tutorial Motion Detect (MD) will be added. Check MD -> Check mark the day or days recordings are to be set for -> select save.
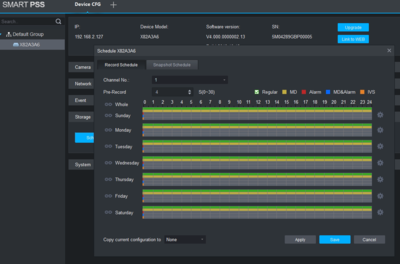
7. Here you can see green across for the days you set schedule recordings for in the previous step. You can copy the configuration set in the previous step to other channels -> Select "Apply" and "Save" to save configuration.
