Difference between revisions of "Template:Schedule Record SystemUI NewGUI"
(→Video Instructions) |
|||
| (One intermediate revision by one other user not shown) | |||
| Line 1: | Line 1: | ||
==Description== | ==Description== | ||
| + | The tutorial shows how to schedule recordings via New GUI SystemUI. | ||
==Prerequisites== | ==Prerequisites== | ||
* Dahua NVR or DVR | * Dahua NVR or DVR | ||
* Internal HDD | * Internal HDD | ||
| + | |||
==Video Instructions== | ==Video Instructions== | ||
| − | <embedvideo service="youtube"> | + | <embedvideo service="youtube">https://youtu.be/bqK1XKi8KsE</embedvideo> |
==Step by Step Instructions== | ==Step by Step Instructions== | ||
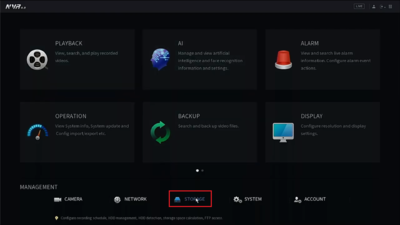
| + | 1. Click "STORAGE" to open the recording schedule option. | ||
| + | <br> | ||
| + | [[File:1._Storage_-_Schedule_Record_SystemUI_New.PNG|400px]] | ||
| + | |||
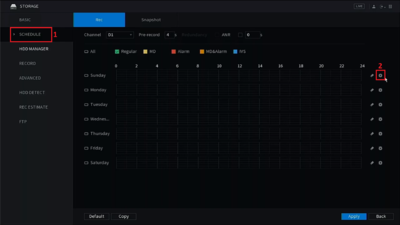
| + | 2. Click "SCHEDULE" => select the first gear icon as highlighted. | ||
| + | <br> | ||
| + | <span style=color:red;font-style:italic;font-weight:bold>Please note this setup is for one camera only. If there are multiple cameras installed, each channel will need to be selected appropriately under "Channel". Ex: D1 means this is the first camera and it is selected.</span> | ||
| + | <br> | ||
| + | [[File:2._Schedule_-_Schedule_Record_SystemUI_New.PNG|400px]] | ||
| + | |||
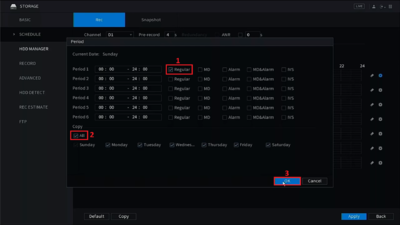
| + | 3. Check the option "Regular" for continuous recording => Select "All" to apply this setting to all dates => Click "OK" to apply the changes. | ||
| + | <br> | ||
| + | [[File:3._Period_-_Schedule_Record_SystemUI_New.PNG|400px]] | ||
| + | |||
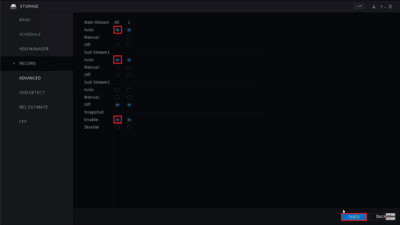
| + | 4. Click "RECORD" => Enable "Auto" on "Main Stream", "Sub Stream 1", and "Snapshot". | ||
| + | <br> | ||
| + | [[File:4._Record_-_Schedule_Record_SystemUI_New.PNG|400px]] | ||
Latest revision as of 19:34, 22 January 2020
Description
The tutorial shows how to schedule recordings via New GUI SystemUI.
Prerequisites
- Dahua NVR or DVR
- Internal HDD
Video Instructions
Step by Step Instructions
1. Click "STORAGE" to open the recording schedule option.

2. Click "SCHEDULE" => select the first gear icon as highlighted.
Please note this setup is for one camera only. If there are multiple cameras installed, each channel will need to be selected appropriately under "Channel". Ex: D1 means this is the first camera and it is selected.

3. Check the option "Regular" for continuous recording => Select "All" to apply this setting to all dates => Click "OK" to apply the changes.

4. Click "RECORD" => Enable "Auto" on "Main Stream", "Sub Stream 1", and "Snapshot".
