Difference between revisions of "Remote Access/LiveStream RTMP to YouTube"
(→Prerequisites) |
|||
| (20 intermediate revisions by 2 users not shown) | |||
| Line 1: | Line 1: | ||
=How to LiveStream RTMP to YouTube= | =How to LiveStream RTMP to YouTube= | ||
| − | |||
| − | |||
==Instructions== | ==Instructions== | ||
===YouTube Setup=== | ===YouTube Setup=== | ||
| + | |||
| + | ====Prerequisites==== | ||
| + | *YouTube Account | ||
| + | *Dahua IP Camera with RTMP on LAN | ||
| + | *All streams encode mode to H.264. | ||
| + | *Audio enabled and set to AAC | ||
| + | *IPC must support Audio function | ||
| + | *HTTP, TCP, and RTMP port forwarded in firewall of LAN | ||
| + | |||
| + | ====Video Instructions==== | ||
| + | <embedvideo service="youtube">https://www.youtube.com/watch?v=oxJwHZ84068</embedvideo> | ||
| + | |||
| + | ====Step by Step Instructions==== | ||
| + | 1. From the YouTube main page select 'Go live' | ||
| + | |||
| + | [[File:RMTP_-_Setup_Youtube_-_1.jpg|600px]] | ||
| + | |||
| + | 2. Select Stream | ||
| + | |||
| + | Enter a title for the Stream | ||
| + | |||
| + | Click Create Stream | ||
| + | |||
| + | [[File:RMTP_-_Setup_Youtube_-_2.jpg|600px]] | ||
| + | |||
| + | 3. The Stream URL and Stream name/key are required to enter at the Dahua interface | ||
| + | |||
| + | [[File:RMTP_-_Setup_Youtube_-_3.jpg|600px]] | ||
| + | |||
| + | 4. Use the Stream setup help interface to copy the information and save to a notepad or word document for reference in the next part of the setup at the Dahua interface | ||
| + | |||
| + | [[File:RMTP_-_Setup_Youtube_-_4.jpg|600px]] | ||
| + | |||
| + | 5. The completed custom URL that must be entered into the Dahua interface will be: | ||
| + | |||
| + | Stream URL/Stream Key | ||
| + | |||
| + | [[File:RMTP_-_Setup_Youtube_-_5.jpg|600px]] | ||
| + | |||
| + | |||
| + | |||
===Device Setup=== | ===Device Setup=== | ||
| + | 1. Log into the web interface of the camera | ||
| + | |||
| + | Click Setting | ||
| + | |||
| + | [[File:RTMP_-_Setup_IP_Camera_-_1.jpg|600px]] | ||
| + | |||
| + | 2. Click Video | ||
| + | |||
| + | [[File:RTMP_-_Setup_IP_Camera_-_2.jpg|600px]] | ||
| + | |||
| + | 3. Confirm the encode settings are set to H.264 and Smart Codec is turned Off (for the video stream you wish to use) | ||
| + | |||
| + | [[File:RTMP_-_Setup_IP_Camera_-_3.jpg|600px]] | ||
| + | |||
| + | 4. Click Audio | ||
| + | |||
| + | Confirm audio is enabled and Encode Mode is set to AAC | ||
| + | |||
| + | [[File:RTMP_-_Setup_IP_Camera_-_4.jpg|600px]] | ||
| + | |||
| + | 5. Click Network > Access Platform | ||
| + | |||
| + | [[File:RTMP_-_Setup_IP_Camera_-_5.jpg|600px]] | ||
| + | |||
| + | 6. Click RTMP | ||
| + | |||
| + | [[File:RTMP_-_Setup_IP_Camera_-_6.jpg|600px]] | ||
| + | |||
| + | 7. Check the box to enable | ||
| + | |||
| + | Select the Stream Type | ||
| + | |||
| + | Select Custom under Address Type | ||
| + | |||
| + | [[File:RTMP_-_Setup_IP_Camera_-_7.jpg|600px]] | ||
| + | |||
| + | 8. In the Custom Address field enter the complete URL that was provided by the previous steps | ||
| + | |||
| + | [[File:RTMP_-_Setup_IP_Camera_-_8.jpg|600px]] | ||
| + | |||
| + | 9. Click Save | ||
| + | |||
| + | [[File:RTMP_-_Setup_IP_Camera_-_9.jpg|600px]] | ||
| + | |||
| + | |||
| + | After configuring the Dahua camera, return the Youtube interface and click Go Live | ||
| + | |||
| + | [[File:RMTP_-_Setup_Youtube_-_6.jpg|600px]] | ||
| + | |||
| + | The camera's video will be streamed live | ||
| + | |||
| + | [[File:RMTP_-_Setup_Youtube_-_7.jpg|600px]] | ||
| + | |||
| + | <!-- | ||
<div class="toccolours mw-collapsible mw-collapsed"> | <div class="toccolours mw-collapsible mw-collapsed"> | ||
[[File:Icon_for_type_SystemUI_Old.png|250px]]<span style="font-size:180%;">'''SystemUI Old'''</span> | [[File:Icon_for_type_SystemUI_Old.png|250px]]<span style="font-size:180%;">'''SystemUI Old'''</span> | ||
| − | <div class="mw-collapsible-content">{{Template: | + | <div class="mw-collapsible-content">{{Template:SMTP_Setup_SystemUI_OldGUI}}</div> |
</div> | </div> | ||
<div class="toccolours mw-collapsible mw-collapsed"> | <div class="toccolours mw-collapsible mw-collapsed"> | ||
[[File:Icon_for_type_SystemUI_New.png|250px]]<span style="font-size:180%;">'''SystemUI New'''</span> | [[File:Icon_for_type_SystemUI_New.png|250px]]<span style="font-size:180%;">'''SystemUI New'''</span> | ||
| − | <div class="mw-collapsible-content">{{Template: | + | <div class="mw-collapsible-content">{{Template:SMTP_Setup_SystemUI_NewGUI}}</div> |
</div> | </div> | ||
<div class="toccolours mw-collapsible mw-collapsed"> | <div class="toccolours mw-collapsible mw-collapsed"> | ||
[[File:Icon_for_type_WebUI_Old.png|250px]]<span style="font-size:180%;">'''WebUI Old'''</span> | [[File:Icon_for_type_WebUI_Old.png|250px]]<span style="font-size:180%;">'''WebUI Old'''</span> | ||
| − | <div class="mw-collapsible-content">{{Template: | + | <div class="mw-collapsible-content">{{Template:SMTP_Setup_WebUI_Old}}</div> |
</div> | </div> | ||
<div class="toccolours mw-collapsible mw-collapsed"> | <div class="toccolours mw-collapsible mw-collapsed"> | ||
[[File:Icon_for_type_WebUI_New.png|250px]]<span style="font-size:180%;">'''WebUI New'''</span> | [[File:Icon_for_type_WebUI_New.png|250px]]<span style="font-size:180%;">'''WebUI New'''</span> | ||
| − | <div class="mw-collapsible-content">{{Template: | + | <div class="mw-collapsible-content">{{Template:SMTP_Setup_WebUI_New}}</div> |
| − | |||
| − | |||
| − | |||
| − | |||
| − | |||
| − | |||
| − | |||
| − | |||
| − | |||
| − | |||
| − | |||
| − | |||
| − | |||
| − | |||
| − | |||
| − | |||
| − | |||
| − | |||
| − | |||
| − | |||
</div> | </div> | ||
| + | --> | ||
Latest revision as of 23:00, 14 July 2020
Contents
How to LiveStream RTMP to YouTube
Instructions
YouTube Setup
Prerequisites
- YouTube Account
- Dahua IP Camera with RTMP on LAN
- All streams encode mode to H.264.
- Audio enabled and set to AAC
- IPC must support Audio function
- HTTP, TCP, and RTMP port forwarded in firewall of LAN
Video Instructions
Step by Step Instructions
1. From the YouTube main page select 'Go live'
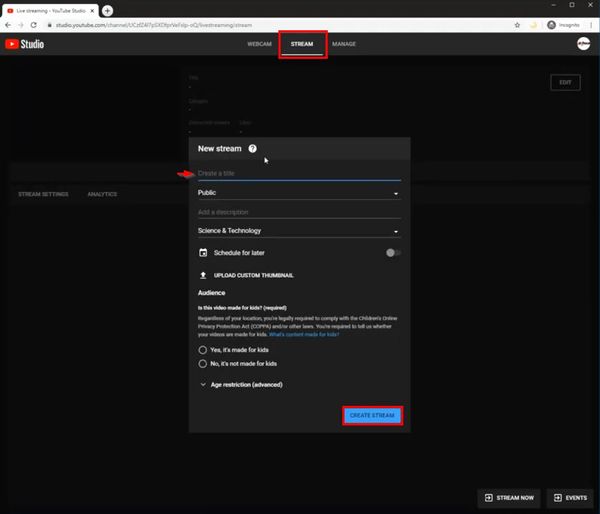
2. Select Stream
Enter a title for the Stream
Click Create Stream
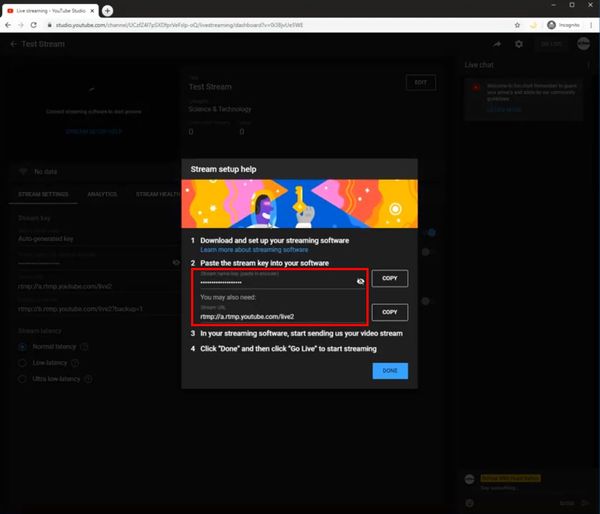
3. The Stream URL and Stream name/key are required to enter at the Dahua interface
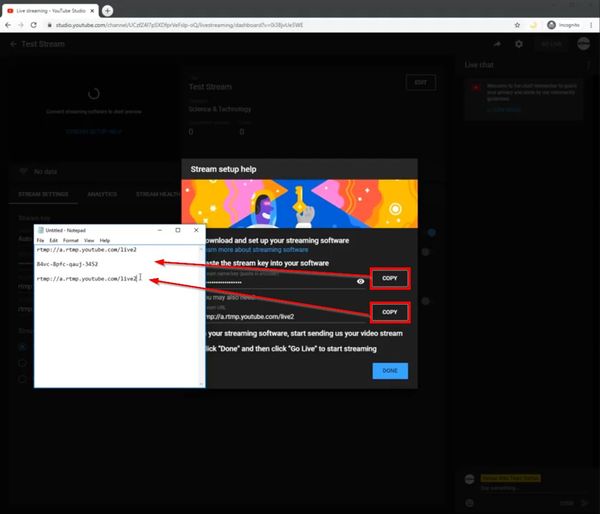
4. Use the Stream setup help interface to copy the information and save to a notepad or word document for reference in the next part of the setup at the Dahua interface
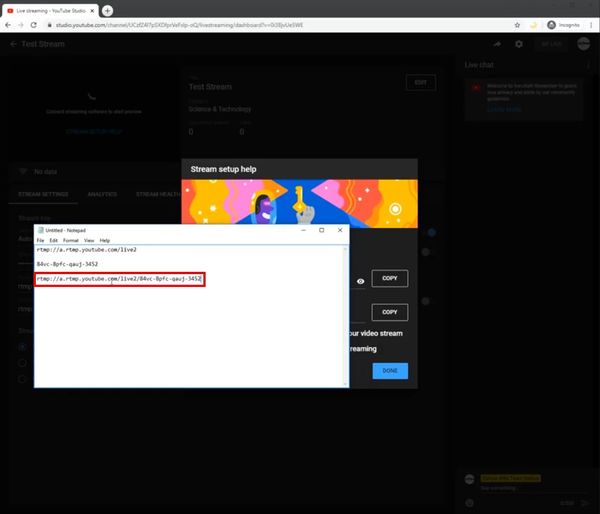
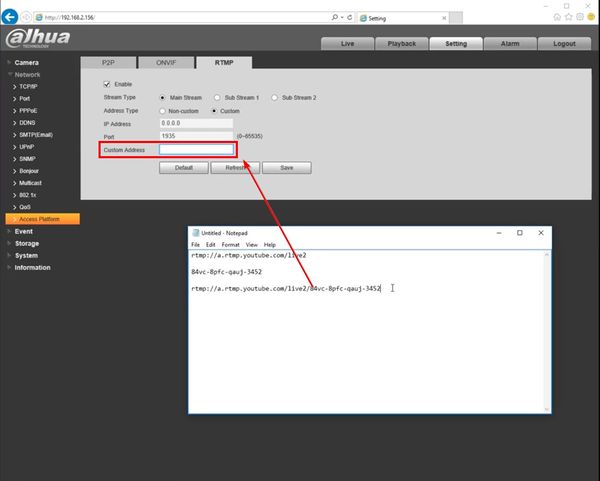
5. The completed custom URL that must be entered into the Dahua interface will be:
Stream URL/Stream Key
Device Setup
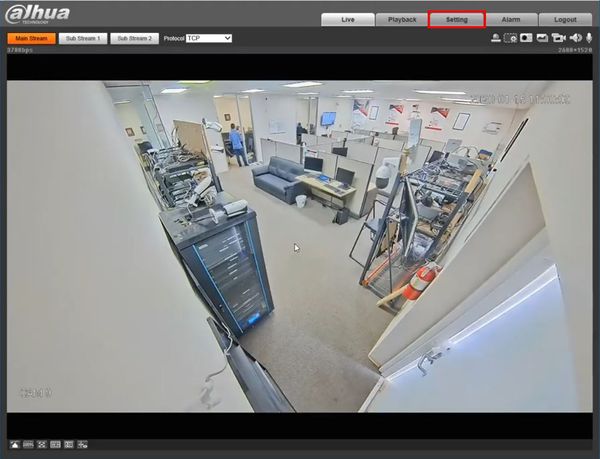
1. Log into the web interface of the camera
Click Setting
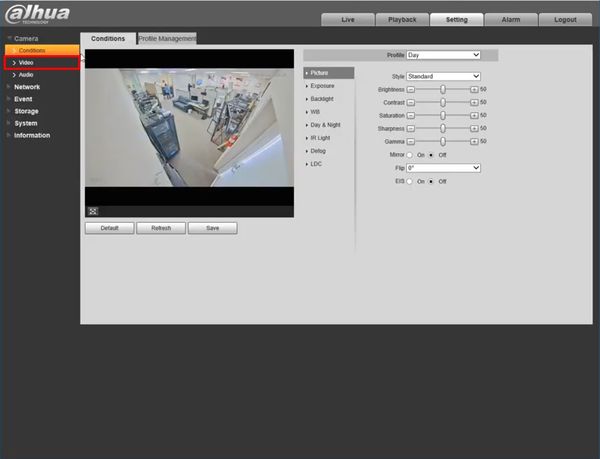
2. Click Video
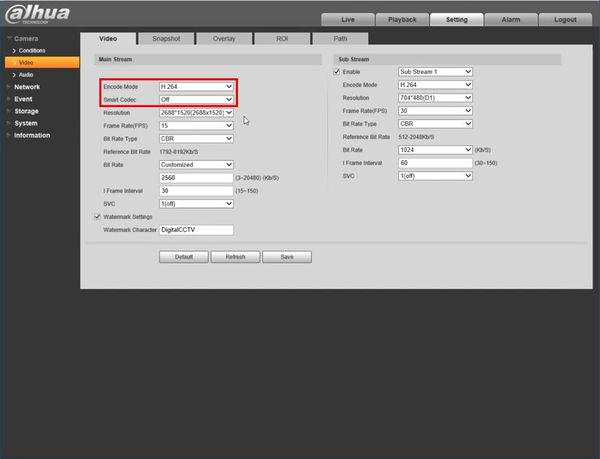
3. Confirm the encode settings are set to H.264 and Smart Codec is turned Off (for the video stream you wish to use)
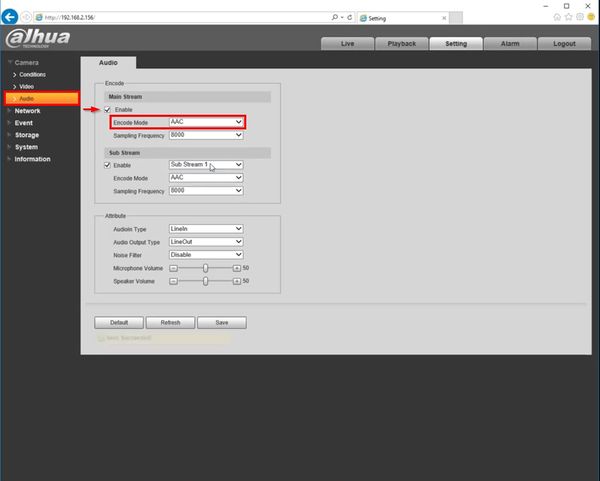
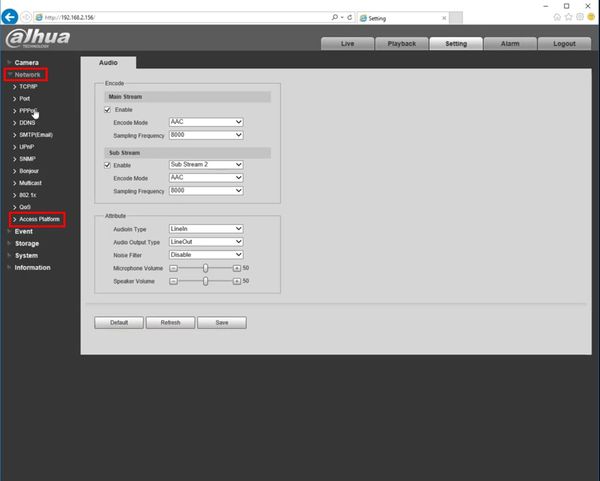
4. Click Audio
Confirm audio is enabled and Encode Mode is set to AAC
5. Click Network > Access Platform
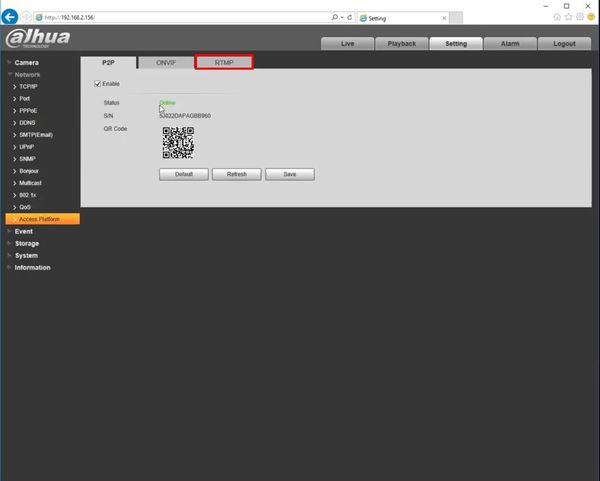
6. Click RTMP
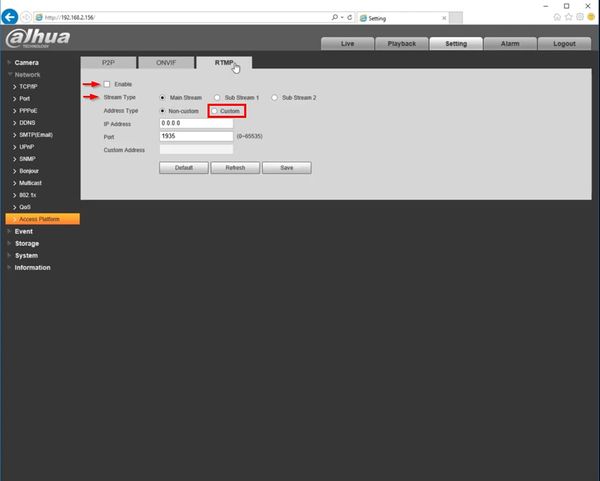
7. Check the box to enable
Select the Stream Type
Select Custom under Address Type
8. In the Custom Address field enter the complete URL that was provided by the previous steps
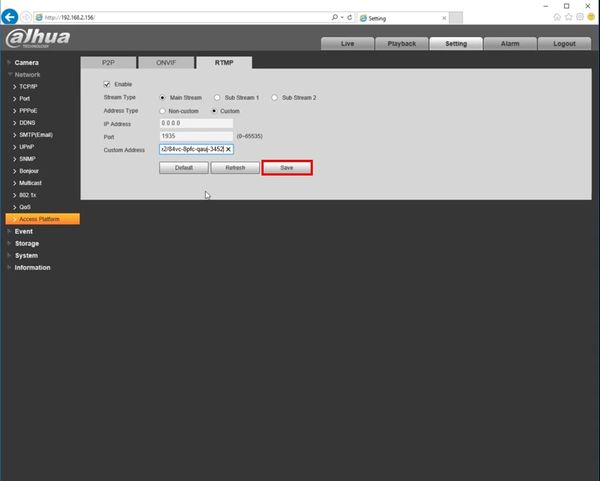
9. Click Save
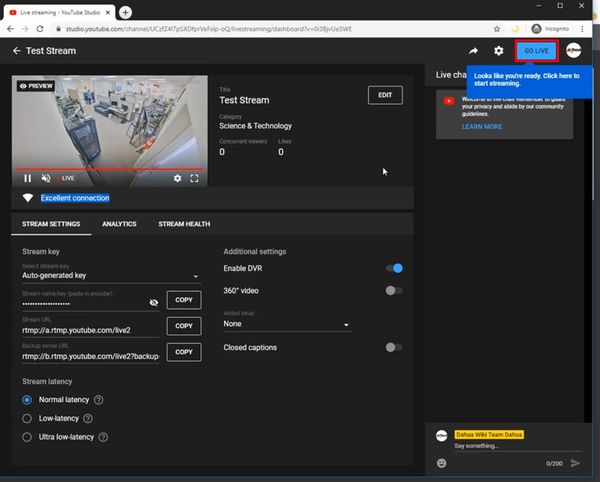
After configuring the Dahua camera, return the Youtube interface and click Go Live
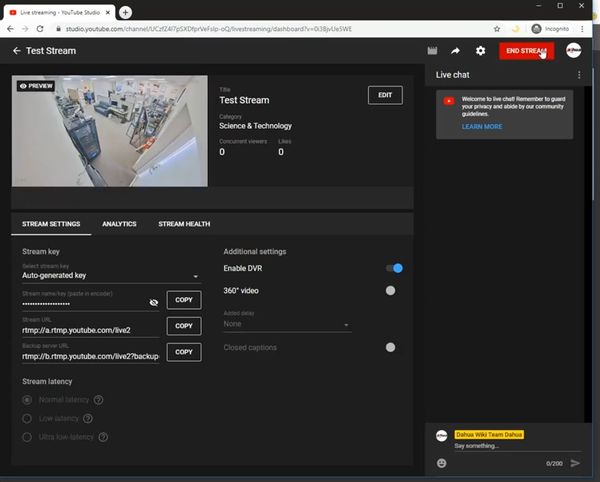
The camera's video will be streamed live

