Difference between revisions of "NVR/Recording Setup/Snapshot"
m |
(→Snapshot Setup on PC) |
||
| (8 intermediate revisions by 3 users not shown) | |||
| Line 1: | Line 1: | ||
| − | ===Snapshot Setup=== | + | ===Snapshot Setup on NVR=== |
| + | ===Description=== | ||
| + | Follow the instructions below to setup Snapshot recording on your recorder. You will need to setup an event on a camera or recorder in order for snapshot to occur. | ||
| + | |||
| + | ===Prerequisites=== | ||
| + | - NVR/DVR with HDD | ||
| + | ===Video Instructions=== | ||
| + | <embedvideo service="youtube">https://youtu.be/xvqjJqq3jFo</embedvideo> | ||
| + | ===Step by Step Instructions=== | ||
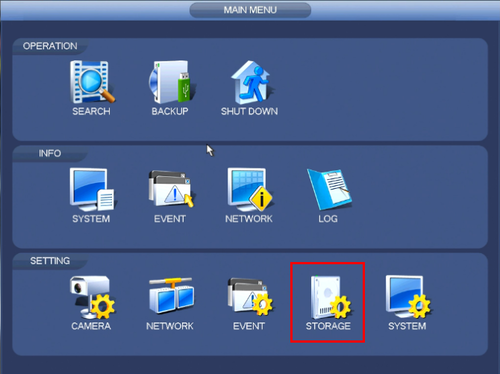
1. From the Main Menu click, "Storage" under, "Settings" | 1. From the Main Menu click, "Storage" under, "Settings" | ||
| Line 29: | Line 37: | ||
[[file:Snapshot5.png|500px]] | [[file:Snapshot5.png|500px]] | ||
| + | |||
| + | |||
| + | ===Snapshot Setup on PC=== | ||
| + | |||
| + | 1. Go to Camera -> Video -> Snapshot, choose Snapshot Type general, choose the picture quality and time interval between 1 to 16 seconds. Click save button to apply. | ||
| + | |||
| + | [[File:Snapshotrecord001.png|500x500px]] | ||
| + | |||
| + | 2. Go to Storage -> Schedule -> Snapshot Schedule, tick the general box and set up the schedule the snapshot works. Click Save to apply. | ||
| + | |||
| + | [[File:Snapshotrecord002.png|500x500px]] | ||
| + | |||
| + | 3. Go to Storage -> Destination -> Path, tick the scheduled box in snapshot and click Save to apply. Here we use Local(SD card) as an example, FTP and NAS is also viable for this function. | ||
| + | |||
| + | [[File:Snapshotrecord003.png|500x500px]] | ||
| + | |||
| + | |||
| + | |||
| + | |||
[[Category:Record]] | [[Category:Record]] | ||
| + | [[Category:Email]] | ||
| + | [[Category:Snapshot]] | ||
Latest revision as of 23:11, 2 November 2020
Contents
Snapshot Setup on NVR
Description
Follow the instructions below to setup Snapshot recording on your recorder. You will need to setup an event on a camera or recorder in order for snapshot to occur.
Prerequisites
- NVR/DVR with HDD
Video Instructions
Step by Step Instructions
1. From the Main Menu click, "Storage" under, "Settings"
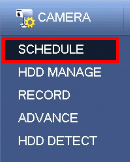
2. Click, "Schedule" on the left hand side.
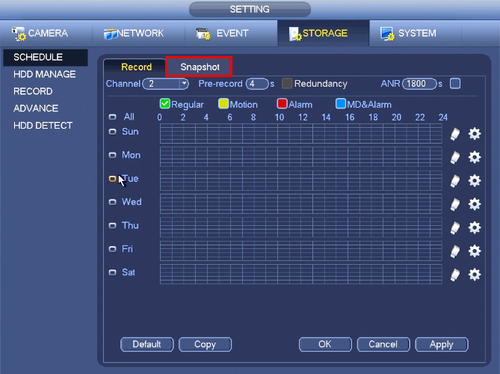
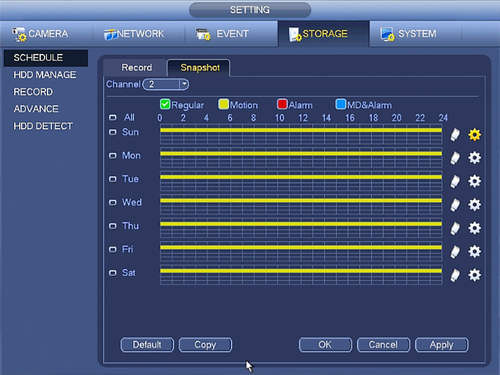
3. Click, "Snapshot"
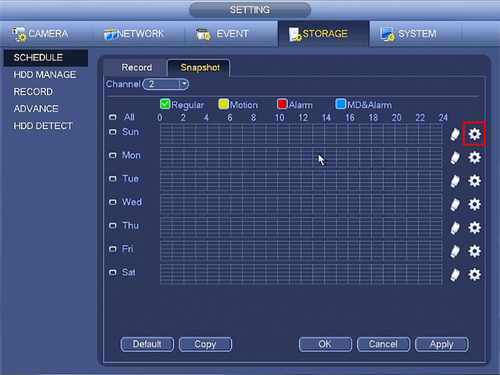
4. Click the Gear icon to the right of any of the graphs.
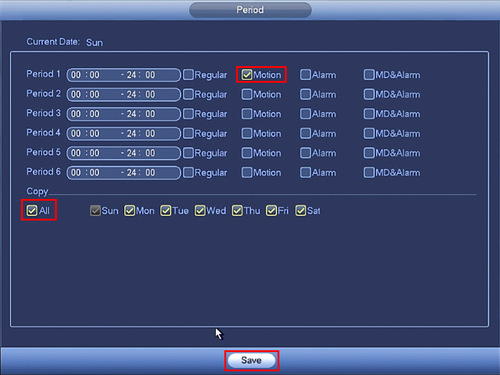
5. Check the box for, "Motion" then click the, "All" box below, "Copy"
6. Click, "Save" This will return you to the previous screen which should look like this.
7. Click, "Apply" and then, "OK"
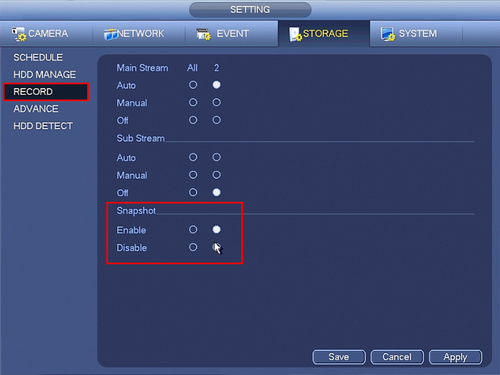
8. On the left, click, "Record" and ensure the, "Enabled" box is filled in for each channel you wish to enable snapshot on.
Snapshot Setup on PC
1. Go to Camera -> Video -> Snapshot, choose Snapshot Type general, choose the picture quality and time interval between 1 to 16 seconds. Click save button to apply.
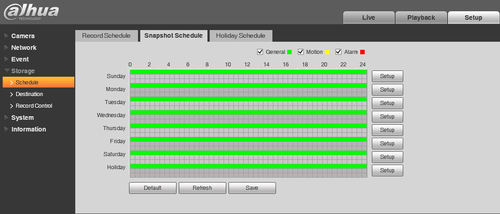
2. Go to Storage -> Schedule -> Snapshot Schedule, tick the general box and set up the schedule the snapshot works. Click Save to apply.
3. Go to Storage -> Destination -> Path, tick the scheduled box in snapshot and click Save to apply. Here we use Local(SD card) as an example, FTP and NAS is also viable for this function.
