Difference between revisions of "IPCRemoteAccess"
| (9 intermediate revisions by 2 users not shown) | |||
| Line 1: | Line 1: | ||
===How to Setup Remote Access for IP Camera=== | ===How to Setup Remote Access for IP Camera=== | ||
| − | + | '''Additional Resources:''' | |
| − | |||
| − | + | * [http://portforward.com/ PortForward.com] | |
| − | + | Note: This setup is only for IP cameras that are not connected to the same LAN as the NVR or recording device. | |
| − | + | [[file:PortForwardDiagram.jpg |300px]] | |
| − | + | 1. Connect IP Camera to network with a CAT5 cable. (Note: If the modem, router, or switch connected to the IP Camera is not capable of POE, you will need to connect a separate power supply to the IP Camera.) | |
| − | |||
| − | |||
| − | + | 2. Enter the LAN IP address of the camera in a web browser. Then login to the camera's web interface. | |
| − | |||
| − | |||
| − | + | 3. Under, Main Menu -> Setup -> TCP/IP | |
Change the IP Camera to, "Static" if the camera is currently set to, "DHCP" | Change the IP Camera to, "Static" if the camera is currently set to, "DHCP" | ||
| − | + | 4. Open another tab and enter the, "Gateway" address listed under your IP Camera's settings. | |
Example: 192.168.1.1, 192.168.0.1, 10.0.10.1 | Example: 192.168.1.1, 192.168.0.1, 10.0.10.1 | ||
| − | + | 5. Login to your gateway and locate the, "Port Forwarding" section of your gateway. | |
| + | |||
| + | 6. Create port forwarding rules for each port you wish to forward for the IP Camera. (Usually you will only need to forward the HTTP and the TCP port.) | ||
| − | |||
Default Ports: | Default Ports: | ||
| − | TCP: 37777 | + | *TCP: 37777 |
| − | UDP: 37778 | + | *UDP: 37778 |
| − | HTTP: 80 | + | *HTTP: 80 |
| − | RTSP: 554 | + | *RTSP: 554 |
| − | HTTPS: 443 | + | *HTTPS: 443 |
| + | |||
| + | 7. The end result should look like the below image. We used a Cisco router for this example. | ||
| + | |||
| + | [[file:IPCPortForward.jpg|600px]] | ||
| + | |||
| + | 8. Hit, "Save" in the gateway interface, and open another tab. | ||
| + | |||
| + | 9. Go to, "www.canyouseeme.org" and check that the ports you opened on the gateway. | ||
| + | |||
| + | [[file:PortsCheck80.jpg]] | ||
| + | |||
| + | [[file:PortsCheck37777.jpg]] | ||
| + | |||
| + | |||
| + | |||
| − | |||
| − | |||
| − | |||
| − | + | [[Category:Remote Access]] | |
| − | [[ | ||
Latest revision as of 21:41, 26 June 2023
How to Setup Remote Access for IP Camera
Additional Resources:
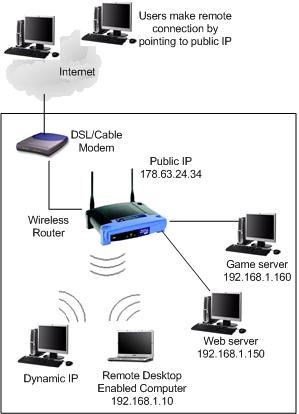
Note: This setup is only for IP cameras that are not connected to the same LAN as the NVR or recording device.
1. Connect IP Camera to network with a CAT5 cable. (Note: If the modem, router, or switch connected to the IP Camera is not capable of POE, you will need to connect a separate power supply to the IP Camera.)
2. Enter the LAN IP address of the camera in a web browser. Then login to the camera's web interface.
3. Under, Main Menu -> Setup -> TCP/IP Change the IP Camera to, "Static" if the camera is currently set to, "DHCP"
4. Open another tab and enter the, "Gateway" address listed under your IP Camera's settings. Example: 192.168.1.1, 192.168.0.1, 10.0.10.1
5. Login to your gateway and locate the, "Port Forwarding" section of your gateway.
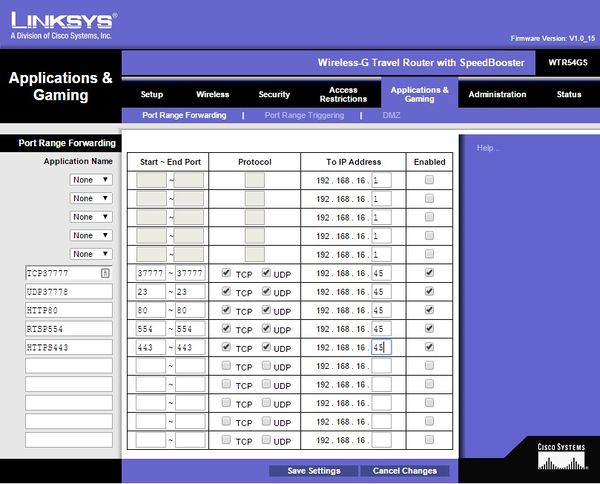
6. Create port forwarding rules for each port you wish to forward for the IP Camera. (Usually you will only need to forward the HTTP and the TCP port.)
Default Ports:
- TCP: 37777
- UDP: 37778
- HTTP: 80
- RTSP: 554
- HTTPS: 443
7. The end result should look like the below image. We used a Cisco router for this example.
8. Hit, "Save" in the gateway interface, and open another tab.
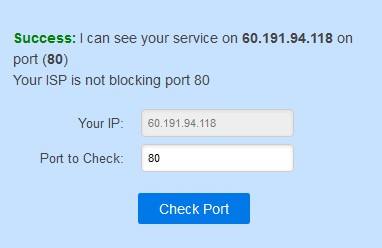
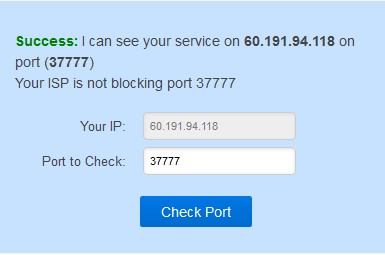
9. Go to, "www.canyouseeme.org" and check that the ports you opened on the gateway.


